Move beyond guesswork. Apply a structured, room-by-room approach to select lighting that supports daily tasks while cultivating the emotional atmosphere you desire—without compromise.
Choosing the right lighting fixture is a thoughtful balance between providing sufficient illumination for practical activities and shaping the emotional character of a space. This guide offers a clear, adaptable methodology to evaluate lighting needs across any room, budget, or living situation. By integrating measurable criteria with personal ambiance goals, you can create environments where light serves both purpose and feeling—enhancing safety, comfort, and connection in everyday life.
Introduction
Step into a thoughtfully lit space, and you feel it immediately: clarity without glare, warmth without dimness, intention without effort. Light highlights the grain of a wooden table while ensuring safe movement across the floor. It supports focused work and invites quiet conversation. This harmony emerges not by chance, but through deliberate attention to two interconnected dimensions: function and ambiance. Historically, lighting advice has often leaned too far in one direction—prioritizing technical specifications alone or emphasizing aesthetics without grounding in daily use. This guide bridges that gap. Drawing from established lighting principles documented by the Illuminating Engineering Society (IES) and widely accepted residential best practices, we present a unified approach that respects both human activity and emotional experience. Whether you’re refreshing a single fixture or reimagining an entire home, this framework empowers choices that remain relevant, adaptable, and deeply supportive of how you live. Light shapes perception; let’s shape it with care.
The Dual-Lens Framework: Evaluating Every Fixture Through Purpose and Feeling
Imagine viewing each lighting decision through two complementary lenses. One lens clarifies utility: Can I safely prepare a meal here? Read comfortably? Navigate stairs at night? The other reveals atmosphere: Does this light feel welcoming? Does it enhance textures and colors? Does it support relaxation or focus? Most lighting challenges arise when only one lens is used. A single bright ceiling fixture may satisfy basic visibility (function lens) but create a flat, institutional feel that discourages connection. Conversely, a sculptural pendant chosen purely for visual appeal (ambiance lens) might cast deep shadows where tasks occur. Mastery lies in holding both perspectives simultaneously—not as a compromise, but as integration. The Dual-Lens Framework provides a repeatable process to evaluate, select, and layer fixtures so that practicality and mood reinforce one another. It transforms lighting from isolated purchases into a cohesive environmental strategy. Let’s explore each step with clarity and care.
Step 1: Define the Functional Non-Negotiables
Begin with the immutable realities of the space and its use. Function forms the foundation; ambiance builds upon it. Skipping this step risks selecting fixtures that look appealing but fail in daily life. For every lighting location, consider these five guiding questions:
- What specific tasks occur here? Move beyond general terms. In a kitchen: chopping herbs on the counter requires shadow-free vertical light; reading a recipe on the island needs focused downward illumination; loading the dishwasher demands even ambient light inside the appliance. In a home office: typing requires desk-surface light without screen glare; video calls need even, flattering facial illumination; reviewing documents benefits from adjustable task lighting. Each distinct activity may warrant a dedicated light source.
- What is the appropriate light level? Lumens measure total visible light output. Wattage no longer indicates brightness in the LED era. Use these widely referenced ranges as starting points (adjust ±20% based on personal preference, age-related needs, or room surface reflectivity):
- General Ambient Lighting: 1,000–2,000 lumens for a standard 10×12 ft room (e.g., living room, bedroom), typically achieved through multiple sources.
- Task Lighting: 450–800 lumens focused precisely where activity occurs (e.g., under-cabinet strips, adjustable desk lamps).
- Accent Lighting: 150–300 lumens per feature (e.g., artwork, architectural details).
- Safety-Critical Zones: Stair treads require consistent illumination (minimum 20 lumens per sq. ft on horizontal surfaces); hallways need even path lighting without dark gaps.
- Where must light be directed? (Beam Angle & Placement) Beam angle (measured in degrees) determines spread. Narrow spots (15°–25°) highlight specific objects; wide floods (60°–120°) provide general wash. For kitchen counters, position light in front of the user (e.g., under-cabinet fixtures) to prevent hand shadows. Overhead lights directly above a sink create hazardous shadows on hands—offset placement slightly forward. In bathrooms, vanity lights should flank the mirror (not sit above it) to eliminate shadows under eyes and chin.
- What environmental constraints exist? Moisture exposure demands appropriate Ingress Protection (IP) ratings: IP44 minimum for bathroom zones near sinks/showers; IP65+ for uncovered outdoor areas. Heat proximity (ovens, fireplaces) requires heat-tolerant fixtures. High-traffic areas or children’s spaces benefit from durable, non-protruding designs. Sloped ceilings may need adaptable mounting hardware.
- What control is essential? Dimming capability significantly expands usability. Verify compatibility across all components: fixture driver (for LEDs), bulbs, and dimmer switch. Inactive compatibility causes flickering or reduced lifespan. For multi-use spaces (e.g., living rooms hosting both movie nights and playtime), consider independent controls for ambient, task, and accent layers.
Why this step matters: Documenting functional needs before browsing styles creates a practical filter. It shifts evaluation from “Do I like how this looks?” to “Does this solve my documented requirements?” A visually striking fixture over a kitchen island may fail if it delivers insufficient downward lumens for food preparation. Clarity here prevents costly mismatches.
Step 2: Articulate the Ambiance Vision
With functional needs defined, turn to the sensory and emotional dimension. Ambiance is the feeling light evokes—the psychological and experiential quality of a space. Translate subjective terms like “cozy” or “energizing” into specific, actionable characteristics:
-
Color Temperature (Measured in Kelvin – K): This describes the visual warmth or coolness of white light.
- 2700K–3000K (Warm White): Evokes candlelight or sunset. Supports relaxation, enhances warm wood tones and earthy palettes, and feels inviting. Ideal for living rooms, bedrooms, and dining areas. Note: In task-intensive zones like kitchens, very warm light (<2700K) may reduce visual acuity for detailed work.
- 3500K–4000K (Neutral White): Resembles morning sunlight. Promotes alertness, renders colors accurately (valuable for makeup application, art, or food prep), and feels clean. Recommended for kitchen task zones, bathroom vanities, home offices, and laundry areas.
- 5000K+ (Cool White/Daylight): Mimics bright midday sun. Highly stimulating but often feels clinical in living spaces. Best reserved for security lighting, workshops requiring extreme detail, or display cases. Caution: Evening exposure to high-Kelvin light may disrupt natural sleep cycles; avoid in primary relaxation or sleeping areas.
- Layering Insight: Intentional temperature layering enhances flexibility. In a bedroom, use 2700K for ambient wall sconces (relaxation) paired with a 3000K adjustable reading lamp (focused clarity). Consistency within a visual field prevents visual dissonance—avoid mixing 2700K and 4000K sources in the same immediate area without purposeful separation.
-
Light Quality (CRI – Color Rendering Index): Lumens measure quantity; CRI measures quality. Rated 0–100 (100 = perfect sunlight), CRI indicates how faithfully a light source reveals true colors. Low-CRI light (70s) dulls reds, alters skin tones, and flattens artwork. For spaces where color perception matters—kitchens (judging food freshness), bathrooms (applying makeup), art displays—prioritize CRI 90+. High-CRI light feels richer and more natural, elevating perceived quality even at identical lumen levels. Verify CRI on packaging; it is frequently omitted in budget options.
-
Distribution & Shadow Character: How light falls shapes mood. Harsh, direct overhead light creates sharp, unflattering shadows. Soft, diffused light wraps gently around objects, minimizing contrast and fostering comfort. Consider:
- Direction: Upward-facing fixtures (wall sconces, torchieres) bounce light off ceilings for an airy, expansive ambient glow. Downward-focused fixtures (recessed cans, pendants) define zones and add intimacy but may feel confined if overused.
- Diffusion: Fabric shades, etched glass, or frosted acrylic scatter light rays, softening edges. Open-bottom metal shades or clear glass create sharper shadows. Bedrooms benefit from high diffusion; a modern dining nook might intentionally use clear glass for sculptural shadow effects.
- Wall Treatment: Grazing (fixture close to wall) emphasizes texture (brick, stone). Washing (fixture farther out) creates uniform brightness that enhances perceived space. Choose based on whether you wish to highlight features or maximize openness.
-
Fixture as Visual Element: Beyond emitted light, the fixture itself occupies visual space. Does its form, material, and scale complement your room’s architecture and decor? A heavy wrought-iron chandelier may overwhelm a minimalist space but feel harmonious in a rustic entry. A sleek linear suspension complements contemporary cabinetry yet clashes with ornate moldings. Translate ambiance goals concretely: “serene forest retreat at dusk” suggests warm 2700K light, high diffusion, organic materials (rattan, wood), and flowing lines. “Crisp, inspiring studio” suggests neutral 3500K light, high CRI, geometric forms, and strategic accent points.
Why this step transforms outcomes: Specificity prevents reactive choices. Instead of “I need a bathroom light,” seek “a 3000K, CRI 90+ vanity light with frosted diffusion for shadow-free grooming and a calming glow.” This precision guides selection and filters distractions.
Step 3: Bridge the Gap with Fixture Selection
Now align functional requirements (Step 1) and ambiance vision (Step 2) during evaluation. Create a simple comparison table for top contenders:
| Feature | Fixture A | Fixture B | Fixture C | Meets Function? | Meets Ambiance? |
|---|---|---|---|---|---|
| Lumens Output | 1,200 | 1,800 | 2,400 (adjustable) | B & C (Need min. 1,500) | A (Softer output desired) |
| Color Temp | 2700K | 3000K | Tunable (2700K–5000K) | All acceptable | A & C (Must be 2700K) |
| CRI | 80 | 92 | 95 | B & C (Need min. 90) | B & C |
| Beam Angle | Narrow spot (25°) | Wide flood (100°) | Adjustable spots | C (Need focused task light) | A (Want dramatic accent) |
| IP Rating | Indoor only | Indoor only | IP44 | C (Bathroom requires IP44) | N/A |
| Style/Material | Brushed brass, geometric | Matte black, fabric shade | White track, metal heads | N/A | B (Matches “warm modern” vision) |
| Dimmable | Yes (compatible dimmer) | Yes | Yes | All pass | All pass |
| Verdict | ❌ Fails function (lumens, IP) | ❌ Fails function (IP rating) | ✅ Meets ALL criteria |
This table reveals critical mismatches invisible when viewing fixtures alone. Fixture A may be aesthetically appealing but unsafe for location. Only Fixture C satisfies core requirements and supports desired mood. This method reduces emotional bias and anchors decisions in documented needs.
Practical Bridge-Building Tactics:
* Simulate Before Selecting: Tape paper to the ceiling at the intended location. Shine a flashlight (set to target Kelvin if possible) through it. Observe shadow patterns on task surfaces. For pendants over tables, hold a cardboard cutout of the shade at planned height. Does it feel oppressive? Block sightlines? This low-cost test prevents post-purchase regret.
* Scale & Proportion Guidelines: Incorrect sizing disrupts ambiance. Use these widely accepted formulas:
* Dining Table Pendant: Diameter = ½ to ⅔ table width. Hang bottom 30–36 inches above surface.
* Room Flush Mount: Add room length + width (in feet) = ideal max fixture diameter (in inches). (e.g., 12ft x 15ft room → max 27-inch diameter).
* Chandelier over Bed: Width = ⅓ to ½ bed width. Bottom hangs ≥7 feet above floor.
* Vanity Light: Width ≥75% of mirror width. Mount centers 75–80 inches from floor.
* Material Interaction: Finishes interact with light temperature. Warm brass or antique bronze deepens the cozy feel of 2700K light. Polished nickel or matte black complements cooler 3000K–4000K light, enhancing crispness. Matte black absorbs light for dramatic contrast; light wood or white reflects it, amplifying brightness. Choose finishes that reinforce your chosen ambiance.
* Bulb Integration Matters: Never treat bulbs as an afterthought. If a fixture requires specific shapes (G9 capsules, T4 tubes) or has enclosed sockets (trapping heat), confirm compatible high-CRI, dimmable LED options are available before purchase. Fixtures accepting standard A19 bulbs offer greater future flexibility.
Step 4: Layer and Refine
No single fixture fulfills all needs in a room. Layering creates adaptable, dynamic environments. Think of building a lighting “wardrobe” with pieces for different moments. The three essential layers:
- Ambient (General) Layer: Provides baseline illumination for safe navigation. Not intended as sole light source. Examples: Recessed downlights (spaced correctly), cove lighting, upward-shining floor lamps, semi-flush mounts. Functional Role: Meets minimum illumination for the space. Ambiance Role: Sets foundational light level and temperature; upward ambient light feels more spacious.
- Task Layer: Delivers focused light exactly where activities occur. Examples: Under-cabinet strips, adjustable desk lamps, vanity lights, reading lamps, pendants over islands. Functional Role: Eliminates shadows, reduces eye strain, enables precision. Ambiance Role: Creates visual interest through pools of light; defines activity zones within open layouts.
- Accent Layer: Highlights architectural features, artwork, or objects; adds depth and sophistication. Examples: Wall sconces (grazing texture), picture lights, track spots on shelves, LED tape inside cabinets. Functional Role: Minimal direct utility; enhances spatial perception. Ambiance Role: Critical for emotional impact—draws the eye, creates focal points, prevents a “flat” feel. Rooms without accent lighting often feel unfinished.
Layering Sequence for Any Room:
1. Begin with ambient: Install sufficient sources for safe, even base illumination (using Step 1 guidelines). Avoid the “single central fixture” trap—it creates harsh shadows. Space recessed lights 4–6 feet apart, offset 2–3 feet from walls.
2. Add task lighting: Position sources precisely where activities happen. Under-cabinet lights should run full counter length. Desk lamps position the bulb behind your shoulder, shining onto the desk—not into eyes or screen.
3. Weave in accent lighting: Place sconces at 60–66 inches height to graze textured walls. Position narrow-beam spots 12–18 inches from artwork, aimed at its center. Install LED tape under floating shelves to create a “floating” effect.
4. Refine with controls: Install dimmers on every circuit. This single refinement unlocks adaptability: dim ambient lights for movie night while keeping task lights bright for knitting; brighten accent lights during gatherings while lowering ambient for mood. Systems allowing preset “scenes” (e.g., “Dinner,” “Morning Routine,” “Relax”) adjust multiple layers simultaneously.
The Fundamental Principle: Lighting is not a single solution but a symphony of layers—each serving a distinct purpose, yet harmonizing to create a cohesive, responsive environment. Mastery lies in the intentional relationship between all light sources within a space.
Room-by-Room Application: Aligning Function and Ambiance Across Eight Key Spaces
Theory gains clarity through practical application. Below, we apply the Dual-Lens Framework to eight common spaces, defining functional priorities, ambiance opportunities, fixture considerations, and frequent pitfalls. Each section emphasizes adaptable solutions grounded in real-world use.
The Kitchen: Precision and Warmth in Harmony
Kitchens demand exceptional clarity for safety-critical tasks while fostering connection during meals. Poor lighting here directly impacts usability and comfort.
-
Functional Priorities:
- Task Zones Require Dedicated Light: Identify every work surface: countertops (front and back edges), sink, stove, island, pantry interior. Under-cabinet lighting is essential for countertops to eliminate hand shadows. Position recessed lights in front of the sink (toward the room), not directly overhead, to illuminate the basin without body shadows. Over the stove, combine range hood lighting with adjacent recessed lights; hood lights alone create deep cooktop shadows.
- Light Level Guidance:
- General Ambient: 3,000–5,000 lumens total (via multiple recessed lights or layered sources).
- Countertop Task: ~500 lumens per linear foot (achieved via under-cabinet LED strips).
- Island Task: 1,000–1,500 lumens total (via 2–3 pendants or linear suspension).
- Sink/Stove Task: 400–600 lumens focused on the area.
- Safety Note: Fixtures within 3 feet of sinks or stoves should be rated for damp locations per manufacturer specifications. Avoid glass directly over cooktops where steam and grease accumulate; choose easy-clean metal or acrylic.
- Control Strategy: Three independent dimmer circuits are ideal: 1) Ambient ceiling lights, 2) Under-cabinet/task lights, 3) Island pendants. Enables cooking under bright task light with ambient dimmed, or entertaining with ambient bright and task lights off.
-
Ambiance Vision:
- Temperature Strategy: Layer intentionally. Use 3000K for all task lighting (under-cabinet, island pendants, sink lights) for accurate color rendering during food prep. Use 2700K for ambient lighting in dining nooks or over breakfast tables to create a warm backdrop for meals. This subtle contrast supports both efficiency and connection.
- CRI Matters: Prioritize CRI 90+ for all kitchen lighting. High-CRI light makes fresh produce vibrant, meats appetizing, and spices distinguishable—enhancing both safety and enjoyment. Low-CRI light dulls colors and reduces visual confidence.
- Fixture Style & Material: Select finishes complementing cabinetry and hardware. Brushed nickel or matte black under-cabinet strips minimize visual distraction. For island pendants, choose shapes echoing kitchen geometry (linear for modern islands, clustered mini-pendants for farmhouse sinks). Prioritize durable, cleanable materials: sealed wood, metal, high-quality acrylic.
-
Fixture Selection Guidance:
- Ambient Layer: 4–6 recessed LED downlights (IC-rated if near insulation) with 3000K, CRI 90+, ~750-lumen modules. Space evenly, avoiding direct alignment over task zones. Alternative: Semi-flush mount with diffused shade in smaller kitchens, supplemented by wall sconces.
- Task Layer:
- Countertops: Hardwired LED tape light (3000K, CRI 90+, ~450 lumens/ft) installed at the front underside of upper cabinets. Include separate switch/dimmer. Budget Option: Plug-in LED under-cabinet bars with clean cord management.
- Island: 2–3 pendants hung 30–36 inches above surface. Diameter: ⅓ island width. Choose open-bottom shades for direct task light or diffused shades for softer ambiance. Critical: Ensure pendants don’t obstruct sightlines across the island.
- Sink/Stove: Recessed adjustable trims (3000K) positioned to aim light precisely where needed.
- Accent Layer: LED tape inside glass-front cabinets. Narrow-beam recessed light highlighting a decorative backsplash or open shelving. Toe-kick lighting under base cabinets (2700K) for safe nighttime navigation.
-
Common Pitfalls & Thoughtful Solutions:
- Pitfall: Single central fixture casting shadows on all counters. Solution: Implement layered lighting; under-cabinet illumination is essential for task zones.
- Pitfall: Island pendants hung too high (ineffective) or too low (obstructive). Solution: Measure meticulously. Have the tallest household member sit at the table while testing heights; target 30–36 inches above surface.
- Pitfall: Glare from shiny countertops. Solution: Use diffused light sources (frosted lenses, fabric shades), position task lights carefully, consider matte-finish countertops where feasible.
- Pitfall: Overlooking the pantry. Solution: Install a motion-sensor LED puck light inside the pantry door—hands-free illumination upon opening.
The Bathroom: Clarity with Comfort
Bathrooms require precise illumination for grooming tasks while cultivating a spa-like sense of calm. The vanity area is particularly critical.
-
Functional Priorities:
- Vanity Lighting Requires Side Illumination: Overhead lights alone cast shadows under eyes, nose, and chin—problematic for shaving, makeup, or skincare. Light must come from the sides. Install fixtures mounted on the mirror or flanking it horizontally. Ideal placement: bulb centers 65–70 inches from floor, spanning ≥75% of mirror width. For double vanities, use two separate fixtures or a continuous linear light.
- Light Level Guidance: Vanity task lighting: 700–1,000 lumens total. General ambient: 1,500–2,500 lumens. Shower niche: 200–300 lumens from a dedicated waterproof source.
- Moisture Ratings Are Essential: Zone definitions (based on international standards) guide IP ratings:
- Zone 0 (Inside bath/shower): IP67 minimum (submersible). Only specific low-voltage fixtures permitted.
- Zone 1 (Above bath/shower to 2.25m height): IP65 minimum (protected against water jets).
- Zone 2 (0.6m outside bath/shower perimeter, around sink): IP44 minimum (splash-proof).
- Outside Zones: Standard indoor fixtures acceptable. Always verify local building codes, which may have stricter requirements.
- Mirror Integration: Mirrors with integrated, edge-lit LED lighting (3000K, CRI 90+) provide exceptionally even, shadow-free illumination. Ensure separate switch/dimmer control from ambient lights.
-
Ambiance Vision:
- Temperature Precision: 3000K is widely recommended for bathroom task lighting. It balances warmth (inviting, natural skin tone rendering) with neutrality (accurate color judgment). Reserve 2700K only for ambient cove lighting or a decorative ceiling fixture in the main area, dimmed low for relaxation.
- CRI for Confidence: CRI 95+ is ideal for vanity lighting. Near-sunlight accuracy ensures makeup matches skin tone under various lighting conditions and makes skin appear healthy. This detail significantly impacts daily confidence.
- Diffusion Enhances Comfort: Harsh, direct light on bare skin feels stressful. Choose vanity fixtures with fully diffused lenses—frosted glass, opal acrylic, or fabric shades that wrap around the bulb. Avoid exposed filaments or clear glass directly facing the mirror. Light should feel soft and enveloping.
-
Fixture Selection Guidance:
- Task Layer (Vanity): Horizontal light bar mounted on the mirror (optimal for even light) or two vertical sconces flanking the mirror. Must be IP44 rated if within Zone 2. 3000K, CRI 95+, total ~800 lumens. Look for fixtures designed to minimize shadows.
- Ambient Layer: Two recessed downlights (3000K, CRI 90+, IP65 rated if near shower) positioned to wash ceiling and walls, not shine directly into eyes at the vanity. Alternative: Moisture-rated semi-flush mount with wide, diffused shade.
- Accent Layer: Waterproof LED strip (IP67) inside a shower niche. A small, dimmable wall sconce (2700K) near the toilet area for nighttime use. Cove lighting around the ceiling perimeter (2700K) for a luxurious, indirect glow.
- Tub Area Consideration: For freestanding tubs, avoid bright overhead light. Use a dimmable wall sconce on an adjacent wall (positioned to avoid glare when reclining) or subtle cove lighting. Goal: gentle, relaxing illumination.
-
Common Pitfalls & Thoughtful Solutions:
- Pitfall: Single overhead light creating “raccoon eyes.” Solution: Side-lighting is essential. Retrofit with plug-in LED mirror lights if hardwiring isn’t feasible.
- Pitfall: Using 2700K vanity lights causing makeup to appear mismatched in daylight. Solution: Stick to 3000K for task areas; use dimmers to lower intensity for ambiance without shifting color temperature.
- Pitfall: Ignoring moisture zones. Solution: Map bathroom zones before shopping; select fixtures with verified IP ratings for their specific location.
- Pitfall: Glare from lights reflecting off wet surfaces or mirrors. Solution: Use diffused fixtures, position lights carefully, consider anti-glare mirror coatings.
The Living Room: Adaptable Heart of the Home
This multi-functional space hosts conversation, entertainment, reading, and relaxation. Lighting must shift seamlessly between vibrant social energy and serene retreat. Rigidity limits usability.
-
Functional Priorities:
- Define Activity Zones: Mentally divide the room: conversation area (sofas/chairs), entertainment zone (TV), reading nook, display areas (shelves, art). Each zone benefits from independent lighting control. Uniform room-wide lighting diminishes intimacy.
- Minimize TV Glare: Position task lights (floor lamps, table lamps) behind or to the side of seating, aimed away from the screen. Implement bias lighting: a low-level, dimmable LED strip (2700K) mounted behind the TV. This reduces eye strain by providing ambient light matching screen brightness, improving perceived contrast and comfort during extended viewing.
- Ensure Safe Pathways: Maintain clear, shadow-free paths between seating areas, especially at night. Low-level lighting (toe-kick lights under consoles, dimmable wall sconces near doorways) prevents trips without disrupting ambiance.
- Reading Light Precision: Dedicated reading lamps are essential for avid readers. Provide 450–800 lumens of focused, adjustable light onto the book page, not into eyes or across the room. Swing-arm wall sconces or architect-style floor lamps offer ideal adjustability.
-
Ambiance Vision:
- Temperature Consistency: 2700K is generally ideal for living rooms. It promotes relaxation, enhances warm textiles and wood tones, and feels inherently welcoming. Avoid mixing temperatures within the main visual field—consistency fosters cohesion. For a dedicated home office nook within the living area, use a separate, adjustable task lamp (3000K) controlled independently.
- Dimming as Primary Control: Dimming is not optional here; it is the core ambiance tool. A room at 100% brightness rarely feels intimate. Dimming ambient lights to 30–50% instantly cultivates warmth and focus. Install dimmers on every circuit: ambient, task, accent. Systems allowing saved presets (“Movie Mode,” “Game Night,” “Cocktail Hour”) simplify transitions.
- Fixture as Focal Point: In rooms with architectural interest or high ceilings, a thoughtfully scaled statement fixture (chandelier, sculptural pendant) can anchor the space visually. Ensure scale aligns with room dimensions (see Step 3 formulas) and complements, rather than conflicts with, the room’s style. In minimalist spaces, let the quality of light itself be the focus—choose fixtures creating interesting shadow patterns or using textured materials.
-
Fixture Selection Guidance:
- Ambient Layer: Avoid reliance on a single central fixture. Instead, use:
- Option A (Recessed): 4–6 adjustable recessed lights (2700K, CRI 90+) spaced to wash walls (wall washing), creating a spacious, gallery-like feel.
- Option B (Indirect): Cove lighting around the ceiling perimeter (2700K LED tape) bouncing light upward. Provides the most flattering, shadow-free ambient glow. Requires architectural detail but offers exceptional quality.
- Option C (Decorative): A central semi-flush or chandelier (2700K) supplemented by multiple floor/table lamps to avoid flat, shadow-casting light.
- Task Layer:
- Reading: Adjustable floor lamp (architect style) or wall-mounted swing-arm sconce beside primary seating. Use directional shades.
- Conversation Areas: Table lamps on side tables (fabric shades for diffusion) create localized pools of light encouraging intimate grouping.
- TV Area: Bias lighting strip behind TV; avoid direct light sources facing the screen.
- Accent Layer:
- Artwork: Picture lights or narrow-beam recessed spots (15° beam angle) highlighting key pieces without glare.
- Bookshelves: LED tape mounted on the top front edge of each shelf, shining down onto books (creates a “floating” effect). Use warm 2700K.
- Architectural Features: Wall sconces grazing a textured stone fireplace or highlighting built-in cabinetry.
- Ambient Layer: Avoid reliance on a single central fixture. Instead, use:
-
Common Pitfalls & Thoughtful Solutions:
- Pitfall: One bright overhead light creating an institutional feel. Solution: Eliminate or minimize central fixture use; build layers from the ground up with lamps and indirect sources.
- Pitfall: TV glare disrupting viewing. Solution: Implement bias lighting and strategically position all other light sources away from screen reflection angles.
- Pitfall: Dark corners making the room feel smaller. Solution: Use wall washing with recessed lights or add a tall floor lamp in the corner to bounce light off wall and ceiling.
- Pitfall: Lamps too dim for reading. Solution: Select lamps with minimum 600-lumen output and adjustable heads. Prioritize high-CRI bulbs for clarity.
The Bedroom: Sanctuary for Rest
The bedroom’s primary purpose is restorative rest. Lighting choices should support natural sleep cycles and cultivate calm. Harsh or cool-toned light here can be biologically disruptive.
-
Functional Priorities:
- Support Circadian Rhythms: Exposure to blue-rich light (higher Kelvin temperatures) in the evening suppresses melatonin production. All bedroom lighting should be 2700K or warmer. For bedside lights used in the hour before sleep, consider ultra-warm options (2200K–2400K, often labeled “Sunset” mode on tunable bulbs). Avoid any fixtures emitting light above 3000K in the main sleeping area.
- Personalized Bedside Lighting: Reading in bed requires focused light on the book, not flooding the room or shining in a partner’s eyes. Swing-arm wall sconces are highly effective—they free nightstand space, offer precise adjustability, and contain cords. If using table lamps, select styles with deep, directional shades.
- Discreet Pathway Lighting: Motion-activated, very low-level light (under-bed LED strip, dimmable toe-kick light in closet) provides just enough illumination for nighttime bathroom trips without fully waking you or disrupting sleep cycles. Set to 1–5% brightness.
- Closet Lighting: Motion-sensor LED puck lights or strips inside the closet ensure accurate color selection. Use 3000K, CRI 90+ here for accuracy, but ensure light is contained within the closet and doesn’t spill into the bedroom when the door is closed.
-
Ambiance Vision:
- Temperature as Calming Tool: Embrace ultra-warm light for pre-sleep routines. 2200K–2400K is ideal for bedside lights used in the final hour before sleep. This amber-hued light minimizes blue spectrum exposure, signaling the body to wind down. Reserve standard 2700K for general ambient lighting used earlier in the evening.
- Diffusion Promotes Serenity: Harsh shadows feel stressful in a rest space. Prioritize fixtures with heavy diffusion: fabric drum shades, etched glass sconces, paper lanterns. Light should feel gentle and enveloping, like a soft embrace.
- Scale for Calm: Oversized fixtures can feel visually heavy in a sanctuary. Choose bedside fixtures proportional to the headboard (sconce height aligning with pillow top). A single modest central fixture (or none at all) is often preferable to a large, dominant chandelier that draws visual tension upward.
-
Fixture Selection Guidance:
- Ambient Layer: Minimalist approach is often best. Avoid bright overhead lights as the primary source. Options:
- Cove lighting (2700K) for soft, indirect glow.
- A single, dimmable semi-flush mount with a heavy fabric shade (used sparingly).
- Rely primarily on layered task and accent sources for overall illumination.
- Task Layer:
- Bedside: Swing-arm wall sconces (2200K–2700K, dimmable) with opaque shades directing light downward onto the book. Alternative: Plug-in wall sconces if hardwiring isn’t possible.
- Dressing Area: If space allows, a dedicated vanity with proper side-lighting (3000K, CRI 90+)—ensure it has its own switch and isn’t the room’s primary light source.
- Accent Layer:
- Artwork: A single narrow-beam spot highlighting a calming piece above the bed (use a dimmer!).
- Architectural: A subtle wall sconce on the wall opposite the bed, aimed downward to create a soft pool of light without glare.
- Functional Accent: Under-bed LED strip (2200K, motion-activated) for safe nighttime navigation.
- Ambient Layer: Minimalist approach is often best. Avoid bright overhead lights as the primary source. Options:
-
Common Pitfalls & Thoughtful Solutions:
- Pitfall: Bright overhead light used as the main source, disrupting sleep preparation. Solution: Remove the central fixture or keep it off; build ambiance with low-level layered sources. Install a dimmer if it must remain.
- Pitfall: Bedside lamps shining light directly into eyes or across the room. Solution: Choose lamps with deep, directional shades or switch to swing-arm sconces.
- Pitfall: Using cool-white bulbs “to see better” for reading. Solution: Use a higher-lumen (but still 2700K or warmer) bulb in a well-designed task lamp; warmth does not equate to insufficient light.
- Pitfall: Overlooking the closet. Solution: Install motion-sensor LED lighting inside; use warmer temperature (2700K) if light spills out, or 3000K if fully contained.
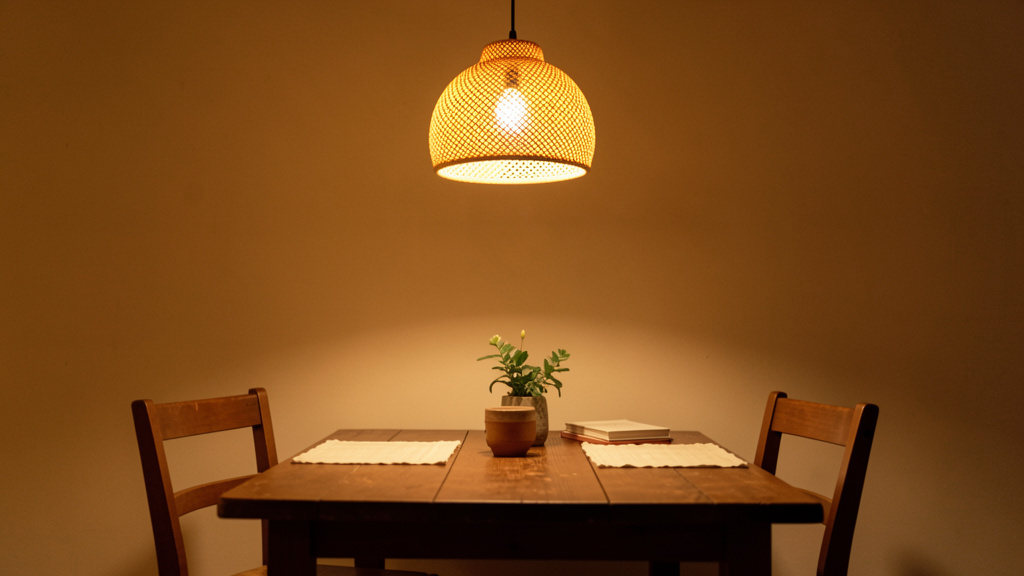
The Dining Room: Illuminating Connection
This space exists to facilitate shared meals and conversation. Lighting must flatter food and faces, encourage interaction, and define the table as the emotional centerpiece. Poor lighting directly impacts the dining experience.
-
Functional Priorities:
- Table Illumination is Essential: The fixture must provide adequate, shadow-minimized light on the table surface for seeing food clearly and reading expressions. A single pendant should hang 30–36 inches above the table surface. For rectangular tables, use a linear suspension or 2–3 pendants spaced evenly.
- Light Level Target: 3,000–6,000 lumens total focused on the table area (e.g., a 36-inch diameter pendant with ~4,000 lumens). Ensures food is visible without clinical harshness. Use a dimmer to adjust intensity for different occasions (bright for game night, dim for intimate dinner).
- Glare Prevention: The bottom of the fixture should be below seated eye level to prevent direct glare. Choose fixtures with opaque shades directing light downward, or use diffusers. Avoid clear glass globes where bare bulbs are visible from seating positions.
- Context in Open Plans: In open-concept homes, ensure the dining fixture doesn’t create harsh shadows in adjacent living areas. Layer with subtle ambient lighting (wall sconces, cove light) in surrounding space to maintain visual connection without competing with the table focus.
-
Ambiance Vision:
- Temperature for Appetite and Atmosphere: 2700K is strongly recommended. Warm light enhances the appearance of food (richer meats, vibrant vegetables) and creates a welcoming, intimate mood. It softens skin tones and encourages relaxation. Avoid temperatures cooler than 3000K—it can make food look less appetizing and the space feel sterile.
- CRI for Culinary Appeal: CRI 90+ is highly beneficial. High color rendering makes food look fresh, colorful, and delicious—a subtle but meaningful factor in enjoyment. Low-CRI light can make a beautifully plated meal appear dull.
- Fixture as Centerpiece: The dining fixture often serves as the room’s focal point. Choose a style complementing your table and overall decor. A sculptural piece can elevate the entire space. Ensure scale is correct (see Step 3 formulas)—too large feels oppressive; too small looks lost. Material should resonate: rattan for coastal, black metal for industrial, crystal for traditional.
-
Fixture Selection Guidance:
- Primary Fixture: Pendant or chandelier centered over the table.
- Round Table: Single round or multi-light pendant. Diameter = ½ to ⅔ table diameter.
- Rectangular Table: Linear suspension (length = ⅓ to ½ table length) OR 2–3 pendants spaced 24–30 inches apart. Hang lowest point 30–36 inches above table.
- Critical: Must be dimmable. Choose a fixture with integrated dimming capability or ensure compatible bulbs/dimmer switch.
- Ambient Layer (Supporting Role): Wall sconces (upward or downward facing) or discreet recessed lights around the room perimeter. Set significantly lower than the table light (use separate dimmer circuit) to avoid washing out the focal point. Purpose: provide safe navigation and prevent the room from feeling like a spotlight on the table.
- Accent Layer: Picture lights highlighting artwork on adjacent walls. A narrow-beam recessed light to graze a textured accent wall behind the buffet. Subtle LED tape under a glass-top buffet to illuminate displayed items.
- Primary Fixture: Pendant or chandelier centered over the table.
-
Common Pitfalls & Thoughtful Solutions:
- Pitfall: Fixture hung too high (ineffective lighting) or too low (hits heads, blocks views). Solution: Measure meticulously. Have someone sit at the table while testing heights; find the sweet spot where light covers the table but doesn’t obstruct sightlines.
- Pitfall: Fixture with exposed bulbs causing glare. Solution: Choose fixtures with shades fully enclosing the light source or use frosted bulbs/diffusers. Test by sitting at the table—can you see the bright filament?
- Pitfall: Ignoring the rest of the room, making the space feel like a stage under a spotlight. Solution: Add low-level ambient sources (sconces, cove light) on a separate dimmer to gently illuminate walls and pathways.
- Pitfall: Choosing a fixture that clashes stylistically. Solution: Bring a photo of your table and room when shopping. Consider the fixture’s silhouette and material against existing elements.
The Home Office: Supporting Focus and Well-being
Whether a dedicated room or a corner nook, office lighting must minimize eye strain, support sustained concentration, and adapt to varied tasks (screen work, reading documents, video calls). Lighting quality directly impacts productivity and comfort.
-
Functional Priorities:
- Eliminate Screen Glare: Position your desk so windows are to the side, not in front or behind you. Never place a bright light source (window or fixture) directly in your line of sight to the screen. Use indirect ambient lighting (wall washing, cove light) rather than downlights directly over the desk.
- Task Lighting Precision: Your desk lamp must provide focused light on the work surface, not into your eyes or onto the screen. An adjustable architect lamp (with weighted base and multiple pivot points) is ideal. Position the lamp on the opposite side of your dominant hand (e.g., left side if right-handed) to prevent hand shadows while writing.
- Video Call Readiness: For frequent calls, dedicated face lighting is valuable. A compact softbox or ring light placed in front of you, slightly above eye level, provides even, flattering illumination eliminating shadows under eyes and chin. Avoid relying solely on overhead lights or window light (which creates harsh shadows if behind you).
- Balanced Light Levels: Ambient light should be moderate (1,500–2,500 lumens total) to reduce contrast between bright screen and dark room (a major cause of eye strain). Task light should provide 500–800 lumens focused on the desk. Avoid stark brightness differences between screen, desk, and surrounding room.
-
Ambiance Vision:
- Temperature for Cognitive Support: 3500K offers a balanced choice for focused work. It provides enough neutrality to promote alertness and concentration without the harshness of 4000K+ light. For creative tasks or evening work sessions, having a dimmable option to shift toward 3000K can reduce strain. Avoid 2700K for primary task lighting during demanding cognitive work—it may induce drowsiness.
- CRI for Accuracy: CRI 90+ is essential, especially for color-critical work (graphic design, photo editing, selecting materials). Low-CRI light distorts colors on screen and in physical samples, leading to errors. Even for text-based work, high-CRI light feels clearer and reduces visual fatigue.
- Dynamic Lighting for Energy: Tunable white systems allowing shifts from 4000K (energizing for morning deep work) to 3000K (calming for afternoon tasks) can align with natural energy rhythms, supporting sustained focus throughout the day.
-
Fixture Selection Guidance:
- Ambient Layer: Recessed adjustable downlights (3500K, CRI 90+) positioned to wash walls and ceiling, not shine directly on the desk or screen. Superior Option: Cove lighting around the room perimeter providing soft, indirect illumination. Avoid a central ceiling fixture directly over the desk area.
- Task Layer:
- Desk Lamp: Adjustable architect lamp (3500K, CRI 90+, ~600 lumens) with directional shade. Must be dimmable.
- Video Call Light: Compact LED panel (3500K, dimmable) mounted on monitor or desk. Use only during calls; turn off otherwise to avoid over-illumination.
- Accent Layer: Narrow-beam recessed spot highlighting a bookshelf of reference materials or inspirational artwork. A small picture light on a motivational print above the desk. Purpose: Creates visual interest without distraction; defines the workspace zone.
-
Common Pitfalls & Thoughtful Solutions:
- Pitfall: Overhead light causing screen glare and eye strain. Solution: Eliminate direct overhead light over the desk; use indirect ambient sources and a dedicated, adjustable task lamp.
- Pitfall: Desk lamp positioned incorrectly, casting hand shadows or shining into eyes. Solution: Place lamp on opposite side of dominant hand; adjust shade to direct light precisely onto work surface.
- Pitfall: Poor lighting during video calls (shadowy face, harsh overhead light). Solution: Invest in a dedicated, adjustable face light placed in front of you. Test your setup before important meetings.
- Pitfall: Monochromatic lighting causing visual fatigue. Solution: Layer temperatures intentionally—3500K task light, 3000K ambient wall wash—and use dimmers to adjust throughout the day.
The Entryway & Hallway: Welcoming Transitions and Safe Passage
These transitional spaces set the home’s initial tone and ensure safe movement. Often overlooked, they significantly impact daily experience and first impressions. Lighting here must be intuitive, welcoming, and hazard-preventing.
-
Functional Priorities:
- Pathway Illumination is Safety-Critical: Hallways require consistent, shadow-free light along the entire walking path. Staircases demand even illumination on every tread—no dark spots between steps. Use multiple low-level sources rather than one bright overhead light at each end. Motion sensors are highly recommended for hallways and stairwells, ensuring light is available when needed without manual switching.
- Identify Task Zones in Entryways: Specific needs include: a console table for dropping keys (needs a small lamp or focused downlight), a mirror for last-minute checks (requires flanking sconces like a bathroom vanity), a coat closet (needs internal motion-sensor light). One central fixture rarely covers all needs.
- Light Level Guidance: Hallways: 10–20 lumens per square foot of floor area, distributed evenly. Staircases: Minimum 20 lumens per sq. ft on horizontal tread surfaces. Entry Foyer: 1,500–3,000 lumens total ambient, plus task lighting for specific zones.
- Control Strategy: Three-way switches at top and bottom of stairs. Motion sensors in long hallways or closets. Smart switches that activate entryway lights automatically at dusk or upon arrival.
-
Ambiance Vision:
- Temperature for Welcome: 2700K creates immediate warmth and hospitality. The moment someone steps inside, the light should feel inviting, not cold or clinical. This is especially important for entryways visible from the street at night—warm light signals “home.”
- Fixture Scale for Proportion: Entryways are often narrow. Avoid oversized fixtures that feel cramped. Choose fixtures proportional to the space: a modest semi-flush mount, a pair of wall sconces flanking the door, or a single elegant pendant if ceiling height allows. In hallways, low-profile fixtures are essential to avoid head bumps.
- Highlighting Positive Features: Use accent lighting to draw attention to architectural details: a wall sconce grazing a textured wall, a narrow-beam spot highlighting artwork at the hallway’s end, or LED tape under a floating console table. This transforms a passageway into an intentional experience.
-
Fixture Selection Guidance:
- Ambient Layer:
- Entry Foyer: Semi-flush mount (2700K) centered in the space, sized appropriately (room width + length in feet = max fixture diameter in inches). Alternative: Two wall sconces flanking the front door interior.
- Hallway: Recessed adjustable downlights spaced every 4–6 feet along the corridor, aimed to wash the walls (not shine directly down). Critical for stairs: Recessed lights positioned to illuminate each tread evenly; consider integrated step lights for modern builds.
- Task Layer:
- Console Table: Small table lamp (fabric shade) or a dedicated downlight aimed at the surface.
- Mirror: Vertical sconces flanking the mirror (2700K, diffused).
- Closet: Motion-sensor LED puck lights inside.
- Accent Layer: A single picture light on artwork at the end of a hallway (creates a visual destination). LED tape under a floating shelf holding keys/mail. A narrow-beam spot highlighting architectural molding or a textured wall section.
- Ambient Layer:
-
Common Pitfalls & Thoughtful Solutions:
- Pitfall: Dark hallway or staircase creating tripping hazards. Solution: Install multiple, evenly spaced light sources; use motion sensors for automatic activation. For stairs, consider low-voltage LED strip lighting integrated into step nosing (professional installation recommended).
- Pitfall: Single bright overhead light in entryway creating harsh shadows and feeling unwelcoming. Solution: Layer with wall sconces or a table lamp on the console to create softer, multi-directional light.
- Pitfall: Fixture too large for a small entryway, making the space feel cramped. Solution: Choose low-profile fixtures; use wall-mounted options to preserve headroom and visual space.
- Pitfall: Forgetting the closet. Solution: Install motion-sensor lighting inside every entry closet—a small detail with significant usability impact.
Outdoor Living Spaces: Extending Comfort Beyond Walls
Patios, decks, and porches function as outdoor rooms deserving thoughtful lighting consideration. Safety, ambiance, and functionality must coexist under the stars. Weather resistance is non-negotiable.
-
Functional Priorities:
- Safety First – Path & Step Lighting: Clearly illuminate all walking paths, deck edges, and step transitions. Use low-voltage LED path lights spaced 6–8 feet apart along walkways. For deck stairs, install dedicated step lights (rated IP67 or higher) recessed into the riser or tread. Avoid placing bright lights directly at eye level where people sit—position sources below seating height or use shielded fixtures.
- Define Activity Zones: Identify specific areas: dining table (needs focused downward light), cooking/grilling station (requires bright, shadow-free illumination in front of the grill, not behind), conversation area (needs gentle ambient light), fire pit (minimal light to preserve flame ambiance). Each zone benefits from dedicated lighting.
- IP Ratings Are Mandatory: Understand the ratings:
- IP65: Protected against low-pressure water jets (rain). Suitable for covered porches, under eaves.
- IP67: Protected against temporary immersion (heavy rain, splashes). Essential for deck rail lights, step lights, path lights.
- IP68: Continuous submersion rating. Required for in-ground well lights or pond lighting.
- Always select fixtures rated for the specific exposure. “Damp location” rating is insufficient for fully exposed areas.
- Voltage Considerations: Low-voltage (12V) systems are safer for DIY installation around water features or gardens and offer fixture flexibility. Line-voltage (120V) is required for high-lumen fixtures (like security floodlights) but demands professional installation and GFCI protection. Solar path lights offer convenience but often lack sufficient brightness and reliability—best used for subtle decorative accent only.
-
Ambiance Vision:
- Temperature for Outdoor Comfort: 2700K is universally preferred outdoors. It mimics candlelight or firelight, creating a warm, intimate, and inviting atmosphere. Cool white light (4000K+) feels harsh, clinical, and attracts more insects. Reserve cooler temperatures only for security floodlights (and keep them on motion sensors, not constantly on).
- The Art of Subtlety: Outdoor lighting should enhance the night, not eliminate it. Avoid “car dealership” over-illumination. Use lower light levels than indoors. The goal is to reveal shapes, textures, and pathways—not to read a book by the light of a tree. Shadows create depth and mystery; embrace them.
- Highlighting Nature: Use accent lighting to showcase landscape features: uplight a specimen tree (place fixture at base, aim up into branches), graze a stone wall to emphasize texture, silhouette a shrub against a light-colored wall. This connects the space to its environment and adds layers of visual interest.
-
Fixture Selection Guidance:
- Ambient Layer:
- Covered Porch/Patio: Pendant or flush mount (IP65 rated) over seating area. String lights with warm LED bulbs (2700K) crisscrossed overhead—choose commercial-grade with individual bulb sockets for longevity.
- Open Deck: Recessed deck lights (IP67) installed in the floor or rail caps providing soft, downward ambient glow. Avoid bright overhead fixtures that create glare and diminish ambiance.
- Task Layer:
- Dining Table: Pendant hung 28–32 inches above table surface (IP65+ rated). Use a dimmer.
- Grilling Station: Dedicated, shielded downlight (IP67) mounted on the house eave or pergola beam, positioned to shine onto the grill surface from the front. Critical: Must be heat-resistant and positioned away from direct flame exposure.
- Conversation Area: Low-level bollard lights or discreet path lights around the perimeter of the seating zone.
- Accent Layer:
- Path Lighting: Low-voltage LED path lights (2700K) spaced along walkways. Choose styles with hoods to direct light downward and minimize skyglow/light pollution.
- Tree Uplighting: Well lights (IP68) buried at the base of trees, aimed upward. Use multiple fixtures for large trees.
- Deck Railing: Integrated LED tape (IP67) under the top rail cap, shining downward onto the deck surface—provides safe pathway lighting without glare.
- Water Features: Submersible LED lights (IP68) to highlight fountains or ponds.
- Ambient Layer:
-
Common Pitfalls & Thoughtful Solutions:
- Pitfall: Over-lighting the space, creating glare and eliminating evening magic. Solution: Use fewer fixtures at lower brightness; prioritize layering and directionality over sheer output. Install dimmers on all circuits.
- Pitfall: Using cool-white bulbs that feel harsh and attract bugs. Solution: Insist on 2700K for all ambiance and task lighting; use warm-dim or amber bulbs near seating areas to further reduce insect attraction.
- Pitfall: Ignoring safety hazards (dark steps, uneven paths). Solution: Prioritize path and step lighting before decorative elements. Test the space at night—walk the paths, use the stairs—before finalizing the plan.
- Pitfall: Choosing fixtures not rated for exposure, leading to premature failure. Solution: Verify IP ratings for each specific location; when in doubt, choose a higher rating. Consult a lighting professional for complex installations near water or requiring trenching.
Navigating Common Constraints: Budget, Rentals, and Style Differences
Real-world conditions shape lighting decisions. Tight budgets, rental agreements, or differing household preferences aren’t barriers—they’re invitations to apply the framework creatively. Core principles remain; execution adapts thoughtfully.
Budget Constraints: Strategic, Phased Investment
Lighting is often deprioritized in budgets, yet poor lighting undermines even beautiful finishes. Approach lighting as a phased investment, prioritizing impact and safety.
-
Priority Hierarchy (Safety to Refinement):
- Safety & Core Function: Allocate funds first to eliminate hazards and enable essential tasks:
- Shadow-free task lighting in kitchens (under-cabinet lights) and bathrooms (proper vanity lighting).
- Safe pathway lighting on stairs and in hallways (recessed step lights, motion-sensor night lights).
- Correct IP-rated fixtures in wet locations (showers, outdoors).
- Why: These directly impact daily safety, usability, and well-being. Compromising here creates ongoing frustration and risk. Invest in quality here before decorative elements.
- Ambiance Foundation: Next, address primary ambiance drivers:
- A quality dimmer switch on the main ambient circuit (living room, bedroom). This single upgrade transforms existing lighting more than most new fixtures.
- High-CRI, correct-color-temperature bulbs (2700K/3000K, CRI 90+) in existing fixtures. Replacing bulbs is the highest ROI lighting upgrade.
- One well-chosen task lamp per primary seating area (reading lamp, desk lamp).
- Why: These create immediate perceptual improvement in comfort and quality without major installation costs.
- Decorative & Accent Layers: Finally, add statement fixtures and accent lighting:
- A pendant over the dining table.
- Wall sconces for ambiance.
- Picture lights, LED tape for shelves.
- Why: These enhance aesthetics and refinement but are less critical to core function. They can be added gradually.
- Safety & Core Function: Allocate funds first to eliminate hazards and enable essential tasks:
-
Budget-Friendly Tactics with Significant Impact:
- Bulb Upgrades Are Transformative: Spend $15–$25 per bulb on high-CRI (90+), dimmable LEDs in the correct color temperature. Replace all bulbs in a room at once for consistency. This instantly elevates existing fixtures. Look for reputable value-focused lines offering high-CRI options.
- Master the Dimmer: Installing a quality dimmer switch on existing overhead lights costs modestly and takes minimal time (if comfortable with basic electrical safety; otherwise hire a professional). Dimming warm-white bulbs makes them appear richer and warmer, dramatically improving ambiance. Critical: Ensure bulbs are dimmer-compatible—check packaging.
- Strategic Lamp Placement: Use floor and table lamps to create layers without renovation. Place a tall arc floor lamp behind a sofa to wash the wall with light (ambient layer). Add a directional task lamp on a side table. Thrift stores often have solid lamp bases that can be paired with new shades for under $30 total.
- Temporary Diffusion Solutions: If stuck with harsh recessed lights, retrofit with clip-in diffusers or adjustable trims that allow aiming. Adhesive fabric circles can soften glare temporarily. Not ideal long-term, but a low-cost interim step.
- Focus on High-Impact Zones: Prioritize upgrades in spaces used most frequently (kitchen, main bathroom, primary living area) before guest rooms or basements. A well-lit kitchen island has more daily impact than a fixture in a rarely used formal room.
- Splurge vs. Save Guidance:
- Splurge: On fixtures in high-visibility, high-use areas where quality is noticeable (dining room pendant, primary bathroom vanity lights). Quality materials, better diffusion, and reliable performance justify investment.
- Save: On purely functional fixtures in utilitarian spaces (garage, laundry room, closet interiors). Basic, efficient LED solutions suffice.
- Never Compromise: On safety-critical items (IP ratings for wet locations, proper electrical components). This is false economy.
-
Example Phased Implementation Plan (6-Month Budget Build):
- Month 1: Audit all bulbs. Replace with correct temperature (2700K/3000K) and CRI 90+ LEDs. Install dimmer switches on living room and bedroom main lights. ($100–$150)
- Month 2: Add under-cabinet LED tape light in kitchen (hardwired or plug-in). ($80–$150)
- Month 3: Install proper vanity lighting in main bathroom (flanking sconces or light bar). ($150–$300)
- Month 4: Add two quality floor lamps to living room for ambient and task layers. ($100–$250)
- Month 5: Install path lights and step lighting on deck/stairs for safety. ($120–$200)
- Month 6: Invest in statement pendant over dining table. ($200–$500+)
- Ongoing: Add accent lighting (picture lights, shelf lighting) as budget allows.
This approach ensures every dollar spent meaningfully advances both function and ambiance, building a cohesive system over time without financial strain. Consistent, quality light from simple sources consistently outperforms inconsistent, poor light from expensive fixtures.
Rental Limitations: Respectful, Portable Solutions
Renters face unique constraints: restrictions on hardwiring, concerns about security deposits, and the need for portability. Significant lighting improvements are achievable without permanent changes. The key is leveraging plug-in, adhesive, and portable solutions that respect the space while transforming it.
-
The Renter’s Lighting Toolkit (All Non-Permanent):
- Plug-In Pendant Kits: Transform a standard ceiling hook (common in rentals) into a stylish pendant. Kits include a cord set, socket, and shade that plug directly into a wall outlet. Hang over a dining table, kitchen island (if hook exists), or bedside. Use cord covers painted to match the wall for a cleaner appearance.
- Adhesive-Backed LED Solutions: Modern LED tape lights and puck lights feature strong removable adhesive backing. Ideal for:
- Under-cabinet kitchen lighting (peel-and-stick tape).
- Inside closet shelves or pantry.
- Under floating shelves or console tables.
- Behind the TV for bias lighting.
- Critical: Test adhesion on a small, hidden area first. When moving out, gently heat the adhesive with a hairdryer for clean removal. Keep original fixture packaging to reinstall landlord’s items.
- Plug-In Wall Sconces: Mount to the wall with removable adhesive strips or simply plug into an outlet with a discreet cord. Provide crucial vertical light for vanities, beside beds (replacing table lamps), or in hallways. Look for styles with cord covers.
- Smart Plug + Bulb Combo: Screw a smart bulb into an existing fixture. Control brightness and (in some cases) color temperature via app or voice, no wiring needed. Pair with a smart plug for lamps. Instant dimming and scheduling capability. Ensure bulb fits existing fixture shade.
- High-Quality Portable Lamps: Invest in versatile, well-designed floor and table lamps:
- Arc Floor Lamp: Provides ambient light over a sofa without taking up floor space beside it.
- Adjustable Task Lamp: For desks or bedside reading.
- Tripod Floor Lamp: Adds height and visual interest in corners.
- Choose lamps with fabric shades for diffusion and neutral colors (black, white, natural wood) for easy portability.
- Temporary Fixture Swaps (With Permission): With written landlord approval, swap out builder-grade fixtures. Photograph originals before removal. Store originals safely. Reinstall before moving out. Focus on high-impact, easy-swap locations: bathroom vanity lights, entryway flush mount. Choose fixtures with standard mounting brackets.
-
Room-by-Room Renter Strategy:
- Kitchen: Adhesive LED tape under cabinets. Plug-in pendant over island if ceiling hook exists. Small plug-in lamp on countertop for morning ambiance (use sparingly).
- Bathroom: Plug-in wall sconces flanking the mirror (mounted with removable adhesive strips). Critical: Ensure sconces are rated for damp locations if near sink. Use a high-CRI, 3000K bulb. Alternative: Adhesive-backed LED mirror light that plugs in.
- Bedroom: Plug-in wall sconces beside bed (eliminates nightstand clutter). Smart bulb in existing ceiling fixture for dimming. Under-bed LED strip (adhesive) for nightlight.
- Living Room: Layer with arc floor lamp (ambient), adjustable floor lamp for reading (task), and table lamps on consoles (accent/ambient). Smart bulbs in existing fixtures for control.
- Hallway/Stairs: Battery-operated motion-sensor LED puck lights on walls near stairs or dark corners. Plug-in wall sconce at hallway end if outlet exists.
-
Landlord Communication Protocol:
- Request Permission in Writing: “I’d like to install temporary, non-damaging lighting upgrades to improve safety and ambiance, such as adhesive-backed LED strips under kitchen cabinets and plug-in wall sconces. All original fixtures will be preserved and reinstalled upon move-out. May I proceed?” Attach photos of proposed products.
- Document Approval: Keep a copy of written approval with your lease documents.
- Professional Installation (If Needed): For solutions requiring minor modifications (e.g., adhesive strips needing small anchors), consider hiring a handyman and providing receipts to demonstrate care. However, prioritize truly non-invasive methods.
- Move-Out Plan: Photograph the space before installing upgrades and after removal. Schedule time to reinstall original fixtures and remove all traces of additions. Test adhesive removal techniques on a hidden spot first to ensure clean restoration.
These approaches demonstrate respect for the property while significantly enhancing daily living. Thoughtful communication and meticulous restoration build trust and preserve your security deposit.
Navigating Style Differences Within Households
When household members have differing lighting preferences, the framework becomes a tool for collaboration, not conflict. Focus on shared goals: safety, comfort, and supporting how each person uses the space.
-
Collaborative Process:
- Define Shared Non-Negotiables First: Agree on functional requirements everyone needs (e.g., “We both need shadow-free light for chopping vegetables,” “We need safe stair lighting at night”). These form the unchangeable foundation.
- Map Individual Ambiance Preferences: Discuss how each person uses the space and what feeling they seek. “I read in bed and need focused light without disturbing my partner.” “I want the living room to feel cozy for evening movies.” Document these specifically.
- Layer to Accommodate Both: Use independent controls to satisfy different needs simultaneously. In the bedroom: swing-arm sconces for individual reading light (3000K) with a dimmable 2700K ambient layer for shared relaxation. In the living room: dimmable ambient lights set low for movie nights, with adjustable task lamps for individuals who prefer brighter light for crafts or reading.
- Test Before Committing: Use the “test drive” simulation (Step 3) together. Tape paper to the ceiling, shine lights at different temperatures and intensities. Experience the options side-by-side. This moves discussion from abstract preference (“I like warm light”) to shared observation (“This 2700K light feels relaxing here, but we need brighter task light for the desk”).
- Compromise on Neutral Ground: For shared ambient layers, choose a middle-ground temperature (e.g., 2800K–3000K) that feels acceptable to all. Reserve personal preferences for individually controlled task or accent layers. Remember: dimming a 3000K light creates a warmer perception without changing the bulb.
-
Example Resolution:
Scenario: One partner prefers bright, cool light for kitchen task areas; the other finds it harsh and prefers warm light.
Solution: Install 3000K, CRI 90+ under-cabinet lighting (optimal for food prep accuracy) on a dedicated dimmer circuit. Install 2700K recessed ambient lights on a separate dimmer. During meal prep, task lights are bright for precision; during cleanup or casual use, ambient lights are dimmed low for warmth. Both needs are met through layering and control—not by choosing one temperature for the entire space.
This approach transforms potential conflict into collaborative problem-solving. Lighting becomes a shared language for understanding how each person experiences the home.
Your Questions, Answered
Q: How do I choose the right color temperature for a room that serves multiple purposes, like a living room that also has a home office nook?
A: Prioritize the room’s primary function for the ambient layer (2700K for living rooms). For the dedicated office nook, install a separate, adjustable task lamp at 3500K on its own switch or dimmer. This allows focused, alertness-supporting light for work without affecting the room’s overall warm ambiance. Layering with independent controls is key for multi-use spaces.
Q: Are dimmers really necessary for every light circuit? Isn’t that excessive?
A: Dimmers are among the most impactful lighting upgrades for adaptability and ambiance. They allow a single fixture to serve multiple purposes: bright for cleaning, medium for socializing, low for relaxation. While not every circuit requires one (e.g., a closet motion-sensor light), dimmers on ambient and task layers in living areas, bedrooms, and dining spaces provide immense daily value. Start with high-impact areas if budget is limited.
Q: What’s the most common lighting mistake homeowners make, and how can I avoid it?
A: Relying solely on a single central ceiling fixture. This creates harsh shadows, flat lighting, and an institutional feel. Avoid this by embracing layering: combine ambient (indirect or multiple sources), task (focused where activities occur), and accent (highlighting features) lighting. Even adding two well-placed floor lamps to a room with only an overhead light dramatically improves functionality and mood.
Q: How important is CRI really? Can I save money by choosing bulbs with CRI 80?
A: CRI significantly impacts how colors—and by extension, your space and yourself—appear. In task-critical areas (kitchens, bathrooms, art studios), CRI 90+ is strongly recommended. Low-CRI light (80s) makes food look less fresh, skin tones appear dull, and artwork lose vibrancy. In low-impact areas like garages or utility closets, CRI 80 may be acceptable. Prioritize CRI 90+ where visual accuracy and comfort matter most; it’s a worthwhile investment in daily experience.
Q: I live in an older home with outdated wiring. Are there safe lighting upgrades I can make without a full electrical overhaul?
A: Absolutely. Focus on solutions requiring minimal electrical work: high-quality plug-in lamps, plug-in pendant kits for existing ceiling hooks, adhesive-backed LED strips (under cabinets, inside closets), and smart bulbs paired with smart plugs. These provide significant improvements in function and ambiance without rewiring. For any hardwired changes, consult a licensed electrician to assess safety and options within your home’s constraints.
Q: How do I light a room with no overhead fixture, like a rental apartment?
A: Build layers entirely with portable and plug-in sources. Use an arc floor lamp or tall torchiere for ambient upward light. Add adjustable floor lamps or swing-arm wall sconces (plug-in style) for task lighting beside seating. Place table lamps on consoles or shelves for accent and additional ambient light. String lights with warm LEDs can add soft overhead ambiance when draped thoughtfully. The key is distributing light sources at varying heights to avoid dark corners.
Q: What lighting considerations support aging in place or accessibility needs?
A: Prioritize consistent, shadow-free illumination on all pathways and task surfaces. Increase ambient light levels slightly (within comfortable ranges), ensure step edges and transitions are clearly lit, and use motion-sensor night lights in hallways and bathrooms. Install rocker-style switches (easier to operate) and place controls at accessible heights. Task lighting should be bright, adjustable, and glare-free. Consult occupational therapy resources for personalized recommendations as needs evolve.
Q: Can outdoor lighting affect wildlife or contribute to light pollution? How can I be responsible?
A: Yes. Bright, unshielded outdoor lights disrupt nocturnal wildlife and contribute to skyglow. Practice responsible lighting: use fixtures with full cutoff shields directing light downward where needed; choose warm color temperatures (2700K); install motion sensors or timers to limit