Clarity over confusion: A systematic, climate-aware framework to select the right shade solution for your space, budget, and lifestyle—grounded in structural principles and real-world adaptability.
Selecting a shade structure involves far more than aesthetics. It requires understanding spatial constraints, climate pressures, material science, and long-term functionality. This guide delivers a structured decision pathway to match your unique outdoor needs with the most suitable solution—whether you seek dappled light for a garden path, full coverage for an entertainment zone, or flexible relief for a rental patio. No fluff, no sales language—just actionable insights synthesized from landscape architecture standards, building science, and regional adaptation patterns.
Introduction
Homeowners frequently encounter a familiar tension: inspiration from beautifully curated images clashes with practical uncertainty about what will genuinely work on their property. Will this structure withstand local weather extremes? Does the footprint align with setback requirements? Will maintenance demands outweigh enjoyment? These are not trivial concerns—they directly impact safety, longevity, and daily usability. This resource bridges that gap. Developed through analysis of structural patterns, material performance data across climate zones, and common decision pitfalls, the framework herein prioritizes your context over generic recommendations. We focus on transferable principles: how sun angles shift seasonally, why soil composition affects foundation design, how material choices interact with humidity or UV exposure. Whether you’re protecting delicate plantings, creating a multi-season gathering space, or seeking temporary relief on a tight budget, this guide provides the clarity to move forward with confidence.
The SITE Framework: Your Step-by-Step Path to the Perfect Shade Structure
Successful shade solutions consistently emerge from answering four foundational questions before selecting a structure type. The SITE Framework shifts focus from visual appeal alone to contextual alignment. It transforms vague desires (“I need shade”) into precise, actionable criteria. This systematic approach prevents the most frequent post-installation regrets: structural instability, inadequate coverage, permit complications, or premature deterioration.
Step 1: Assess Your Space (S)
Your property presents specific physical parameters that dictate viable options. Begin with objective measurement, not aspiration.
Map Critical Dimensions and Constraints
Use graph paper or a free floor-planning app. Document:
– Property lines and local setback requirements (typically 5–10 feet from boundaries; verify with municipal office)
– Existing immovable features: mature trees (note root zones within 3 feet of proposed footprint), utility lines (always call 811 before digging), hardscapes, grade changes
– Soil composition: perform a simple drainage test (dig 12″ hole, fill with water; time drainage). Sandy soil drains rapidly but offers poor stability; clay retains water and heaves in freeze-thaw cycles; loam provides ideal balance
– Microclimate observations: note wind corridors (stand in the space on a breezy day), moisture traps (low spots where water pools), and reflected heat sources (light-colored patios, pool surfaces)
Why this step is crucial: Structures placed without verifying setbacks or soil conditions frequently require costly relocation or reinforcement. A structure positioned where afternoon sun never penetrates slats (e.g., north-facing pergola in the Northern Hemisphere) fails its primary purpose.
Common mistakes to avoid:
– Assuming uniform sun exposure (dappled shade from a tree in June may vanish by August)
– Ignoring seasonal sun-angle shifts (winter sun sits lower; a structure blocking July glare may not shield December light)
– Overlooking utility easements or protected root zones
Space Assessment Checklist
☐ Verified exact dimensions and property setbacks
☐ Mapped hourly sun exposure over two representative days (note morning, midday, afternoon zones)
☐ Identified wind patterns, moisture-prone areas, and reflected heat sources
☐ Confirmed soil drainage characteristics at proposed site
☐ Checked for underground/overhead utilities and protected vegetation zones
This audit converts subjective needs into objective specifications: “80% shade coverage required over a 10×12 patio between 1–6 PM, with wind protection from the northwest.”
Step 2: Define Your Intention (I)
“Shade” serves diverse purposes. Clarity here determines structural requirements, material suitability, and design priorities.
Primary Function Analysis
– Human comfort: Dining for two vs. entertaining twelve? High-traffic zones demand durable, low-maintenance materials and level access.
– Plant protection: Shielding hostas requires diffused light; vegetable patches need adjustable coverage. Avoid structures that trap moisture against delicate foliage.
– Equipment preservation: Hot tubs require moisture-resistant materials; outdoor kitchens need non-flammable surfaces near heat sources and full rain protection.
– Spatial definition: Framing a view, marking a garden entrance, or extending architectural lines calls for aesthetic harmony over maximum coverage.
Functional nuance matters: A structure for “dining” could mean a lightweight umbrella for casual breakfasts, a 10×12 pergola with integrated lighting for weekend brunches, or a fully enclosed pavilion with electrical for holiday feasts. Each scenario demands different engineering.
Usage Pattern Considerations
– Frequency: Daily use warrants robust materials; occasional use allows for agile solutions (sails, umbrellas).
– Time of day: Evening-focused spaces prioritize ambient lighting integration over intense sun-blocking.
– Seasonality: Year-round use requires four-season materials (cedar, aluminum); summer-only allows budget vinyl or fabric solutions.
– User needs: Smooth edges and non-climbable features for toddlers; level thresholds and handrails for accessibility; non-toxic materials where pets frequent the space.
Aesthetic and Emotional Alignment
Consider the feeling the structure should evoke: tranquility (natural wood, flowing lines), entertainment energy (open sightlines, bold geometry), nostalgia (classic lattice), or modern minimalism (clean lines, hidden hardware). Mismatched aesthetics—like an ornate Victorian gazebo in a contemporary landscape—create visual dissonance that diminishes satisfaction.
Intention Clarification Worksheet
1. Top 3 functional needs (ranked): ____
2. Primary users and specific requirements: __
3. Peak usage time/day/season: ____
4. Desired emotional experience: _____
5. Non-negotiable features (e.g., “must accommodate hanging chair”): _______
Defining intention filters irrelevant options and focuses evaluation on structures that solve your specific challenges.
Step 3: Calculate Your Investment (T)
Budget planning requires examining three layers: initial outlay, lifetime maintenance, and hidden costs. Upfront price alone is a misleading metric.
Typical Cost Ranges by Structure Type
Note: Costs vary significantly by region, size, site complexity, and material choices. Ranges reflect standard residential installations (approx. 10×12 ft) including materials and professional installation where noted. Always obtain multiple localized quotes.
| Structure Type | Budget Tier Range | Mid-Range Range | Premium Range | Key Variables |
|---|---|---|---|---|
| Shade Sail | $300–$1,500 | $1,500–$2,500 | $2,500–$4,000+ | Fabric grade, anchor complexity, custom cuts |
| Umbrella/Awning | $200–$800 (unit) | $800–$2,500 | $2,500–$6,000+ | Frame material, fabric quality, automation |
| Arbor | $500–$1,800 | $1,800–$4,000 | $4,000–$8,000 | Material, size, decorative elements |
| Pergola (Basic) | $2,500–$6,000 | $6,000–$12,000 | $12,000–$20,000+ | Wood species, span complexity, site prep |
| Pergola (Louvered) | $8,000–$15,000 | $15,000–$25,000 | $25,000–$35,000+ | Material, motorization, engineering |
| Gazebo | $5,000–$10,000 | $10,000–$18,000 | $18,000–$30,000+ | Size, roof complexity, wall options |
| Pavilion/Ramada | $7,000–$13,000 | $13,000–$22,000 | $22,000–$38,000+ | Roof material, post sizing, engineering |
Critical perspective: The lowest initial cost often yields the highest long-term expense. A budget vinyl pergola kit ($1,500) may warp or fade within 3–5 years in high-UV climates, requiring full replacement. A properly maintained cedar pergola ($8,000) can deliver 20+ years of service. Calculate cost per year of expected service for meaningful comparison.
Frequently Overlooked Costs
– Site preparation: Grading uneven terrain ($500–$3,000), rocky soil excavation ($300–$1,500), drainage solutions ($200–$1,200)
– Foundation work: Concrete piers below frost line are non-negotiable for permanent structures; costs scale with soil difficulty
– Permits and engineering: $100–$800+ for permits; engineering stamps often required for structures over 100–200 sq ft or in high-wind/snow zones
– Utilities integration: Electrical conduits ($800–$2,500), lighting, ceiling fans, or gas lines add significant cost but greatly enhance usability
– Maintenance budget: Annual sealing for wood ($50–$150), fabric replacement for sails/awnings ($200–$600 every 5–10 years), rust inhibitors for metal
– Contingency buffer: Allocate 10–15% of total budget for unforeseen site conditions or material delays
Strategic Budget Tiers
– Budget-Conscious Path ($1,000–$5,000): Prioritize high-impact, low-complexity solutions. A custom-cut shade sail provides immediate 70% shade coverage. A pre-fab arbor defines an entryway. Focus on UV-resistant materials and secure anchoring.
– Value-Optimized Path ($5,000–$15,000): Ideal for permanent structures. A 10×12 cedar pergola offers decades of service with moderate upkeep. A small open-sided pavilion maximizes airflow and views. Prioritize proper footings, quality wood species (cedar, redwood), and pre-wired conduits for future lighting.
– Premium Investment Path ($15,000+): For legacy structures or complex needs. Louvered aluminum systems offer adjustable sun/rain protection. Custom gazebos with integrated utilities become true outdoor rooms. Prioritize engineering review, architectural detailing, and multi-season usability features.
Transparent investment planning transforms budget constraints into empowered, sustainable decisions.
Step 4: Evaluate Your Environment (E)
Climate and site conditions are non-negotiable factors in material selection and structural design. A solution thriving in one region may fail rapidly in another.
Climate Zone Considerations
Identify your USDA Hardiness Zone and regional climate patterns (coastal, arid, humid subtropical, etc.). Then assess:
– Sun Intensity (UV Exposure):
– High UV (Southwest, Florida): Prioritize UV-stabilized materials: powder-coated aluminum, marine-grade stainless steel, cedar/redwood with UV-inhibiting sealants. Avoid dark colors on solid roofs (heat absorption).
– Moderate UV (Midwest, Mid-Atlantic): Pressure-treated pine is viable with rigorous sealing. Fabrics require mildew-resistant coatings.
– Low UV, High Moisture (Pacific Northwest): Focus on rot resistance: cedar, redwood, cellular PVC, or aluminum. Ensure excellent drainage around posts.
– Precipitation Patterns:
– Heavy Rain/Snow: Solid roofs require adequate pitch (minimum 1/4″ per foot slope) and snow load ratings per local code (often 20–50+ lbs/sq ft). Avoid flat roofs in snowy zones. Louvered systems must have reliable “rain mode” closure.
– High Humidity (Southeast, Gulf Coast): Accelerates mold, mildew, and corrosion. Choose naturally rot-resistant woods or non-organic materials. Ensure cross-ventilation—avoid fully enclosed structures without vents.
– Arid/Dry (Desert Southwest): Wood dries and cracks; requires frequent sealing. Metal expands/contracts significantly—design must incorporate thermal breaks. Light-colored roofs reflect heat.
– Wind Exposure:
– Coastal/Hurricane Zones: Structures need hurricane straps, deeper footings (4+ feet), and wind-permeable designs (open pergolas often outperform solid-roof gazebos). Fabrics must be marine-grade solution-dyed acrylic.
– Plains/Mountain Passes: Gusts funnel unpredictably. Opt for slatted designs or tensioned sails with reinforced corners. Avoid large solid surfaces.
– Urban Canyons: Wind accelerates between buildings. Consult a professional for structures over 8 feet tall.
Soil and Site Adaptation
– Slope Management:
– <5% slope: Standard footings with minor grading.
– 5–15% slope: Stepped footings or integration with retaining walls (consult landscape professional).
– >15% slope: Strongly consider alternative solutions (shade sails anchored to existing structures) or significant earthwork.
– Vegetation Impact:
– Avoid digging within the drip line of mature trees (root damage destabilizes soil and harms the tree).
– Design roofs to shed falling debris (acorns, pinecones); avoid flat surfaces under heavy-debris trees.
– In termite-prone regions, prioritize non-organic materials (aluminum, PVC) or pressure-treated wood rated for ground contact (UC4B).
Environmental Adaptation Checklist
☐ Verified local snow/wind load requirements with building department
☐ Tested soil drainage at proposed site location
☐ Assessed seasonal sun path variations (winter vs. summer angles)
☐ Identified microclimate challenges (reflected heat, wind tunnels, moisture traps)
☐ Selected materials rated for local UV/moisture exposure
☐ Planned positive drainage around foundation (slope ground away 2%)
The Fundamental Principle: The most successful shade structures harmonize with the property’s existing features, serve defined functional needs without compromise, and demonstrate resilience against local environmental pressures for decades—not just seasons. Ignoring these realities transforms an investment into a recurring maintenance burden or safety concern.
Deep Dive: Shade Structure Types Compared
With your SITE profile defined, evaluate these nine primary options. Each excels in specific contexts. Focus on alignment with your constraints and intentions, not universal “best” claims.
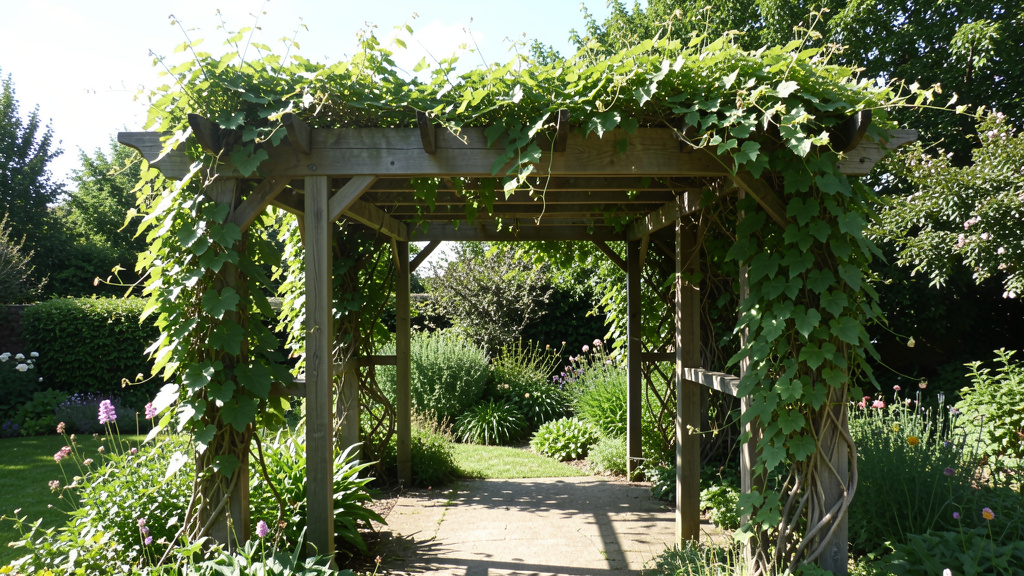
Pergolas: The Versatile Backbone of Outdoor Living
What It Is: An open-framed structure with vertical posts supporting crossbeams and open slats (rafters). Traditionally rectangular; modern variations include curved beams or offset grids. Key distinction: Open roof provides dappled shade and sky visibility, not full coverage. Ideal where partial sun is acceptable or desired.
Best For: Defining outdoor rooms (dining areas, seating zones), supporting climbing plants (wisteria, grapes, clematis), creating visual rhythm in large yards, attaching to homes as architectural extensions. Particularly suitable for climates with moderate sun intensity or where full enclosure isn’t needed year-round.
Material Considerations:
– Western Red Cedar: Naturally resistant to rot, insects, and decay due to protective oils. Weathers gracefully to silvery-gray. Requires sealing every 2–3 years in high-UV zones if color retention is desired. Excellent in humid climates.
– Pressure-Treated Pine (PTP): Budget-friendly when rated for “ground contact” (UC4B). Contains moisture when installed; allow 6–8 weeks to dry before sealing to prevent peeling. Less suitable for arid climates where rapid drying causes cracking.
– Aluminum: Powder-coated for color retention. Zero maintenance, rust-proof, lightweight. Ideal for coastal areas (salt-air resistant). Cannot support heavy climbing plants without reinforcement; lacks the organic warmth of wood.
– Cellular PVC: Impervious to moisture, insects, and UV degradation. Won’t warp or crack. Requires stainless steel fasteners to prevent “creep” (slow deformation under load). Best where wood maintenance is impractical.
Installation & Maintenance Realities:
– Complexity: Moderate. DIY feasible for skilled homeowners on level ground with pre-cut kits. Critical pitfalls: posts not plumb, footings not below frost line, under-engineered beam connections. Professional installation recommended for slopes, large spans (>12 ft between posts), or house attachment.
– Maintenance: Wood requires annual cleaning (oxygen bleach solution) and resealing every 2–3 years. Aluminum/PVC need only occasional rinsing. With climbing plants, prune aggressively each winter; train vines on removable wires—not directly on wood—to prevent moisture trapping and beam damage.
– Climate Adaptations: Add retractable canopy or shade cloth for adjustable coverage in high-sun zones. Space slats 4–6 inches apart in windy areas to reduce sail effect. Angle rafters slightly in snow-prone regions for shedding.
Pergolas excel as adaptable architectural skeletons—defining space without enclosure, inviting integration with nature, and offering significant customization potential.
Gazebos: The Enclosed Oasis
What It Is: A freestanding structure with a solid roof, partial or full walls, and often a dedicated floor. Typically octagonal or hexagonal, though square designs are increasingly common. Key distinction: Enclosure creates a distinct outdoor “room” offering privacy, weather protection, and acoustic buffering.
Best For: Creating private retreats (reading nooks, meditation spaces), sheltering hot tubs or seating groups from wind/rain, serving as focal points in large landscapes, enhancing privacy on properties with close neighbors. Ideal for regions with variable weather where rain or wind protection adds significant value.
Critical Design Elements:
– Roof Style: Hip roofs (sloping on all sides) offer superior wind resistance. Pyramid roofs shed snow effectively with adequate pitch (>30 degrees). Gable roofs provide traditional aesthetics but require careful bracing against crosswinds.
– Ventilation: Ridge vents or cupolas are essential in humid climates to release trapped heat and moisture—omission accelerates interior deterioration.
– Walls: Range from open lattice (maximizing airflow) to solid panels (maximizing privacy/weather block). Screened sections provide bug protection without sacrificing views.
– Flooring: Elevated floors (6–8 inches above grade) with gaps between boards prevent moisture wicking and allow drainage. Skirting promotes airflow underneath.
Material Considerations:
– Cedar/Redwood: Premium choice for aesthetics and natural durability. Requires sealing every 1–2 years on exposed surfaces. Redwood offers slightly better density for humid zones.
– Vinyl (PVC): Low maintenance; won’t rot, fade significantly, or require painting. Can become brittle in extreme cold (<20°F); avoid in hail-prone areas. Requires precise installation gaps to accommodate thermal expansion.
– Aluminum: Lightweight, rust-proof, ideal for coastal installations. Powder coating can mimic wood grain. Dark colors conduct noticeable heat in direct sun.
– Composite: Emerging option. Verify manufacturer’s span ratings for roof support; some composites may sag over time under heavy loads.
Installation & Climate Adaptations:
– Foundation: Concrete piers below frost line with post anchors are mandatory. Never set posts directly in soil.
– Permits: Almost always required due to size, enclosure, and solid roof. Engineering stamps frequently mandated.
– Snow Loads: Roof pitch must exceed local code minimums (often 4:12 slope). Avoid complex roof shapes with valleys that trap snow.
– Humidity Management: Install louvered vents near roof peak plus screened openings at base for cross-ventilation. Use marine-grade plywood for subfloors in damp climates.
– Hot Climates: Light-colored roofs reflect heat. Orient solid walls away from western sun exposure; use lattice on west side for airflow.
Gazebos deliver unmatched enclosure and charm but demand rigorous attention to engineering, ventilation, and climate-specific detailing for long-term success.
Arbors and Trellises: The Graceful Pathway Guides
What They Are:
– Arbor: A freestanding gateway structure (typically 7–9 ft tall) with an arched or flat top, designed to be walked through.
– Trellis: A flat, wall-mounted or freestanding lattice panel for vertical plant growth. Often used in multiples.
Key distinction: Arbors define transitions (garden entrances, path endpoints); trellises maximize vertical space on boundaries. Both prioritize plant integration over human occupancy.
Best For: Marking garden entrances, supporting climbing roses or clematis, softening fences or walls, creating “living walls” for privacy, adding vertical interest in compact spaces. Ideal for gardeners, cottage-style landscapes, or properties needing subtle spatial zoning.
Material Considerations:
– Cedar: Top choice for longevity where vines trap moisture. Use 4×4 posts (not 2×4) for arbors—mature vines add significant weight.
– Redwood: Superior performance in consistently wet climates. Higher initial cost offset by extended service life.
– Wrought Iron: Classic elegance. Requires high-quality powder coating for rust resistance. Leave a 2-inch gap between metal and vines to prevent heat damage to plant tendrils in sunny climates.
– Vinyl: Zero maintenance; won’t stain from plant sap. Best for lightweight climbers (sweet peas, morning glories); avoid heavy vine loads.
– Bamboo: Sustainable, rustic option. Must be specifically treated for outdoor use. Shorter lifespan (5–8 years) but affordable to replace.
Plant Partnership Guide:
| Plant Type | Recommended Structure | Critical Consideration |
|———————|—————————-|———————————————————|
| Wisteria | Heavy-duty arbor (4×4 cedar with internal steel cable reinforcement) | Extremely heavy when mature; requires aggressive bi-annual pruning |
| Climbing Roses | Cedar arbor/trellis | Train canes horizontally on wires for maximum blooms; avoid metal in hot climates |
| Clematis | Light trellis (vinyl/bamboo)| Needs “cool feet”—plant low-growing perennials at base to shade roots |
| Grapes | Sturdy arbor with overhead wires | Requires strong support for fruit weight; prune to 4–6 canes yearly |
| Ivy (Hedera) | Masonry wall trellis with standoff brackets | Never allow ivy to touch wood directly—it traps moisture and accelerates rot |
Installation & Maintenance:
– Arbors: Require concrete footings (18–24″ deep). Set posts before attaching crossbeams for easier plumb adjustment.
– Trellises: Wall-mounted versions must anchor into structural studs (not just siding). Freestanding versions need ground stakes or small footings.
– Annual Care: Late winter is ideal for pruning vines—remove dead wood, thin crowded growth, retrain wayward stems. Inspect structure for vine-induced damage: soft spots in wood, rust at contact points on metal, stress cracks in vinyl.
– Climate Adaptations: Wider lattice spacing (3–4″) improves airflow in humid zones. In arid regions, install drip irrigation at vine bases. In cold zones, protect arbor posts with gravel beds to reduce frost heave impact.
Arbors and trellises offer exceptional aesthetic and functional value with minimal footprint. Their success hinges on thoughtful pairing with appropriate plant species and proactive vine management.
Pavilions and Ramadas: The Uncompromising Shelter
What They Are:
– Pavilion: A large, open-sided structure with a solid roof supported by posts. No walls, no dedicated floor (typically sits over existing patio). Rectangular or square.
– Ramada: A term (common in Southwestern U.S.) for a pavilion emphasizing a completely solid, non-permeable roof for maximum sun and rain blockage.
Key distinction: Pavilions prioritize airflow and unobstructed views; ramadas prioritize absolute weather protection. Both provide superior coverage compared to open-roof structures.
Best For: Covering entire patios or decks, sheltering outdoor kitchens or dining sets, properties with intense western sun exposure, climates where “shade” means complete relief from elements. Ideal when compromise on coverage is not acceptable.
Roof Material Science:
– Standing Seam Metal: Premium choice. Interlocking panels shed rain/snow effortlessly. Reflective coatings reduce heat gain. Lifespan: 40–70 years. Requires concealed fasteners to prevent leaks and accommodate thermal expansion.
– Asphalt Shingles: Budget-friendly if matching house roof. Requires solid sheathing (plywood) underneath. Adds significant weight—verify post/beam sizing can handle load. Avoid in high-wind zones.
– Cedar Shakes: Rustic charm with natural insulating properties. Requires fire-retardant treatment in wildfire-prone areas. Needs proper ventilation underneath to prevent moisture trapping.
– Polycarbonate Panels: Lightweight, translucent (providing diffused light), impact-resistant. Choose UV-protected grade to minimize yellowing. Scratches more easily than metal.
Structural Engineering Essentials:
– Post Sizing: Minimum 6×6 posts for structures larger than 12×12 ft. 4×4 posts may flex under wind load on large roofs.
– Beam Span Limits:
– 2×8 beam: Max span 8 ft between posts
– 2×10 beam: Max span 10 ft
– 2×12 beam: Max span 12 ft
Exceeding these risks sagging. For larger spans, laminated veneer lumber (LVL) beams are often necessary.
– Roof Pitch: Minimum 1/4″ per foot slope for drainage. In snow zones, 4:12 pitch (4″ rise per 12″ run) is safer.
– Wind Bracing: Diagonal knee braces between posts and beams are essential in windy areas. Hurricane ties at every rafter connection prevent uplift.
Climate-Specific Adaptations:
– Snow Country: Roof pitch >4:12; structural bracing per local snow load codes; avoid complex roof shapes with valleys; install snow guards near edges.
– Desert Heat: Light-colored metal roof with reflective coating; rough-in ceiling fan during build; open lattice skirting (not solid walls) for airflow.
– Humid/Tropical: Metal roof with ridge ventilation; elevate structure slightly for airflow underneath; use stainless steel fasteners (grade 316).
– Coastal: Aluminum posts (powder-coated); marine-grade stainless steel hardware; avoid wood within 2 ft of ground level.
Pavilions and ramadas are engineered workhorses—transformative for outdoor living where maximum, reliable coverage is the priority. Their scale demands professional installation and permit compliance for safety and longevity.
Shade Sails, Umbrellas, and Awnings: The Agile Solutions
What They Are:
– Shade Sail: Tensioned fabric membrane anchored to posts, walls, or trees. Geometric shapes (triangles, squares).
– Market Umbrella: Freestanding canopy on a central pole. Tilting or cantilevered options available.
– Awning: Fabric or metal covering attached directly to a building facade. Retractable or fixed.
Key distinction: These offer temporary or semi-permanent solutions with maximum flexibility and minimal site impact. Ideal for renters, tight budgets, testing locations, or supplementing permanent structures.
Shade Sail Essentials
Best For: Irregularly shaped patios, pool decks, temporary event spaces, testing shade locations before permanent builds.
Material Science:
– Marine-Grade Polyester (e.g., solution-dyed acrylic): Industry standard. UV-resistant, mildew-resistant, blocks 90–98% UV. Lifespan: 8–15 years.
– HDPE (High-Density Polyethylene): Budget mesh option. Allows airflow, blocks 70–90% UV. Lifespan: 5–10 years. Stretches over time; requires robust tensioning system.
Critical Installation Factors:
– Anchor Points: Must withstand 300–500+ lbs of tension. Concrete footings essential for freestanding posts. Wall anchors require hitting structural studs with high-shear-rated hardware.
– Slope is Mandatory: Install with 15–30 degree slope for water runoff. Flat sails pool water and collapse.
– Hardware: Use marine-grade stainless steel (316 grade) turnbuckles and D-rings. Galvanized steel rusts quickly in moisture.
Climate Adaptations:
– Wind: Choose mesh fabric (HDPE) in windy zones—solid fabrics act as sails. Install with quick-release clips for storm removal.
– Rain: Only effective with slope >20 degrees. Even “waterproof” fabrics may leak at seams under heavy rain.
– Snow: Remove before first snowfall. Fabric cannot support snow load.
Pro Tip: Install three smaller sails instead of one large one. Creates dynamic shade patterns, reduces wind load per sail, and allows zoned coverage.
Umbrella Selection Guide
Best For: Small patios, poolside lounging, cafe-style seating, renters needing portability.
Critical Factors:
– Base Weight: Minimum 50 lbs for a 9-ft umbrella. Cantilevers require 75–100+ lbs. Underweight bases risk tipping in wind.
– Fabric: Solution-dyed acrylic only. Standard polyester fades and mildews rapidly.
– Ventilation: “Vented canopy” design allows wind to pass through, significantly reducing flip risk.
– Operation: Pulley systems generally outlast crank mechanisms. For frequent use, prioritize easy-tilt functionality.
Maintenance: Store indoors during storms and winter months. Clean fabric annually with mild soap. Lubricate tilt mechanisms seasonally.
Integration Tip: Place umbrella base inside a planter box filled with gravel. Conceals weight, adds stability, and blends with landscaping.
Awning Considerations
Best For: Reducing indoor cooling costs (shading windows), covering attached patios, historic districts where permanent structures face restrictions.
Types:
– Fixed Fabric: Simple, affordable. Requires seasonal removal in snow/wind zones.
– Retractable Manual: Crank-operated. Use when needed, retract in adverse weather.
– Retractable Motorized: Remote/app control. Wind/rain sensors enable automatic retraction.
– Metal (Aluminum): Permanent, low-maintenance. Excellent for commercial aesthetics.
Installation Imperatives:
– Wall Integrity: Must attach to structural framing (studs), not just siding. Weak attachment risks catastrophic failure.
– Pitch: Minimum 15 degrees slope away from the house to prevent water pooling and wall damage.
– Placement: Install above the window header (not at header level) to create a deeper shade pocket and protect the window frame.
Climate Adaptations:
– Snow: Retractable only. Fixed awnings cannot support snow load.
– High Wind: Motorized with wind sensors is strongly recommended.
– Intense Sun: Light colors with UV-blocking coatings reflect heat most effectively.
These agile solutions prove that effective shade doesn’t require permanence. They offer strategic, adaptable relief—perfect for evolving needs, constrained circumstances, or phased outdoor living development.
Critical Decision Factors Beyond Structure Type
Your SITE profile guides structure selection, but these cross-cutting factors determine project success.
Navigating Permits and Building Codes: Your Legal Safety Net
Building regulations exist to ensure structural safety and property compliance—not to hinder projects. Ignoring permits risks fines, forced demolition, insurance complications, or obstacles during future property sales. Approach this proactively.
When Permits Are Typically Required:
– Structures with solid roofs (gazebos, pavilions, ramadas)
– Structures exceeding local size thresholds (often 100–200 sq ft; varies significantly by municipality)
– Structures attached to your home (ledger board connections)
– Structures incorporating electrical, plumbing, or gas utilities
– Properties in floodplains, coastal zones, wildfire-prone areas, or historic districts
When Permits Might Be Waived (Verify Locally!):
– Open pergolas under local size limits with no roof covering
– Freestanding arbors under height restrictions (often 8 ft)
– Shade sails under size limits with temporary anchors
– Critical: “Might” means contact your local building department directly. Do not rely on neighbor anecdotes or online forums. Regulations vary block-by-block.
The Permit Process Simplified:
1. Pre-Application Inquiry: Many departments offer free brief consultations. Bring preliminary sketches. Ask specifically: “What is required for a [structure type] of [dimensions] on my property?”
2. Required Documentation: Typically includes site plan (showing setbacks), structural details (post size, beam spans, footing depth), and engineering stamps for larger/complex structures. Kit suppliers often provide wind/snow load certifications.
3. Timeline: Review periods range from 2–6 weeks. Begin this process early—do not order materials until approval is secured.
4. Inspections: Usually required at key stages: footing inspection (before concrete pour), framing inspection (after structure is up, before roofing), and final inspection.
5. Cost: Typically $100–$500. This fee provides documented compliance, adding verifiable value to your property.
When to Seek Professional Guidance:
– Properties in historic districts (design review boards have strict aesthetic guidelines)
– Sites near protected wetlands, tree preservation zones, or steep slopes
– Local codes requiring geotechnical soil reports
– Projects mandating engineered drawings (do not attempt structural calculations without credentials)
Proactive permit compliance transforms potential anxiety into documented assurance. It verifies your structure is safe, legal, and a legitimate asset to your property.
DIY vs. Professional Installation: An Objective Assessment
The decision hinges on project complexity, your skill set, risk tolerance, and true cost of time.
DIY Installation: When It’s Viable
Ideal Projects:
– Shade sails under 150 sq ft with existing verified anchor points
– Pre-fabricated arbors or small pergola kits (<10×10 ft) on level, stable ground
– Freestanding umbrellas or retractable awnings (after confirming wall stud locations)
Required Competencies:
– Proficiency with post-hole diggers, levels, drills, and concrete work
– Understanding of “plumb, level, square” principles
– Ability to interpret basic plans and follow technical instructions precisely
Realistic Time Investment:
– Research and planning: 10–20 hours
– Material sourcing and site prep: 5–15 hours
– Actual construction: 20–40+ hours (often spanning multiple weekends)
– Contingency for corrections: Highly variable
Financial Consideration:
– Potential savings: 30–50% on labor costs
– Risk factors: Costly errors (misaligned posts, improper footings), voided material warranties, personal injury liability
Self-Assessment Questions:
☐ Do I own or have reliable access to necessary tools (post-hole digger, laser level, concrete mixer)?
☐ Have I successfully completed projects of similar structural complexity?
☐ Can I dedicate uninterrupted time without rushing critical steps?
☐ Am I comfortable making structural decisions (beam spans, footing depth) based on provided guidelines?
☐ What is the opportunity cost of my time? (If valued at $40/hour, 30 hours = $1,200)
Professional Installation: When It’s Strongly Recommended
Required For:
– Structures with solid roofs (gazebos, pavilions, ramadas)
– Structures attached to your home
– Projects requiring permits or engineered drawings
– Sloped sites, rocky soil, or complex custom designs
– Integration of utilities (electrical, gas, plumbing)
Value Beyond Labor:
– Expertise: Professionals anticipate site-specific challenges (drainage, wind load, soil conditions).
– Efficiency: Completion in days versus weeks, minimizing yard disruption.
– Warranty: Reputable contractors provide written warranties on workmanship (typically 1–5 years).
– Liability Coverage: Their insurance covers worksite injuries—not your homeowner’s policy.
– Code Navigation: They manage permit applications and inspection scheduling.
Selecting a Qualified Contractor:
– Verify Credentials: Check state licensing board for active status and violation history.
– Confirm Insurance: Request certificates for general liability ($1M+ minimum) and workers’ compensation.
– Review Relevant Portfolio: Ask for 3–5 completed projects similar to yours (same structure type, climate considerations).
– Contact References: Ask past clients about communication, timeline adherence, and issue resolution.
– Scrutinize the Contract: Must include detailed scope, payment schedule (never >30% upfront), timeline, warranty terms, and permit responsibility clause.
Cost Context: Labor typically represents 40–60% of total project cost. Higher quotes often reflect proper insurance, experienced crews, and quality assurance—not unnecessary markups. Obtain 3 detailed bids; the lowest price frequently indicates omitted scope or uninsured labor.
Hybrid Approach: A Practical Compromise
– You handle: Site clearing, leveling, material delivery coordination, post-installation cleanup
– Professional handles: Foundation work, structural framing, roofing, final assembly, permit coordination
– Potential savings: 15–25% versus full professional installation
– Risk reduction: Minimizes your exposure to critical structural decisions while leveraging your time for preparatory tasks
– Ideal for: Handy homeowners with time availability but limited structural engineering experience
When structural integrity, safety, or compliance is uncertain, professional installation is a prudent investment in long-term satisfaction and property value.
Material Longevity Science: Understanding Performance Drivers
Material choice profoundly impacts aesthetics, maintenance demands, lifespan, and environmental footprint. Decisions should align with local climate pressures and personal maintenance capacity.
Wood Species Performance Guide
| Species | Natural Rot Resistance | Best Climate Fit | Maintenance Needs | Key Consideration |
|———————|————————|———————–|————————|—————————————|
| Western Red Cedar | Excellent (Class 1) | All zones, especially humid | Seal every 2–3 years | Oils provide natural insect resistance; weathers gracefully to silver |
| Redwood | Excellent (Class 1) | Coastal, humid zones | Seal every 2–3 years | Denser than cedar; superior in consistently damp environments |
| Cypress | Very Good (Class 2) | Southeastern U.S. | Seal every 2 years | Contains “cypressene” oil for decay resistance |
| White Oak | Good (Class 3) | Temperate zones | Seal annually | Dense grain resists moisture absorption |
| Pressure-Treated Pine | Good when treated | All zones (with caveats) | Seal after drying (6–8 wks); every 1–2 yrs | Verify UC4B rating for ground contact; requires corrosion-resistant fasteners (hot-dipped galvanized or stainless steel) |
Rot Resistance Context: Based on heartwood durability classifications (Society of Wood Science):
– Class 1 (Excellent): 25+ years in ground contact (cedar, redwood)
– Class 2 (Very Good): 15–25 years (cypress)
– Class 3 (Good): 10–15 years (white oak)
– Class 4 (Poor): <10 years (untreated pine, spruce—only suitable if pressure-treated to UC4B for ground contact)
Non-Wood Material Comparison
| Material | Typical Lifespan | Maintenance | Climate Considerations | Sustainability Note |
|———————|——————|————-|—————————–|———————————–|
| Aluminum | 30–50+ years | Rinse yearly | Conducts heat (dark colors); ideal for coastal (salt-resistant) | Highly recyclable; high embodied energy |
| Cellular PVC | 25–40+ years | Rinse yearly | Expands in heat; requires installation gaps | Non-biodegradable; low maintenance reduces long-term impact |
| Composite | 20–30 years | Clean yearly | Potential for sagging over long spans; verify manufacturer span ratings | Often contains recycled content |
| Wrought Iron | 50+ years | Touch-up paint as needed | Rust risk if coating chips; avoid constant moisture exposure | Durable but energy-intensive to produce |
| Bamboo | 5–10 years | Seal yearly | Rot-prone in wet climates; best for dry zones or temporary use | Rapidly renewable resource |
Sealer and Stain Selection
– Clear Sealers: Preserve natural wood grain. Require reapplication every 1–2 years. Best for high-quality woods like cedar where grain is valued.
– Semi-Transparent Stains: Add subtle color while showing grain. Offer better UV protection than clear sealers. Reapply every 2–3 years.
– Solid Color Stains: Hide wood grain. Provide maximum UV and moisture protection. Last 3–5 years. Ideal for pressure-treated pine.
Application Best Practices:
1. Clean wood thoroughly with oxygen bleach (avoid chlorine bleach—it damages fibers).
2. Allow wood to dry completely (48+ hours).
3. Apply on a cool, cloudy day to prevent premature drying.
4. Seal all surfaces of boards—including ends—before assembly. End grains absorb moisture most rapidly.
5. Reapply when water no longer beads on the surface (sprinkle test).
Sustainability Considerations
– FSC-Certified Wood: Indicates responsible forest management. Worth seeking for cedar, redwood, or other harvested woods.
– Reclaimed Wood: Offers unique character. Verify structural integrity and absence of hazardous treatments (lead paint, old pesticides).
– Local Sourcing: Reduces transportation emissions. Inquire with local sawmills about regionally appropriate species.
– End-of-Life Planning: Wood is biodegradable; aluminum and steel are highly recyclable; PVC requires specialized recycling streams.
Material selection is a balance of performance science, aesthetic preference, maintenance willingness, and environmental values. Understanding the “why” behind material behavior enables confident, lasting choices.
Budget Allocation Strategy: Maximizing Value at Every Tier
Strategic fund distribution matters more than total budget size. Prioritizing structural integrity prevents costly failures.
The 60/30/10 Allocation Principle for Permanent Structures
– 60%: Core Structure (posts, beams, roof framing, foundation)
Rationale: This is the skeleton. Compromising post size, footing depth, or beam spans risks safety, stability, and longevity. Never reduce here.
– 30%: Roofing and Critical Components (roof material, structural hardware, anchors)
Rationale: The roof bears direct weather impact. Quality hardware (hurricane ties, post anchors) prevents catastrophic failure.
– 10%: Aesthetics and Enhancements (decorative brackets, lighting, paint)
Rationale: These elevate enjoyment but don’t compromise core function. Can be added incrementally post-installation.
Tiered Implementation Tactics
– Under $3,000:
– Focus on high-impact agile solutions (quality shade sail, cantilever umbrella).
– Allocate 80% of budget to material quality (e.g., solution-dyed acrylic fabric vs. basic polyester).
– DIY installation to maximize material investment.
– Avoid: Extremely cheap pergola kits with undersized posts—they frequently fail within 1–2 years.
– $3,000–$10,000:
– Prioritize core structure integrity (proper footings, correct post sizing).
– Choose one strategic “splurge” (cedar over pressure-treated pine, metal roof over asphalt shingles).
– Phase enhancements: Install structure first, add lighting or fans later.
– Avoid: Over-customization on first build; stick to proven, efficient designs.
– $10,000+:
– Invest in professional engineering review for large or custom structures.
– Budget explicitly for site preparation (grading, drainage) often overlooked in quotes.
– Include a dedicated maintenance fund (sealer, inspections) in initial planning.
– Avoid: “Feature creep”—adding non-essential elements that inflate cost without proportional functional gain.
Cost-Saving Without Compromising Safety
– Material Sourcing:
– Inquire about “culls” or “seconds” at lumberyards (cosmetically imperfect but structurally sound wood).
– Purchase standard-length materials to minimize waste from custom cuts.
– Explore local sawmills for regionally sourced species, often more affordable than big-box retailers.
– Labor Strategy:
– Handle site preparation (clearing, leveling) and cleanup yourself.
– Coordinate material delivery to minimize contractor wait time.
– Apply final stain/paint yourself after professional structural installation.
– Design Efficiency:
– Choose rectangular designs over octagonal (simpler framing = lower labor costs).
– Select standard dimensions (10×12, 12×16) that optimize material usage.
– Limit intricate decorative elements on initial build; add later if desired.
The True Cost of Shortcuts
| Compromise | Apparent Savings | Long-Term Consequence | Real Impact |
|———————|——————|————————————-|———————————|
| Skipping concrete footings | $300–$600 | Structure shifts/sags within 1–2 years; potential rebuild | 300–500% higher total cost |
| Using undersized posts | $150–$300 | Excessive flexing in wind; premature structural failure | Complete replacement required |
| Cheap, non-corrosion-resistant fasteners | $50 | Rust, corrosion, compromised connections | Repair costs + collateral damage |
| Proceeding without required permits | $100–$300 (fee) | Fines, forced demolition, complications during property sale | $5,000+ in remediation costs |
Wise budgeting focuses spending where it delivers safety, longevity, and peace of mind. Every dollar invested in foundational integrity yields compounded returns over the structure’s lifespan.
Avoiding Common Pitfalls: Pattern-Based Insights
Understanding frequent challenges enables proactive prevention. These insights derive from documented project patterns, not isolated anecdotes.
Foundation Integrity: The Non-Negotiable Base
Structures set directly into soil-filled holes—without concrete footings below the local frost line—frequently develop instability within 1–2 years. Freeze-thaw cycles heave posts unevenly; soil moisture wicks into wood bases, accelerating rot; lateral wind loads lack resistance.
Prevention Protocol:
1. Confirm local frost depth requirement with your building department (ranges from 12″ in mild zones to 48″+ in cold climates).
2. Dig holes 6″ wider than required pier diameter.
3. Pour concrete to grade level; insert galvanized post anchors while concrete is wet.
4. Use standoff brackets to ensure wood never contacts soil or concrete directly.
5. For existing structures showing lean: Helical piers can stabilize posts (consult a foundation specialist; costs vary by site).
Structural engineering principles consistently emphasize that foundation quality is the single greatest predictor of long-term stability. Investing time and resources here is non-negotiable for permanent structures.
House Attachment: Managing Moisture Intrusion
Attaching a structure directly to house siding without proper flashing creates a pathway for water intrusion. Moisture trapped behind ledger boards leads to sheathing rot, interior wall damage, and mold growth—often discovered only after significant deterioration.
Correct Attachment Method:
1. Remove siding where the ledger board will sit (typically 1–2 courses).
2. Install Z-flashing: Slide metal flashing under the upper siding course, over the top of the ledger board. This directs water away from the joint.
3. Use plastic or metal standoffs (1/4″ thick) between ledger and wall sheathing to allow airflow.
4. Apply high-quality polyurethane sealant (e.g., OSI Quad) along the top edge after flashing is secure.
5. Reinstall siding pieces below the ledger board.
6. Verify the ledger attaches directly to house framing (studs), not just sheathing. Use structural screws rated for shear load per engineering guidelines.
7. Slope the ledger slightly away from the house (1/8″ per foot) to encourage drainage.
Building science confirms that moisture management is paramount at any structure-wall interface. Proper flashing and spacing are not optional details—they are essential safeguards for your home’s structural envelope.
Material-Climate Mismatch: Accelerated Degradation
Selecting materials without considering local climate pressures leads to premature failure. Pressure-treated pine in arid climates often develops severe checking (deep cracks) and warping as the wood dries too rapidly. Vinyl components in regions with extreme temperature swings may become brittle and crack. Coastal installations using standard steel fasteners experience rapid corrosion.
Adaptive Material Selection:
– Arid Climates: Prioritize woods with natural oils (cedar, redwood) that resist cracking; commit to a rigorous sealing schedule. Aluminum performs well with proper thermal break design.
– High Humidity/Coastal Zones: Choose naturally rot-resistant woods (cedar, cypress) or non-organic materials (aluminum, cellular PVC). Specify marine-grade stainless steel (316 grade) hardware exclusively.
– Extreme Temperature Swings: For vinyl or composite materials, verify manufacturer’s temperature tolerance ratings. Allow adequate expansion gaps during installation.
– High UV Exposure: Select materials with built-in UV stabilizers. For wood, use sealers explicitly formulated with UV blockers and mildewcides. Reapply before visible graying occurs.
Material performance is inherently contextual. Aligning choices with documented regional patterns significantly extends service life and reduces maintenance burden. When uncertain, consult local building professionals familiar with area-specific challenges.
Your Questions, Answered
Q: Do I need a permit for a small pergola?
A: Permit requirements vary significantly by municipality. Many jurisdictions exempt open pergolas under 100–120 sq ft with no roof covering, but always verify with your local building department. Factors like attachment to your house, proximity to property lines, or location in a historic district can trigger permit requirements regardless of size. When in doubt, ask—permit fees are minor compared to correction costs later.
Q: Which provides more shade: a pergola with shade cloth or a solid-roof pavilion?
A: A solid-roof pavilion provides near-total sun and rain blockage. A pergola with high-quality shade cloth (solution-dyed acrylic) typically blocks 85–95% of UV rays but allows some dappled light and air movement. Choose a pavilion for maximum coverage and weather protection; choose a cloth-covered pergola for adjustable shade, better airflow, and a lighter visual footprint. In hot climates, the airflow advantage of a pergola can enhance comfort despite slightly less shade density.
Q: How deep should footings be for a gazebo?
A: Footings must extend below the local frost line to prevent heaving. Frost depth varies by climate zone (e.g., 12″ in Zone 8, 36–48″ in Zone 5). Contact your municipal building department for the exact requirement in your area. Additionally, footings should be wide enough to distribute the structure’s load—typically 12–18″ diameter for standard residential gazebos. Never set posts directly in soil; use concrete piers with galvanized post anchors.
Q: Can I install a shade sail without digging new posts?
A: Yes, if you have suitable existing anchor points. Shade sails require anchors capable of withstanding 300–500+ lbs of tension. Solid masonry walls, structural beams on your house, or large healthy trees (with proper tree-friendly hardware) can serve as anchors. Critical: Wall anchors must hit structural studs, not just siding. Tree anchors must use wide straps to avoid girdling and allow for growth. If existing anchors are insufficient, dedicated posts with concrete footings are necessary for safety.
Q: What’s the most low-maintenance shade structure material?
A: Powder-coated aluminum and cellular PVC offer the lowest ongoing maintenance. Aluminum won’t rust, rot, or require sealing; rinse annually. Cellular PVC won’t warp, crack, or need painting; rinse periodically. Both perform exceptionally well in humid or coastal environments where wood maintenance is burdensome. Initial cost is higher than wood, but lifetime maintenance savings and longevity often justify the investment for busy homeowners.
Q: How do I prevent vines from damaging my arbor or pergola?
A: Train vines on removable wires or cables strung across the structure, not directly against wood beams. This allows air circulation behind the vines, preventing moisture trapping that accelerates rot. Prune aggressively each late winter to control weight and density. For heavy vines like wisteria, incorporate internal steel cable reinforcement within beams during construction. Choose rot-resistant woods (cedar, redwood) for vine-supporting structures, and inspect annually for soft spots or insect activity where vines contact wood.
Q: Are louvered pergolas worth the higher cost?
A: They offer significant value if adjustable shade and rain protection are priorities. Motorized louvered systems allow you to control sunlight and close completely during rain, effectively transforming the space into a three-season room. This flexibility is ideal for variable climates or spaces used year-round. However, they require professional installation, periodic mechanism maintenance, and a higher initial investment. For consistent sun climates or budget-focused projects, a fixed pergola with retractable canopy may offer a more economical compromise.
Q: How close can I build a structure to my property line?
A: Setback requirements are strictly defined by local zoning ordinances and can vary even within neighborhoods. Common setbacks range from 3 to 10 feet from side/rear property lines. Never assume. Obtain a copy of your property survey and contact your municipal planning or zoning department with your specific address and proposed structure dimensions. Building too close can lead to mandated removal, neighbor disputes, or complications during future property sales.
Q: What’s the best way to add lighting to a new pergola or pavilion?
A: Integrate electrical conduits during construction. Run PVC conduit through posts or along beams before final assembly. This allows easy future installation of low-voltage LED strip lights under beams, recessed ceiling lights, or pendant fixtures. For DIY safety and code compliance, have a licensed electrician handle the final wiring and connections. If running conduit isn’t feasible, high-quality solar-powered string lights or clamp-on LED fixtures offer effective, code-compliant alternatives with no wiring.
Q: How do I maintain a wood structure to maximize its lifespan?
A: Annual inspection and biennial maintenance are key. Each spring: inspect for loose fasteners, soft/rotting wood, insect activity, or finish deterioration. Clean surfaces with oxygen bleach solution (never chlorine bleach). Reapply a quality wood sealer or stain before the wood shows significant graying or when water no longer beads on the surface (sprinkle test). Pay special attention to end grains, post bases, and horizontal surfaces where moisture accumulates. Consistent maintenance can double or triple the service life of wood structures.
Conclusion and Next Step
Selecting the right shade structure is a meaningful investment in your property’s functionality, comfort, and enjoyment. The SITE Framework—assessing Space, defining Intention, calculating Total Investment, and evaluating Environment—provides a reliable pathway to align your choice with your unique context. Remember these core principles:
1. Foundation integrity is non-negotiable for permanent structures—proper footings below frost line prevent the most common failures.
2. Material selection must respond to local climate pressures—what thrives in Seattle may fail rapidly in Phoenix.
3. Clarity of intention drives optimal design—a structure solving your specific needs delivers greater satisfaction than a generic “best seller.”
The 24-Hour Rule: Within the next day, complete just one actionable step from the Space Assessment Checklist: Measure the exact dimensions of your intended location and note the time when harsh western sun hits your primary seating area. This single data point eliminates guesswork and anchors your next decision.
The Big Picture: Your shade structure is not an isolated element—it integrates with your landscape, architecture, and lifestyle patterns. Thoughtful placement enhances flow between indoor and outdoor spaces; climate-appropriate materials reduce long-term environmental impact; intentional design supports how you genuinely live. By prioritizing contextual alignment over fleeting trends, you create a solution that delivers comfort, beauty, and resilience for years to come.
Explore Our Complete Outdoor Living System:
Designing Your Patio Layout | Climate-Smart Plant Selection for Shade Gardens | Outdoor Lighting Principles for Safety and Ambiance | Deck and Patio Material Comparison Guide | Integrating Water Features into Landscapes | Sustainable Hardscaping Practices | Year-Round Outdoor Comfort Strategies