Stop living with wobbly doors and sticky drawers. This step-by-step manual covers every common cabinet repair—from quick fixes to full rebuilds—with expert techniques to restore function and beauty without replacement.
That subtle thump when a cabinet door refuses to close properly. The frustrating scrape of a drawer that jams halfway open. The unsettling wobble when you reach for a spice jar. These aren’t just minor annoyances—they’re symptoms of wear that, left unaddressed, accelerate damage and diminish your kitchen or bathroom’s functionality. Yet replacing entire cabinets generates unnecessary expense and waste. The vast majority of cabinet issues can be resolved with targeted repairs using basic tools and methodical techniques. This guide transforms confusion into confidence, providing a comprehensive roadmap to diagnose root causes and execute precise repairs for doors, drawers, and cabinet boxes. You’ll learn why a loose hinge is rarely just a hinge problem, how humidity silently influences components across seasons, and when a five-minute fix prevents escalation tomorrow. Save resources, preserve your home’s character, and reclaim smooth, silent operation—one cabinet at a time.
Introduction
Cabinets endure relentless daily stress: repeated opening and closing, weight fluctuations from stored items, environmental shifts in humidity and temperature, and accidental impacts. Unlike furniture designed for occasional use, cabinetry operates as functional architecture—integrated into walls, supporting countertops, and anchoring room layouts. This constant demand makes wear inevitable, but failure is not. Understanding cabinet anatomy is the first step toward effective repair. A cabinet system comprises three interdependent components: the door (the visible face, subject to handling stress), the drawer (a moving sub-assembly with slides and joints), and the box (the structural shell anchored to walls or frames). Critically, a symptom in one component often originates in another. A misaligned door frequently stems from cabinet box movement, not hinge failure. A sticking drawer may signal box warping, not slide damage. This systems-based perspective separates temporary patches from lasting solutions. Premature cabinet replacement represents a common and avoidable home maintenance expense. By mastering repair fundamentals, homeowners preserve original craftsmanship—especially vital in period homes where matching custom cabinetry is challenging—and reduce material waste. This guide synthesizes established woodworking principles, material behavior insights, and field-tested techniques into a logical progression: diagnose accurately, repair precisely, and prevent recurrence. Whether your cabinets are solid wood antiques, mid-century plywood constructions, or modern engineered units, the core physics of stress, movement, and joint integrity remain universal. Let’s begin where every successful repair must: with clear-eyed assessment.
The 5-Minute Cabinet Assessment: Diagnose Before You Repair
Skipping diagnosis is the single most common repair mistake. Rushing to tighten a hinge screw when the cabinet box has shifted off-plumb wastes effort and often worsens the problem. A standardized diagnostic sequence isolates root causes efficiently. This “5-Minute Cabinet Assessment” requires no tools—only observation and systematic testing. Perform this ritual before touching a screwdriver.
Step 1: The Visual Scan (60 Seconds)
Stand directly in front of the cabinet. Close your eyes, then open them slowly. What catches your attention first? Note:
– Alignment gaps: Uneven spacing between doors/drawers (e.g., top gap wider than bottom)
– Visible damage: Cracks near hinges, water stains on box interiors, swollen edges on doors
– Hardware condition: Rust on slides, stripped screw heads, loose handles
– Environmental clues: Proximity to sinks (moisture exposure), direct sunlight (finish fading/warping), heating vents (drying effects)
Why this works: Human vision prioritizes asymmetry. Training yourself to observe holistically reveals patterns missed during routine use. A gap widening toward the bottom often indicates cabinet box sagging at the mounting point. Swollen door edges near a sink signal chronic moisture exposure.
Step 2: The Function Test (2 Minutes)
Operate each component deliberately:
– Doors: Open slowly. Does resistance occur at a specific point? Listen for grinding (hinge pin wear) or scraping (box interference). Close gently—does it latch smoothly or require force? Check if it stays closed or drifts open.
– Drawers: Pull out fully. Note where binding occurs (start, middle, end). Wiggle side-to-side—excessive play indicates slide wear or box deformation. Push back in—does it catch or require shoving?
– Box integrity: Press firmly on the cabinet face frame (if present) and sides. Feel for flexing, creaking, or movement against the wall. Open adjacent cabinets—does movement in one affect neighbors?
Why this works: Movement reveals dynamic stress points. A drawer binding only when fully extended points to slide misalignment, not box warping. A door that drifts open suggests hinge mounting screws have pulled out of compromised material—a symptom of deeper structural fatigue.
Step 3: The Root Cause Analysis (90 Seconds)
Correlate observations using this decision framework:
– Symptom: Door won’t stay closed
→ Check: Hinge screws tight? Gap even top/bottom? Cabinet level?
→ Likely root: Stripped screw holes (if screws loose), box movement (if gap uneven), hinge wear (if grinding sound)
-
Symptom: Drawer sticks when half-open
→ Check: Slide tracks straight? Drawer box square? Box interior debris?
→ Likely root: Slide misalignment (if tracks bent), box warping (if drawer rubs sides), debris obstruction (if intermittent) -
Symptom: Cabinet wobbles when opened
→ Check: Mounting screws secure? Wall studs located? Bottom panel intact?
→ Likely root: Loose wall anchors (most common), failed corner joints, water-damaged substrate
The Fundamental Principle: A symptom is never the problem—it is a messenger. Chasing symptoms leads to circular repairs. Interrogating the messenger reveals the true cause.
This diagnostic framework prevents wasted effort. For instance, tightening hinge screws on a door with uneven gaps (caused by a shifted cabinet box) creates tension that accelerates screw pull-out. Correcting the box alignment first resolves the gap; hinge adjustment then fine-tunes operation. Document findings with quick phone photos—label images “Door Gap Top,” “Drawer Binding Point”—to reference during repair. This methodical approach transforms frustration into focused action, saving hours of trial-and-error. Remember: patience in diagnosis compounds into efficiency during execution.
Part 1: Cabinet Door Repairs — From Misalignment to Major Damage
Cabinet doors bear the brunt of daily interaction. They endure pulling forces, accidental bumps, humidity swings, and hardware stress. Yet most door issues stem from three root categories: hardware failure (hinges, handles), material response (warping, swelling), and installation errors (misalignment, improper clearance). Addressing these requires understanding door construction types, as repair methods vary significantly.
Understanding Cabinet Door Anatomy
Before repairing, identify your door type—this dictates feasible solutions:
– Solid Wood Doors: Typically frame-and-panel construction (stiles, rails, floating panel). Prone to seasonal expansion/contraction but repairable indefinitely. Common in pre-1980s homes and high-end modern cabinets.
– Plywood Doors: Stable core with veneer face. Less prone to warping than solid wood but vulnerable to edge delamination and moisture swelling at exposed edges.
– MDF/Particleboard Doors: Dense engineered core with thermofoil (plastic) or laminate skin. Dimensionally stable under normal conditions but susceptible to edge swelling from moisture exposure. Repairs focus on surface restoration and sealing.
– Slab vs. Inset vs. Overlay: Slab doors cover the entire face frame; inset doors sit inside the frame; overlay doors partially cover the frame. Overlay types (full, partial) affect hinge selection and alignment techniques.
Critical Insight: Construction types may vary even within a single kitchen. Test an inconspicuous edge: solid wood shows consistent grain; MDF reveals uniform fine particles; particleboard has coarser, visible chips. Matching repair methods to material prevents further damage.
Repair 1: Fixing Loose or Stripped Hinge Screws
Loose hinges cause doors to sag, rub, or fail to close. Stripped screw holes (where screws spin freely) are the primary culprit—not hinge failure itself.
Why it happens: Repeated door movement creates micro-movement in screws. Soft substrates (particleboard, MDF) compress over time. Oversized pilot holes during installation prevent grip. Humidity cycles expand/contract wood fibers around screws.
Tools & Materials:
– Screwdriver (match screw head type: Phillips #2, Pozi-Drive, or Torx)
– Drill/driver with 1/16″ and 3/32″ bits
– Wood glue (yellow aliphatic resin)
– Toothpicks, wooden matchsticks, or 1/4″ hardwood dowels
– Epoxy wood filler (for severe damage)
– Replacement screws (same length, slightly thicker shank if possible)
– Clamps (optional)
Step-by-Step Repair:
1. Remove the door: Support the door with one hand. Unscrew hinges from the door side first (prevents box damage). Label hinges “Top,” “Bottom” with tape.
2. Clean the hole: Blow out debris with compressed air or a straw. Wipe with a dry cloth.
3. Assess damage: Insert a toothpick. If it slides in easily with no resistance, the hole is stripped.
4. Fill method (minor stripping):
– Dip 3-4 toothpicks in wood glue. Insert tightly into hole until snug.
– Snap off flush with surface. Wait 20 minutes for glue to set.
– Reinsert original screw. It should bite firmly.
5. Dowel method (moderate stripping):
– Drill out hole to 1/4″ depth with 3/32″ bit.
– Cut dowel to 1/2″ length. Coat with glue. Tap firmly into hole.
– Trim flush. Drill new pilot hole (slightly smaller than screw shank).
– Reinstall screw.
6. Epoxy method (severe damage/particleboard):
– Mix epoxy filler. Pack tightly into hole.
– Insert screw coated in petroleum jelly (prevents bonding to epoxy).
– Wait until epoxy cures (follow product time). Remove screw—the hole is now a solid anchor point.
– Reinstall screw.
Common Mistakes to Avoid:
– Plastic wall anchors lack shear strength for dynamic door loads and are not recommended.
– Overtightening screws compresses substrate further, worsening grip. Stop when resistance feels firm.
– Skipping door removal forces misaligned screws, damaging hinge plates.
Alternative Solutions:
– Budget approach: Wrap screw threads with plumber’s tape (PTFE tape) before insertion. Adds temporary friction.
– Emergency measure: Insert a small piece of steel wool into the hole before screwing. Provides immediate grip but degrades over time.
– Enhanced solution: Replace screws with thread-forming types (e.g., Confirmat screws for particleboard). Their coarse threads cut new gripping paths.
Illustrative scenario: A cabinet door with stripped screw holes in particleboard may not hold a toothpick repair long-term. Switching to the epoxy method with a thread-forming screw often restores reliable mounting. Matching repair severity to substrate condition is key.
Repair 2: Adjusting Door Alignment (Up/Down, In/Out, Side-to-Side)
Perfect alignment requires even gaps (typically 1/16″ to 1/8″) between doors and frames. Misalignment causes rubbing, poor latching, and accelerated wear.
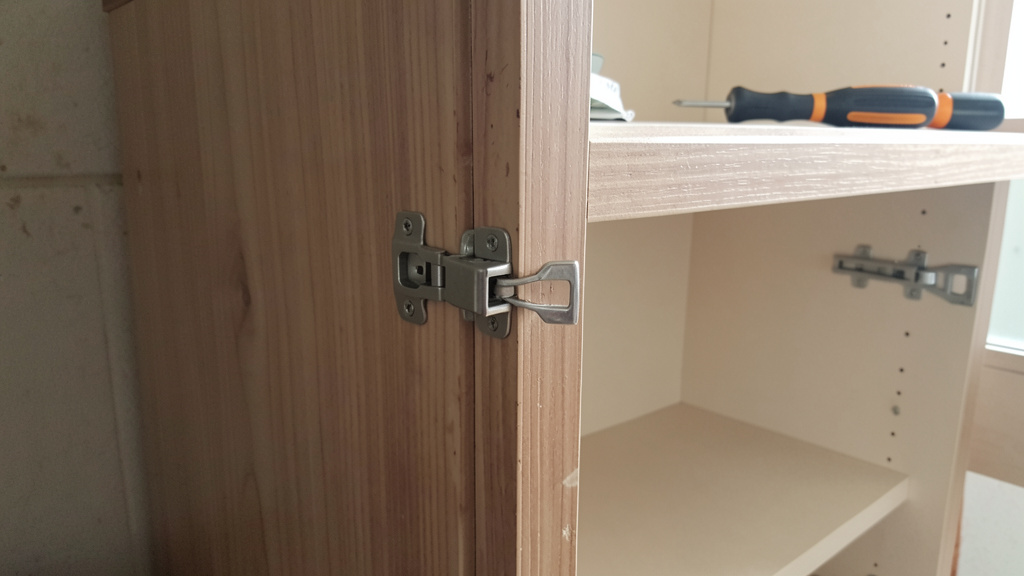
Hinge Types Dictate Adjustment Method:
– Concealed (Euro) Hinges (most common post-1980s): Feature three adjustment screws:
– Depth screw (closest to door edge): Moves door in/out (affects latch engagement)
– Height screw (vertical slot): Moves door up/down
– Width screw (horizontal slot): Moves door left/right
– Butt Hinges (traditional): Require shimming hinge leaves or repositioning screws.
– Pivot Hinges (heavy doors): Adjust via set screws on top/bottom pivots.
Concealed Hinge Adjustment Protocol:
1. Identify problem gap: Use a feeler gauge or folded paper strip. Is the top gap wider? Door rubbing bottom?
2. Adjust one screw at a time: Turn screws 1/8 turn (45 degrees) max per adjustment. Test door operation.
3. Top gap wider than bottom: Turn height screws on both hinges clockwise (raises door bottom).
4. Door rubs frame on closing side: Turn width screws counterclockwise on both hinges (moves door away from frame).
5. Door won’t latch: Turn depth screws clockwise on both hinges (pulls door tighter to frame).
6. Fine-tune incrementally: After major adjustments, make micro-adjustments to one hinge to correct twist (e.g., if top corner rubs but bottom is clear).
Butt Hinge Adjustment Protocol:
– Door sags at handle side: Loosen screws on bottom hinge leaf attached to cabinet. Insert thin cardboard shim behind leaf. Retighten.
– Door binds at top: Shim top hinge leaf.
– Persistent misalignment: Remove hinge. Fill old screw holes (see Repair 1). Reposition hinge leaf 1/16″ toward needed direction. Drill new pilot holes.
Critical Nuance: Always adjust both hinges equally for gross movement. Use single-hinge adjustments only for fine-tuning twist. If gaps remain uneven after hinge adjustments, the cabinet box itself is out of square—address box integrity first (Part 3).
When Alignment Adjustments Fail:
– Check for warped door (see Repair 3)
– Verify cabinet box is plumb and level
– Inspect for swollen door edges (moisture damage)
– Confirm adjacent cabinets aren’t pressing against the door
Analogy: Hinge adjustment resembles tuning a stringed instrument. One adjustment affects the whole system. Small, deliberate turns create balance; aggressive changes cause dissonance.
Repair 3: Repairing Warped or Swollen Doors
Warping (twisting/bowing) and swelling (edge expansion) stem from moisture imbalance. Wood and engineered substrates absorb/release humidity, expanding across the grain. A door stored in damp conditions may warp; one near a dishwasher may swell at the bottom edge.
Assessment: Can It Be Saved?
– Minor warp (<1/8″ deviation over 18″): Often correctable
– Moderate warp (1/8″–1/4″): May require clamping; success depends on wood type and age
– Severe warp (>1/4″) or swollen edges: Usually requires replacement—forced straightening risks cracking
– Critical test: Place door on flat surface. Slide feeler gauge under high points. If gap exceeds 1/8″, proceed cautiously.
Flattening a Warped Solid Wood Door:
1. Identify concave side (the “valley” of the warp). This side needs moisture reintroduction.
2. Dampen concave side: Lightly mist with water using spray bottle. Do not soak. Cover with damp cloth.
3. Clamp strategically: Place door concave-side down on flat surface (garage floor, workbench). Position cauls (straight wood scraps) across high points. Apply clamps every 6–8 inches with moderate pressure.
4. Dry slowly: Leave clamped 48–72 hours in climate-controlled space (not direct sun/heat). Check periodically—over-clamping can crack wood.
5. Seal immediately: After flattening, apply finish (oil, polyurethane) to all surfaces, especially edges, to stabilize moisture content.
Addressing Swollen Edges (MDF/Particleboard):
– Avoid aggressive sanding: Removes protective skin, exposing porous core to further moisture.
– Gentle reduction: Use fine-grit sandpaper (220+) wrapped around a flat block. Sand only the swollen area until flush. Wipe clean.
– Seal thoroughly: Apply moisture-resistant sealant (e.g., shellac, epoxy primer) to sanded edge. Follow with matching finish.
– Prevention: Install under-sink moisture barriers; ensure dishwasher seals are intact.
When Replacement Is Necessary:
– Swelling has compromised structural integrity (soft, crumbly edges)
– Warping exceeds 1/4″ with visible cracks
– Door is veneered and delamination has occurred
– Practical note: Photograph the door. Take precise measurements (height, width, thickness, hinge locations). Many hardware suppliers can match standard sizes. For custom doors, a local woodworker can replicate using the old door as a template.
Illustrative scenario: Attempting to force-flat a severely warped MDF door through aggressive clamping can crack the thermofoil skin and fracture the core. Understanding material limits prevents destructive interventions.
Repair 4: Fixing Cracks, Chips, and Finish Damage
Surface damage affects aesthetics and, if deep, structural integrity. Repair strategy depends on material and damage depth.
Solid Wood Repairs:
– Hairline cracks: Inject wood glue with syringe. Clamp until dry. Wipe excess. Sand lightly. Apply matching wood filler only if gap remains.
– Chips (edge/corner):
– Clean area. Apply wood glue to chip fragment if available.
– For missing pieces: Mix sawdust from same wood type with wood glue to form paste. Pack into void. Let cure 24 hours.
– Sand smooth. Stain to match (test on scrap first). Finish with clear coat.
– Deep gouges: Use epoxy-based wood filler (e.g., Abatron). It bonds permanently and accepts stain better than water-based fillers.
Engineered Material Repairs (MDF, Particleboard):
– Chips/swollen edges: Carefully trim loose material with sharp utility knife. Fill with epoxy wood filler (water-based fillers may swell MDF further). Sand smooth. Prime thoroughly before painting.
– Thermofoil bubbling: Pierce bubble with needle. Inject contact cement. Press flat with clamp and cauls. Wipe excess immediately.
– Laminate lifting: Same method as thermofoil, using laminate adhesive.
Finish Matching Techniques:
1. Identify existing finish: Rub inconspicuous area with mineral spirits. If sticky, it’s shellac. If unaffected, likely polyurethane or lacquer.
2. Stain matching: Mix primary stain colors (e.g., Minwax Early American + Provincial) on scrap wood. Layer thin coats. Patience is key—stain deepens as it dries.
3. Sheen matching: Rub repaired area with fine steel wool (0000 grade) to dull shine. Apply paste wax for satin sheen; clear matte poly for flat finishes.
4. Advanced technique: For antique cabinets, “age” the repair by lightly rubbing with tea-stained cloth or artist’s burnt umber oil paint diluted in mineral spirits. Wipe off excess—mimics natural patina.
Common Pitfalls:
– Using untinted wood filler on dark wood: Always tint filler with stain or universal colorant.
– Skipping primer on MDF: Causes paint to absorb unevenly, highlighting the repair.
– Over-sanding: Creates depressions. Sand with the grain using progressively finer grits (120 → 180 → 220).
Illustrative scenario: A dent in a maple cabinet door can be addressed by steaming the compressed fibers with a damp cloth and iron, filling residual voids with maple-tinted epoxy, sanding, and applying thin coats of wipe-on polyurethane. From typical viewing distance, the repair blends seamlessly.
Repair 5: Replacing Broken or Missing Hardware
Hardware failure is inevitable with use. Upgrading during repair enhances function and aesthetics.
Hinge Replacement Protocol:
1. Identify hinge type: Note overlay type (full/partial), cup diameter (typically 35mm), and arm length. Photograph existing hinge.
2. Measure precisely:
– Overlay: Distance door covers face frame (e.g., 1/2″ overlay)
– Bore distance: Center of hinge cup to door edge
– Mounting plate: Screw pattern dimensions
3. Source matching hinges: Bring old hinge to hardware store. Online retailers allow filter-by-spec. For vintage cabinets, specialty suppliers carry period-appropriate options.
4. Installation:
– Transfer hinge locations using template or careful measurement.
– Drill cup hole with Forstner bit (prevents tear-out). Depth = hinge cup depth + 1/16″.
– Attach mounting plate to cabinet box first. Verify door alignment before securing door-side plate.
Handle/Knob Replacement:
– Standard spacing: Most knobs use 1″ centers; pulls vary (3″, 5″, etc.). Measure existing hole centers.
– Filling old holes: For mismatched spacing, fill holes with epoxy wood filler. Drill new holes after curing. Paint over filled holes before installing new hardware.
– Enhanced option: Soft-close hinges (Blumotion, Salice) prevent slamming. Requires specific hinge models but installs like standard concealed hinges. Worthwhile for high-use cabinets.
Hardware Selection Guide:
| Hardware Type | Best For | Key Consideration |
|—————|———-|——————-|
| Concealed Hinges | Modern cabinets, easy adjustment | Match overlay type precisely |
| Butt Hinges | Traditional/inset doors, heavy doors | Requires precise mortising |
| Soft-Close Hinges | High-traffic areas, child safety | Verify cabinet box depth accommodates mechanism |
| Undermount Slides | Full-access drawers, modern aesthetics | Requires precise box mounting |
| Side-Mount Slides | Repair-friendly, budget option | Visible when drawer open |
Replacing hardware refreshes the cabinet’s aesthetic while improving function. Brushed nickel knobs on dated oak cabinets create contemporary contrast; antique brass pulls enhance vintage charm. Always install hardware after completing structural repairs and finish work to avoid damage during handling.
Part 2: Drawer Repairs — Smooth Operation Restored
Drawers endure complex stresses: vertical load when full, lateral forces during opening/closing, and friction against slides. Failures manifest as sticking, wobbling, or complete seizure. Unlike doors, drawers involve multiple moving parts—slides, box joints, and fronts—that must work in concert. Successful repair requires understanding slide mechanics and drawer box construction.
Understanding Drawer Anatomy and Slide Types
Identify your slide system first—repair methods differ significantly:
– Side-Mount Slides: Metal rails attached to drawer sides and cabinet interior. Most common in pre-2000s cabinets. Visible when drawer is open. Types: roller slides (wheels on track), ball-bearing slides (smoothest operation).
– Undermount Slides: Rails mounted beneath drawer box. Concealed when closed. Allow full drawer face visibility. Require precise box dimensions.
– Center-Mount Slides: Single rail under drawer center. Less common; found in older or budget cabinets. Prone to binding.
– Wooden Slides: Traditional friction slides (wood-on-wood). Found in antique furniture. Require waxing for smooth operation.
Drawer Box Construction Types:
– Dovetail Joints: Interlocking “tails” and “pins.” Strongest joint; indicates quality construction. Common in solid wood drawers.
– Box Joints (Finger Joints): Straight-cut interlocking fingers. Strong, easier to machine than dovetails.
– Butt Joints with Dowels/Biscuits: Simpler joinery; relies on glue and mechanical fasteners. Common in engineered wood drawers.
– Stapled/Nailed Corners: Lowest durability; typical in budget particleboard drawers. Prone to separation.
Diagnostic Tip: Remove the drawer completely. Examine slides for bent rails, missing balls (in ball-bearing slides), or rust. Inspect box corners for separation. This reveals whether the issue is slide-related, box-related, or both.
Repair 1: Fixing Sticking or Binding Drawers
Sticking is rarely random—it occurs at predictable points revealing the cause.
Diagnosis by Binding Location:
– Binds at start of pull: Debris in slide track; misaligned front mounting bracket
– Binds midway: Drawer box warped; slides not parallel; box rubbing cabinet interior
– Binds near full extension: Slide track bent; stop mechanism obstructing; box bottom dragging
Step-by-Step Correction:
1. Remove drawer: For side-mount slides, pull out fully until stops engage, then lift upward. For undermount, release locking lever (varies by brand).
2. Clean tracks: Vacuum debris. Wipe rails with isopropyl alcohol to remove grime. Inspect for dents or bends.
3. Straighten bent rails: Use needle-nose pliers gently on metal slides. For wooden slides, sand high spots with fine sandpaper wrapped around a block.
4. Lubricate correctly:
– Metal slides: Dry lubricant (graphite powder, Teflon spray). Avoid oil/grease—attracts dust, creating grinding paste.
– Wooden slides: Paste wax (beeswax or paraffin). Rub wax on slide surfaces and mating cabinet areas. Buff lightly.
5. Check box squareness: Measure diagonally corner-to-corner. If measurements differ by >1/8″, the box is out of square (see Repair 4).
6. Reinstall and test: Slide in/out slowly. Note binding point. Adjust slide mounting screws incrementally (1/8 turn) to shift alignment.
Humidity-Specific Fixes:
– Swollen drawer sides (common near sinks): Lightly sand binding edges with 220-grit paper. Apply moisture-resistant finish to sanded areas. Install silica gel packets inside cabinet to moderate humidity.
– Seasonal sticking (wood drawers in humid summers): Minor seasonal variation is normal. If severe, slightly reduce drawer width by sanding sides—but only as last resort, as this compromises fit in dry seasons.
Illustrative scenario: A drawer that consistently sticks midway may have misaligned slides. Cleaning reveals no debris. Measurement shows one slide mounted slightly higher. Adjusting the mounting screw restores parallel alignment. Precise diagnosis enables efficient correction.
Repair 2: Repairing or Replacing Drawer Slides
Worn slides cause wobble, uneven operation, or failure to close. Replacement is often more efficient than repair.
When to Repair vs. Replace:
– Repair: Bent rail (if straightenable), loose mounting screws, dirty mechanism
– Replace: Rust corrosion, missing ball bearings, cracked plastic components, broken release levers
Replacement Protocol:
1. Identify slide specifications:
– Length: Measure fully closed slide (standard sizes: 16″, 18″, 20″, 22″)
– Extension type: 3/4 extension (drawer doesn’t fully open), full extension (drawer clears cabinet front)
– Mounting type: Side-mount, undermount
– Load rating: Light (≤50 lbs), medium (50–100 lbs), heavy (100+ lbs). Estimate drawer contents weight.
2. Remove old slides:
– Side-mount: Unscrew from drawer box and cabinet. Note orientation (left/right specific).
– Undermount: Release locking mechanism per manufacturer instructions (often requires pressing tabs while pulling drawer out).
3. Prepare for new slides:
– Clean mounting surfaces. Fill old screw holes with wood filler if reusing locations.
– Verify cabinet interior is flat—shim mounting points if warped.
4. Install new slides:
– Mount cabinet-side rails first. Use a jig or spacer block to ensure perfect height alignment on both sides.
– Attach drawer-side components. Test fit before final tightening.
– Critical step: Adjust front mounting brackets (if present) to eliminate side-to-side play. Most quality slides have micro-adjustment screws.
Pro Tips for Perfect Installation:
– Buy slides in pairs—even if only one is damaged. Manufacturing tolerances vary slightly between batches.
– For undermount slides on existing drawers: Confirm drawer box height matches slide requirements (typically 3.5″–5″ tall sides).
– Upgrade to soft-close slides during replacement. They prevent slamming and reduce long-term stress on joints. Brands like Blum, Grass, and Accuride offer retrofit kits.
Budget Alternative: For functional but noisy roller slides, disassemble if possible. Clean wheels and track with alcohol. Re-lubricate wheels with light machine oil. Reassemble carefully—small parts are easily lost.
Repair 3: Fixing Loose or Broken Drawer Fronts
The drawer front (face) attaches to the box via screws, dowels, or glue. Separation causes misalignment and operational issues.
Reattaching a Detached Front:
1. Remove drawer: Place on work surface.
2. Clean mating surfaces: Scrape old glue with chisel. Wipe with mineral spirits.
3. Reinforce attachment:
– Screw method (most secure): Drill pilot holes through drawer box front into back of drawer front. Use #6 x 1″ pan-head screws. Countersink holes. Fill with wood putty matching front material.
– Dowel method: Drill matching holes in box and front. Insert glued dowels. Clamp until dry.
– Glue-only: Only suitable for solid wood with large glue surface. Apply yellow glue. Clamp with even pressure. Wipe excess immediately.
4. Align perfectly: Place drawer in cabinet opening. Close until front is flush with adjacent fronts. Clamp in position. Tighten screws or let glue set.
Repairing Cracks in Drawer Fronts:
– Solid wood: Inject glue into crack. Clamp with cauls. For hairline cracks, use cyanoacrylate (super glue) wicking method—capillary action draws glue deep into crack.
– MDF/Laminate: Fill with epoxy wood filler. Sand smooth. Prime and paint. For laminate cracks, use color-matched laminate repair pen after filling.
Preventing Future Separation:
– Avoid overloading drawers—weight stresses front attachments.
– Install drawer slide stabilizers (small brackets that connect slide to drawer front).
– For vintage drawers with weak attachments, add discreet interior corner braces.
Critical Insight: A loose drawer front often indicates underlying box damage. Always inspect box corners after reattaching the front. Addressing only the symptom leads to recurrence.
Repair 4: Repairing a Damaged Drawer Box
Drawer boxes fail at corners due to repeated stress. Repair depends on joint type and material.
Dovetail/Box Joint Repair:
1. Disassemble carefully: If glued, apply heat with hairdryer to soften old glue. Use chisel to gently separate joints. Do not force—risk of breaking tails/pins.
2. Clean old glue: Scrape mating surfaces with chisel. Sand lightly to bare wood.
3. Reinforce joints:
– Glue only: Apply fresh yellow glue to all surfaces. Clamp with band clamps or corner clamps. Wipe excess.
– Add splines: Cut thin wood spline to fit across joint. Glue into kerf cut across joint. Doubles strength.
– Add corner blocks: Glue small triangular wood blocks inside corners. Ideal for antique drawers where disassembly risks damage.
4. Clamp strategy: Alternate clamp pressure to avoid distorting box shape. Check for squareness during clamping (measure diagonals).
Butt Joint/Dowel Joint Repair:
– Separated corners: Inject glue into joint. Clamp. For added strength, drill pilot hole through corner and insert screw (countersink and plug).
– Broken dowel: Drill out old dowel. Insert new glued dowel. Clamp.
– Particleboard failure: Glue alone won’t hold. Use epoxy adhesive. Reinforce with metal corner brace screwed through box sides.
Replacing a Drawer Side or Bottom:
1. Disassemble box: Remove bottom panel (often nailed/stapled). Separate damaged side.
2. Create template: Trace old piece onto new material. Match thickness precisely (typically 1/2″ for sides, 1/4″ for bottoms).
3. Cut new piece: Use table saw or circular saw with guide. Sand edges smooth.
4. Reassemble: Attach new side with glue and screws/dowels. Reinstall bottom panel. For bottoms, use plywood (more stable than particleboard). Secure with brad nails and glue.
Strengthening Weak Joints Proactively:
– Install drawer slide stabilizers that connect slides to box sides.
– Add a center support rail under wide drawers (>24″ wide).
– For heavy-use drawers (utensil drawers), line bottom with 1/8″ hardboard to distribute weight.
Material Note: When replacing parts, match substrate type if possible. Mixing solid wood sides with plywood bottom can cause seasonal movement conflicts. If unavoidable, use flexible adhesive (e.g., polyurethane glue) at joints to accommodate differential movement.
Repair 5: Addressing Drawer Bottom Sag or Failure
Drawer bottoms bear vertical load. Sag occurs from thin material, wide spans, or moisture damage. Failure (cracking, detachment) is common in particleboard bottoms.
Diagnosis:
– Sag: Visible dip when drawer is loaded. Often accompanied by bottom rubbing cabinet interior.
– Failure: Cracks radiating from corners; bottom detached from grooves; soft spots when pressed.
Repair Methods by Severity:
– Minor sag (plywood bottom): Install support cleats. Cut 1/4″ x 3/4″ wood strips. Glue and screw to inside bottom edges of drawer sides. Provides continuous support.
– Moderate sag/failure: Replace bottom panel.
1. Remove old bottom (pry nails/staples carefully).
2. Measure groove depth in drawer sides. Cut new bottom from 1/4″ Baltic birch plywood (superior stability).
3. Slide into grooves. Secure front edge with small brad nails or screws (pre-drill to avoid splitting).
4. Upgrade: Add support cleats as above for heavy loads.
– Particleboard bottom failure: Replacement is necessary. Particleboard cannot be reliably repaired once compromised. Use plywood replacement. Seal all edges with waterproof wood glue or epoxy before installation to prevent future moisture damage.
Prevention Strategies:
– Avoid overloading drawers—distribute weight evenly.
– For deep drawers (>8″ depth), add a center support rail under the bottom.
– Line drawer bottoms with cork or felt liners. They cushion items and distribute point loads.
– In humid environments (under sinks), use marine-grade plywood for replacements and seal all edges thoroughly.
Illustrative scenario: A utensil drawer with a sagging particleboard bottom benefits from replacement with sealed Baltic birch plywood and added support cleats. This solution supports heavier loads while resisting future moisture exposure. Thoughtful material selection extends service life significantly.
Part 3: Cabinet Box Repairs — The Foundation of Stability
The cabinet box is the structural backbone. When it fails—sagging, separating, or detaching from walls—doors and drawers cannot function properly. Box repairs demand respect for structural integrity but are achievable with methodical techniques. Never ignore box issues; they compound damage to other components.
Assessing Cabinet Box Integrity
Perform these checks before any door/drawer repair:
– Wall attachment: Press cabinet top firmly. Does it move away from wall? Check mounting screws at top rail.
– Corner integrity: Open cabinet. Shine light into corners. Look for gaps in joints, cracked glue lines, or separated panels.
– Level and plumb: Place level on top and against front face. Note deviations. >1/4″ out of level/plumb requires correction.
– Floor contact: For base cabinets, ensure all corners rest firmly on floor. Rocking indicates uneven floor or damaged legs/feet.
– Water damage signs: Soft spots on bottom panels (under sinks), discoloration, musty odor, warped sides.
Critical Insight: Cabinet boxes fail predictably at stress points: top mounting rail (pull-out force), bottom panel (water exposure), and corner joints (racking forces). Focus inspection here first.
Repair 1: Fixing a Loose or Sagging Cabinet Box
Sagging boxes cause door misalignment, drawer binding, and countertop stress. Causes include loose wall anchors, inadequate stud attachment, or failed corner joints.
Re-Securing to Wall Studs:
1. Locate studs: Use electronic stud finder. Verify by tapping (solid sound) or drilling small test hole. Exercise caution near plumbing/electrical.
2. Access mounting points: Remove top cabinet contents. For upper cabinets, remove soffit panels if present. For base cabinets, remove toe-kick board.
3. Remove old anchors: Unscrew existing mounting screws. Extract wall anchors if stripped.
4. Install new anchors:
– Into studs: Use 3″ structural screws (e.g., GRK Cabinet Screws). Pre-drill pilot holes to prevent splitting cabinet rail.
– No stud available: Use heavy-duty toggle bolts (e.g., SnapToggle). Drill hole per bolt specs. Insert toggle, tighten until snug. Plastic anchors are not recommended for structural cabinet mounting.
5. Lift and secure: Place pry bar under cabinet bottom (protect finish with wood block). Gently lift to desired position. Hold firmly while driving screws. Use two people for large cabinets.
6. Verify alignment: Check level across top and front. Adjust screw tension incrementally.
Reinforcing Corner Joints:
– Visible gaps: Inject wood glue into joint. Clamp with band clamp or ratchet strap. Wipe excess. For added strength, install corner brace inside cabinet:
1. Cut 1″x1″ wood cleat to fit corner.
2. Apply glue to mating surfaces.
3. Screw cleat to both sides of corner (use 1″ screws to avoid penetrating front).
– Severely separated joints: Disassemble corner if possible. Clean old glue. Re-glue with epoxy adhesive (superior gap-filling). Clamp. Install external corner brace temporarily until cure.
Addressing Sagging Base Cabinets:
– Adjustable legs: Turn leveling legs clockwise to raise cabinet. Place level on top to monitor.
– Fixed legs/damaged feet: Shim between cabinet bottom and floor. Use plastic shims (wood swells). Stack shims until cabinet is level and stable. Secure shims with construction adhesive.
– Structural reinforcement: For chronic sagging, install a continuous ledger board along the wall before rehanging cabinet. Screw ledger into studs. Cabinet then rests on and attaches to ledger—distributing weight more effectively.
Safety Note: When lifting cabinets, protect countertops. Place thick cardboard or wood blocks between pry bar and countertop edge. Cabinet tops are not designed for point loads.
Repair 2: Repairing Water Damage or Rot
Water damage is a primary threat to cabinetry, especially under sinks. Early intervention saves the cabinet; neglect leads to replacement.
Assessment Protocol:
1. Identify moisture source: Fix leaky faucet, dishwasher hose, or pipe before repair. No repair lasts while water intrudes.
2. Test material integrity: Press suspected area with screwdriver tip. Solid resistance = surface damage only. Soft, crumbly texture = substrate failure.
3. Map damage extent: Trace soft areas with pencil. Extend repair zone 2″ beyond visible damage.
Repair Methods by Damage Severity:
– Surface swelling (MDF/particleboard):
1. Dry thoroughly: Use fan/dehumidifier for 48+ hours. Confirm dryness with moisture meter (<12% moisture content).
2. Sand swollen area flush with orbital sander (80 → 120 grit).
3. Seal aggressively: Apply shellac or epoxy primer to all exposed edges and surfaces. Multiple thin coats.
4. Fill minor voids with epoxy wood filler. Sand smooth. Prime and paint.
– Moderate substrate damage (soft but intact):
1. Dry completely (critical step—trapped moisture causes recurrence).
2. Inject consolidant: Use epoxy-based wood consolidant (e.g., Abatron LiquidWood). It penetrates and hardens degraded fibers.
3. After consolidant cures, fill voids with epoxy filler. Sand and finish.
– Severe rot/structural failure:
1. Cut out damaged section with oscillating tool or chisel. Create clean, square opening.
2. Fabricate replacement panel from moisture-resistant material (marine plywood, PVC board).
3. Attach new panel: Glue and screw to surrounding solid structure. Use stainless steel screws.
4. Seal all edges with waterproof sealant (e.g., silicone caulk rated for wet areas).
Prevention is Paramount:
– Install under-sink moisture barriers: Adhesive-backed rubber mats or custom-cut PVC sheets line the cabinet bottom.
– Apply waterproofing sealant to all interior surfaces during initial installation or repair—especially bottom panels and side edges near plumbing.
– Fix leaks immediately. Place absorbent pads under connections as early-warning indicators.
– Improve ventilation: Leave cabinet door slightly ajar after heavy sink use; consider a small battery-operated fan in chronically damp cabinets.
Material Science Insight: Particleboard and MDF absorb moisture readily due to their porous composition. Once binder resins degrade, structural integrity is compromised. Epoxy consolidation can rescue moderately damaged areas, but severely compromised sections require replacement. Solid wood swells but often recovers if dried slowly—avoid force-drying with heat guns, which causes cracking.
Repair 3: Fixing Broken or Worn Shelf Supports
Shelf supports endure concentrated loads. Failure causes shelves to sag, tilt, or collapse.
Support System Types:
– Peg Systems: Small metal/plastic pins inserted into holes drilled in cabinet sides. Most common. Holes wear oval over time.
– Standards and Brackets: Vertical metal tracks (standards) mounted inside cabinet; brackets hook into standards. Common in office/storage cabinets.
– Fixed Shelves: Shelves glued/screwed directly to cabinet sides. Not adjustable; repair requires disassembly.
Peg System Repair:
– Worn holes:
– Temporary fix: Insert toothpick dipped in glue into hole. Break off flush. Provides grip for peg.
– Permanent fix: Drill out worn hole to next standard size (e.g., 1/4″ → 5/16″). Insert hardwood dowel coated in epoxy. Trim flush. Drill new pilot hole for peg at correct location. Alternative: Install metal shelf pin sleeves—they reinforce the hole permanently.
– Missing pegs: Match diameter and head style. Universal pegs available, but original manufacturer parts ensure best fit.
Standards and Brackets Repair:
– Loose standards: Remove brackets. Unscrew standard. Fill old screw holes with epoxy filler. Re-mount standard with longer screws into solid wood (avoiding old holes). Ensure standards are perfectly vertical using level.
– Bent brackets: Replace. Take old bracket to store for matching. Upgrade to heavier-duty brackets if shelf loads increased.
– Stripped screw holes in standards: Use thread-forming screws or install rivet nuts for permanent repair.
Reinforcing Sagging Shelves:
– Add center support: Install a vertical divider panel in cabinet center. Rest shelf ends on divider.
– Shelf stiffener: Glue and clamp a hardwood strip (1/4″ x 1″) along the front edge of the shelf underside. Doubles rigidity.
– Upgrade material: Replace particleboard shelves with plywood or solid wood. For heavy loads (books, appliances), use 3/4″ plywood minimum.
Practical Tip: When reinstalling shelves, place heavier items toward the back—over the cabinet’s structural support points—to minimize front-edge sag.
Repair 4: Repairing Cracks or Separations in the Cabinet Frame
Face frames (on framed cabinets) and box corners experience racking forces. Cracks often appear at stile-rail joints or where the frame meets the box.
Gluing and Clamping Techniques:
1. Clean the joint: Remove old glue/debris with dental pick or narrow chisel. Wipe with damp cloth. Let dry completely.
2. Apply adhesive:
– Tight-fitting cracks: Use cyanoacrylate (super glue) with accelerator spray for instant bond.
– Gapped joints: Use epoxy adhesive—it fills voids and bonds to degraded surfaces better than wood glue.
3. Clamp strategically:
– For face frame cracks: Use band clamp around entire cabinet front. Place cauls (wood blocks) over clamp pads to distribute pressure and prevent marring.
– For corner separations: Use ratchet strap or corner clamps. Alternate clamp pressure to avoid distorting the box.
4. Reinforce after glue-up:
– Splines: Cut slot across crack with router or saw. Insert glued wood spline.
– Braces: Install discreet L-brackets inside cabinet at corners. Use brass screws for antique cabinets to avoid corrosion.
– Dowels: Drill matching holes across crack. Insert glued dowels. Provides mechanical strength beyond glue alone.
Addressing Movement-Related Cracks:
– Seasonal cracks (open in winter, close in summer): These are normal in solid wood frames. Do not glue—fill with flexible wood filler (e.g., latex-based). Allows movement without re-cracking.
– Structural cracks (widen over time): Indicate underlying instability—check wall attachment and floor leveling. Repair the root cause first.
Preventing Future Frame Damage:
– Avoid slamming doors—install soft-close hinges.
– Distribute weight evenly on shelves; avoid overloading one section.
– Maintain stable indoor humidity (35–50%) with humidifiers/dehumidifiers as needed. Rapid humidity swings stress wood joints.
Critical Distinction: Cosmetic cracks in finish (checking) differ from structural cracks in wood. Finish cracks follow wood grain and don’t compromise integrity. Structural cracks cross grain lines and feel like gaps when probed. Only repair structural cracks.
Advanced Scenarios and When to Call a Professional
Some cabinet issues exceed typical DIY scope. Recognizing these boundaries prevents safety hazards, costly mistakes, and irreversible damage. This section provides clear decision criteria—not to discourage effort, but to empower wise choices.
Scenario 1: Extensive Water Damage Compromising Structural Integrity
Indicators:
– Soft, spongy areas larger than 6″x6″ on load-bearing panels (bottom, sides, top)
– Visible mold growth inside cabinet walls (indicates prolonged moisture intrusion)
– Countertop separation or sagging due to cabinet failure
– Persistent musty odor after drying (sign of hidden degradation)
Why Consult a Professional: Water damage often extends beyond visible areas. Specialists use moisture meters to map saturation, infrared tools to detect hidden leaks, and structural knowledge to assess load paths. Attempting patch repairs on compromised substrates risks failure—especially under heavy countertops. Qualified professionals can:
– Safely remove damaged sections without disturbing adjacent cabinets
– Address underlying plumbing issues
– Install moisture-resistant replacement materials (marine plywood, cement board)
– Integrate repairs seamlessly with existing cabinetry
Consideration: If damage is confined to a non-structural area (e.g., small bottom panel section under sink) and the moisture source is fixed, the epoxy replacement method in Part 3 may be feasible for experienced DIYers.
Scenario 2: Antique Cabinets Requiring Specialized Techniques
Indicators:
– Cabinets pre-1940s with hand-cut joinery, original finishes, or historical significance
– Veneer lifting extensively across large surfaces
– Unique hardware with no modern equivalents
– Evidence of prior restoration attempts (mismatched repairs)
Why Consult a Professional: Antique cabinets possess historical and potential monetary value that improper repairs may diminish. Conservators specialize in:
– Reversible repair techniques (using hide glue instead of modern adhesives)
– Veneer restoration without sanding through original surfaces
– Matching historic finishes using traditional materials (shellac, linseed oil)
– Sourcing or replicating period-appropriate hardware
DIY Boundary: Surface cleaning, gentle waxing, and minor hardware tightening are generally safe. Anything involving disassembly, finish removal, or structural repair warrants professional consultation. Organizations like the American Institute for Conservation provide directories of qualified conservators.
Scenario 3: Custom or Built-In Cabinets with Unique Challenges
Indicators:
– Cabinets integrated with architectural elements (arched openings, curved walls)
– Non-standard dimensions requiring custom fabrication
– Cabinets supporting structural elements (e.g., breakfast bar overhang)
– Complex multi-cabinet assemblies with interdependent alignment
Why Consult a Professional: Built-in cabinets often require millwork skills beyond standard repairs. Misalignment in one section cascades through the entire assembly. Professionals possess:
– Cabinet-grade woodworking tools (router tables, edge banders) for precise part replication
– Experience with scribing techniques to fit cabinets to uneven walls
– Knowledge of building codes regarding structural supports
– Access to material suppliers for matching exotic woods or laminates
DIY Boundary: Hardware replacement, minor alignment tweaks, and surface repairs are usually feasible. Structural modifications, full panel replacements, or realignment of multi-cabinet runs should involve a cabinetmaker.
Safety First: Knowing Your Limits
Beyond specific scenarios, heed these universal safety boundaries:
– Electrical/plumbing proximity: If repair requires working near live wires or water lines, shut off power/water at the source. When uncertain, consult an electrician or plumber first.
– Heavy lifting: Cabinets over 50 lbs require two-person handling. Use furniture dollies for transport. Never lift alone—risk of injury or damage.
– Chemical safety: When using epoxies, solvents, or strippers, work in ventilated areas. Wear nitrile gloves and safety glasses. Keep children/pets away.
– Tool proficiency: Only use tools you’ve mastered. A misused power tool causes severe injury. Practice techniques on scrap wood first.
The Professional Threshold Principle: If a repair requires disassembling more than 50% of the cabinet, involves structural load-bearing elements, or risks damaging adjacent finishes/fixtures, professional service is often justified by avoided complications. Strategic consultation preserves both your cabinet and your peace of mind.
Remember: Seeking professional help isn’t failure—it’s strategic resource management. Document the issue with photos. Get multiple quotes. Many cabinetmakers offer hourly consultation rates for complex DIY guidance. Your role shifts to informed project manager, ensuring the right solution for your home’s unique context.
Your Questions, Answered
Q: Can I repair stripped screw holes in particleboard cabinets without replacing the entire cabinet?
A: Yes. Particleboard requires specific techniques due to its lower screw-holding capacity. The epoxy anchor method is most reliable: clean the hole, mix two-part epoxy filler, pack tightly, insert a screw coated in petroleum jelly (to prevent bonding), let cure fully, then remove the screw. The hardened epoxy creates a solid anchor. For less severe cases, wooden dowels with polyurethane glue (which expands to fill voids) work well. Avoid toothpicks—they lack structural integrity in particleboard. Always use screws with coarse threads designed for particleboard (Confirmat screws) for reinstallation.
Q: My cabinet door is slightly warped. Will humidity changes fix it over time?
A: Unlikely—and waiting risks worsening the warp. Wood moves predictably with humidity, but a warp indicates uneven moisture content across the door. Passive waiting rarely equalizes this. Instead, actively correct it using the clamping method in Part 1: dampen the concave side lightly, clamp flat with cauls, and dry slowly over 48–72 hours. After flattening, seal all surfaces (especially edges) with finish to stabilize moisture content. For engineered doors (MDF), significant warping is often permanent due to core damage—replacement may be more practical than repair.
Q: How do I know if my drawer slides need replacement versus just cleaning/lubrication?
A: Test operation after thorough cleaning and dry lubrication (graphite/Teflon). If the drawer still exhibits these symptoms, replace the slides: consistent grinding/gritty feeling (indicates ball bearing damage), visible rust pitting on rails, side-to-side wobble exceeding 1/8″ when extended, or failure of the release mechanism to disengage. Ball-bearing slides typically last 10–15 years with moderate use; roller slides wear faster. Replacement is cost-effective—quality slides cost $15–$40 per pair and dramatically improve function.
Q: Is wood glue strong enough to repair separated cabinet box corners, or do I need epoxy?
A: For tight-fitting joints in solid wood with clean surfaces, yellow aliphatic resin wood glue creates bonds stronger than the wood itself. However, epoxy is superior when: gaps exceed 1/32″, surfaces are contaminated (old glue, finish), substrates are degraded (water-damaged particleboard), or immediate handling strength is needed. Epoxy fills voids, bonds to imperfect surfaces, and cures waterproof. For critical structural joints (cabinet mounting rails, corner joints), epoxy provides a more reliable repair, especially in humid environments. Always clamp joints properly regardless of adhesive choice.
Q: Can I fix a swollen MDF cabinet door edge without sanding it down?
A: For minor swelling (slight roughness), minimal sanding is necessary—but minimize material removal. Use 220-grit sandpaper on a flat block, sanding only the high spot until flush. Immediately seal the sanded edge with shellac or epoxy primer to prevent further moisture absorption. For severe swelling (soft, crumbly edges), sanding alone won’t restore integrity. The edge must be trimmed back to solid material, then rebuilt with epoxy wood filler, sanded smooth, and sealed thoroughly. Prevention is key: address moisture sources and apply edge sealant during initial installation.
Q: Why do my cabinet doors keep going out of alignment after adjustment?
A: Recurring misalignment signals an unresolved root cause. Common culprits: 1) Cabinet box movement (loose wall mounting—check Part 3 repairs), 2) Substrate failure around hinge screws (stripped holes—repair per Part 1), 3) Humidity-induced seasonal movement (seal door edges thoroughly), or 4) Overloaded cabinets stressing the box. Perform the 5-Minute Cabinet Assessment again. If gaps change seasonally, minor adjustment needs may be normal wood behavior. If misalignment worsens rapidly, investigate structural issues in the cabinet box or wall attachment.
Q: What’s the best way to match the finish on a repaired cabinet door?
A: Finish matching requires patience and layering. Steps: 1) Identify existing finish type (rub with mineral spirits—if sticky, it’s shellac), 2) Sand repair area smooth, feathering edges into surrounding finish, 3) Apply stain in thin layers, testing on scrap first; mix stains to match (e.g., add walnut to darken oak), 4) For sheen matching, rub repaired area with 0000 steel wool after final coat to dull shine, 5) For antique cabinets, “age” the repair by lightly rubbing with tea-stained cloth or diluted artist’s oil paint. Accept that perfect matches are rare—focus on blending so repairs aren’t noticeable from normal viewing distance (3+ feet).
Q: Are soft-close hinges worth installing during cabinet repairs?
A: For high-use cabinets (kitchen base cabinets, bathroom vanities), soft-close hinges are a worthwhile upgrade. Benefits: prevent slamming damage to doors/frames, reduce stress on hinges and mounting points (extending cabinet life), enhance user experience (quiet operation), and improve safety (child-friendly). Installation is straightforward if replacing existing concealed hinges—match overlay type and bore pattern. Cost: $3–$8 per hinge. Prioritize cabinets used frequently by children or in high-traffic areas. For rarely used upper cabinets, standard hinges may suffice.
Q: How can I prevent cabinet repairs from happening again?
A: Prevention focuses on three areas: 1) Environmental control: Maintain indoor humidity 35–50% with humidifiers/dehumidifiers; install under-sink moisture barriers; ensure dishwasher seals are intact, 2) Usage habits: Avoid overloading drawers/shelves; close doors/drawers gently; distribute weight evenly, 3) Proactive maintenance: Tighten hinge/drawer slide screws annually; lubricate slides with dry lubricant every 6 months; inspect for early signs of wear (loose hardware, minor misalignment). A brief quarterly maintenance routine prevents most major repairs.
Q: Can I repair cabinets made of particleboard, or is replacement the only option?
A: Particleboard cabinets can be repaired effectively with appropriate techniques, though they require careful handling. Key strategies: use epoxy-based adhesives and fillers (water-based products may swell particleboard), replace damaged sections with moisture-resistant materials (marine plywood), seal all exposed edges aggressively with shellac or epoxy primer, and upgrade hardware to particleboard-specific screws (Confirmat). Focus repairs on high-impact areas (hinge mounts, drawer slides). For cabinets with widespread degradation (multiple failed joints, extensive water damage), replacement may become more economical. Assess the cost of materials and time versus new cabinet options—repairs often extend service life significantly.
Conclusion and Your Next Step
Cabinet repairs are more than fixing nuisances—they’re an act of stewardship. By restoring function to doors, drawers, and boxes, you honor the role cabinetry plays in your home, reduce material consumption, and cultivate a deeper connection to your living space. Throughout this guide, three principles emerged as essential for lasting success:
- Diagnose before acting: The 5-Minute Cabinet Assessment transforms guesswork into targeted solutions. A symptom is a clue, not the culprit. Investing time in observation prevents wasted effort and recurring issues.
- Match the repair to the material: Solid wood responds to moisture and movement differently than MDF or particleboard. Using epoxy on degraded particleboard, sealing wood edges against humidity, or selecting hardware designed for your substrate ensures repairs endure.
- Address root causes, not just symptoms: Tightening a loose hinge without fixing stripped screw holes or a shifted cabinet box guarantees recurrence. True repair requires tracing the problem to its origin—whether environmental (moisture), structural (box movement), or usage-related (overloading).
The 24-Hour Rule
Before gathering tools or purchasing materials, implement this simple but powerful step: Spend the next 24 hours observing your cabinet’s behavior in context. Note when problems occur (e.g., “Drawer sticks only when fully loaded with pots,” “Door drifts open after humid mornings”). Watch how household members interact with it. This observation period reveals patterns invisible during frustrated troubleshooting. You might discover the “sticking” drawer only binds when the adjacent cabinet is open—a clearance issue, not a slide problem. Or that the sagging door correlates with seasonal humidity shifts, guiding your repair strategy toward moisture management. This pause cultivates patience and precision, ensuring your effort resolves the true cause.
The Big Picture
Every repaired cabinet extends the lifecycle of materials, conserves resources, and preserves architectural character—especially vital in older homes where original cabinetry holds historical significance. These skills compound: mastering hinge adjustment builds confidence for drawer slide replacement; understanding box integrity informs future furniture projects. You’re not just fixing cabinets; you’re developing a mindset of thoughtful maintenance that applies across your home. When repairs feel overwhelming, remember the progression: assess, research, execute one step at a time. Celebrate small victories—a smoothly closing door, a silent drawer glide. These moments of restored function are tangible rewards of your care.
Cabinets are silent partners in daily life. By giving them attentive repair, you ensure they continue supporting your routines with reliability and grace for years to come. Start with one cabinet. Apply the diagnostic framework. Execute one repair. Feel the satisfaction of renewal. Your home—and your confidence—will thank you.
Explore Our Complete System:
The Ultimate Guide to Cabinet Refinishing: From Stripping to Stunning Finish | How to Replace Cabinet Hardware Like a Pro: A Step-by-Step Upgrade Guide | Preventing Cabinet Damage: Maintenance Tips for Long-Term Durability | DIY Cabinet Installation: Building and Hanging Cabinets from Scratch | Understanding Cabinet Materials: Wood, Plywood, MDF, and Laminate Compared | Moisture Management in Kitchens and Bathrooms: Protecting Your Cabinetry | Tool Essentials for Home Woodworkers: Building Your Repair Kit