Go beyond string lights and solar spikes: a step-by-step system to design garden lighting that captivates by day, enchants by night, and protects your family and property at every turn.
Garden lighting exists at the profound intersection of artistry and engineering—a space where the dream of a moonlit sanctuary must harmonize with the non-negotiable demands of electrical safety and human-centered functionality. Too often, homeowners face a false choice: select between the ethereal glow of professionally curated ambiance or the reassuring certainty of a hazard-free installation. This guide dismantles that dichotomy entirely. Drawing from established landscape lighting standards (IESNA, UL, NEC Article 411) and design principles refined across diverse residential environments globally, we present a unified, actionable framework that treats safety not as a constraint but as the essential canvas upon which breathtaking ambiance is painted. Whether you are sketching initial concepts on a tablet or finalizing specifications with a contractor, this system provides the clarity to illuminate pathways without creating disabling glare, highlight your prized specimen tree without introducing fire risk, and craft evening scenes that feel simultaneously magical and deeply secure. Discover the three-layer methodology professionals use to balance voltage, visibility, visual poetry, and vigilance—transforming your garden into a space that welcomes, protects, and inspires long after sunset.
Introduction: Why Your Garden Deserves a Lighting Philosophy, Not Just a Shopping List
Step into any home improvement retailer, and you’ll encounter aisles overflowing with garden lighting promises: solar path lights claiming “instant ambiance,” whimsical fairy lights promising “enchanted evenings,” and sleek spotlights advertising “architectural drama.” These products beckon with seductive simplicity. Yet without a guiding philosophy—a cohesive strategy that unites purpose with precaution—these individual components frequently coalesce into a disjointed, potentially hazardous outcome. Harsh pools of light blind guests navigating a stone path; deep, unlit shadows conceal tripping hazards near steps; fixtures corrode prematurely due to moisture exposure; or worse, hidden electrical risks lurk beneath the soil. The chasm between a random collection of illuminated objects and a thoughtfully designed lighting environment is precisely where safety and ambiance must converge.
True garden lighting design begins not with product selection, but with layered intention. It requires asking foundational questions: What emotions should this space evoke after twilight? Where do feet require unambiguous visual guidance? Which features deserve celebration without compromising sightlines? How can light intuitively guide movement while preserving the soul of the landscape? Simultaneously, it demands rigorous inquiry into voltage requirements, burial protocols, weatherproofing standards, and emergency contingencies. This dual focus is not merely advisable—it is the hallmark of enduring, responsible design. Projects approaching lighting as an integrated system—where every aesthetic choice is vetted for safety implications and every safety measure is evaluated for its contribution to experiential quality—tend to achieve higher long-term satisfaction, require fewer corrections, and demonstrate greater resilience across seasons and usage patterns. This guide is built upon that integrated philosophy. We will walk you through a repeatable, three-layer framework (Foundation, Function, Flourish) that ensures no critical detail is overlooked, whether you are illuminating a compact urban balcony, a suburban backyard oasis, or a sprawling rural estate. By the conclusion, you will possess not merely a checklist of tips, but a durable mental model to evaluate any lighting decision through the inseparable lenses of security and serenity.
The Integrated Safety-Ambiance Framework: Building Light from the Ground Up
Imagine constructing a home. No prudent builder would select wallpaper swatches before pouring a structurally sound foundation. Similarly, garden lighting demands a sequential methodology where structural integrity (safety) precedes decorative expression (ambiance). The Integrated Safety-Ambiance Framework is a rigorously tested, three-layer methodology designed to prevent pervasive pitfalls while unlocking professional-grade results. Each layer intentionally builds upon the previous one, creating a cascade of informed, interdependent decisions. Skipping or reversing layers risks systemic instability—yielding either a visually stunning but dangerously compromised installation or a technically sound but emotionally sterile illumination. This framework has been validated through iterative application across diverse climates, property types, and user skill levels. Let us explore each layer with granular detail, actionable protocols, real-world illustrations, and critical nuances often omitted in fragmented online guides.
Layer 1: The Foundation Layer – Safety as the Non-Negotiable Base
This layer addresses every critical consideration that occurs before a single fixture is unboxed or positioned. It forms the bedrock of your entire project, focused exclusively on risk mitigation, regulatory alignment, environmental assessment, and strategic planning. Neglecting this layer is analogous to building upon unstable soil; no quantity of beautiful fixtures can compensate for underlying hazards that threaten people, property, or peace of mind. This layer is non-optional. It is the ethical and practical prerequisite for all subsequent work.
Step 1.1: Conduct a Comprehensive, Multi-Session Site Assessment
Resist the urge to rush this phase. True understanding emerges from observation across time and conditions. Dedicate two separate evenings (ideally spaced 3–5 days apart) to document your garden’s natural behavior after sunset. Equip yourself with a weatherproof notebook, a red-light headlamp (to preserve night vision), and a smartphone for timestamped photos. Document meticulously:
- Natural Light Transitions: Note the precise time dusk begins, when full darkness settles, and how ambient light from streetlamps, neighboring properties, or moonlight interacts with your space. Does a full moon create usable silhouettes on the main path? Does a neighbor’s security light cast an unwanted glare into your seating area?
- Moisture Mapping: Identify micro-zones prone to persistent dampness: areas beneath dense canopy where dew lingers past noon, low spots where rainwater pools, zones directly in the trajectory of sprinkler heads or irrigation overspray, proximity to ponds, streams, or drainage swales. Mark these zones clearly on your sketch.
- Human Traffic Patterns: Trace not just the paved pathways, but the actual routes people take—the shortcut across the lawn to the compost bin, the path to the side gate used after dark, the area where children play. Place temporary markers (biodegradable stakes) to visualize these flows.
- Hazard Inventory: Catalog physical risks visible at night: uneven stepping stones, a single step down into the patio, a low-hanging branch at head height near the bench, a change in surface texture (gravel to pavers), proximity to water features.
- Utility Verification (Critical Safety Protocol): Before any soil is disturbed, contact your national utility locating service (e.g., 811 in the United States and Canada, “Dial Before You Dig” services in Australia, local equivalents in the UK/EU). Request marking of all underground utilities—electrical lines, gas pipes, water mains, fiber optics. Allow the mandated waiting period (typically 2–3 business days). Verify markings upon arrival. Never assume you know what lies beneath. Never dig near marked lines without explicit clearance. This single step prevents catastrophic accidents, costly repairs, and legal liability.
Why this step is crucial: A site assessment transforms reactive guesswork into proactive strategy. For instance, noting that the evening sprinkler cycle activates precisely at 9:00 PM prevents placing path lights directly in the spray zone, avoiding premature corrosion and electrical faults. Documenting the natural moonlight path across the lawn might reveal that minimal supplemental lighting is needed in that zone, reducing cost and light pollution.
Common mistake to avoid: Conducting assessment only on a clear, calm evening. If possible, observe during light rain or high humidity to understand how moisture affects visibility and fixture placement needs.
Illustrative scenario: In regions with high rainfall, path lights installed in low-lying areas without prior moisture mapping may experience premature failure due to persistent water pooling around fixture bases. A brief observational investment during damp conditions identifies drainage-sensitive zones, prompting selection of higher IP-rated fixtures or strategic repositioning onto better-drained soil—avoiding replacement costs and installation labor later.
Step 1.2: Decode Electrical Safety, Power Sources, and Regulatory Requirements
Electricity interacting with earth, water, and organic matter demands profound respect. Your power source selection dictates installation complexity, safety protocols, long-term maintenance, and legal compliance. Understand the distinct profiles:
- Low-Voltage Systems (12V or 24V AC/DC): The optimal choice for the vast majority of residential garden lighting projects. A transformer steps down standard household current (120V/240V) to a significantly safer level. Even if a cable is accidentally nicked during future gardening, the risk of severe electric shock is minimal. Critical Implementation Notes:
- The transformer must be plugged into a GFCI (Ground Fault Circuit Interrupter) protected outlet. Test the GFCI monthly.
- The transformer itself requires protection: mount it within a weatherproof electrical box if installed outdoors, or place it in a dry, sheltered location (garage, shed) with cable exiting through a sealed conduit.
- Size the transformer correctly: sum the wattage of all planned fixtures, then select a transformer rated for at least 20% more capacity (e.g., 150W total load requires a 180W+ transformer). This prevents overheating and extends transformer life.
- Use only cable explicitly rated for direct burial and wet locations. Look for markings like “UF” (Underground Feeder) or “Direct Burial” on the jacket.
- Line-Voltage Systems (120V/240V): Reserved for high-lumen applications requiring significant power (e.g., illuminating a large sports field, permanent high-output security floodlights on a perimeter wall). These carry substantial shock and fire risk. Critical Imperative: Installation almost universally requires a licensed, insured electrician. Local building codes dictate strict requirements: burial depth (often 18–24 inches for direct-burial cable, deeper if not in conduit), mandatory use of rigid or flexible conduit, specific GFCI protocols, and permit acquisition. Never attempt line-voltage installation as a DIY project. The consequences of error are severe and potentially fatal.
- Solar-Powered Systems: Eliminate wiring risks entirely but introduce performance variables. Each fixture operates independently. Critical Considerations:
- Solar panel placement is paramount: requires 6–8 hours of unobstructed direct sunlight daily. Panels shaded by trees, eaves, or fences will underperform.
- Battery technology is the limiting factor: most integrated lithium or NiMH batteries degrade significantly after 2–3 years, reducing runtime. Verify if batteries are user-replaceable.
- Output is weather-dependent: expect reduced brightness and runtime on cloudy days or during winter months with shorter daylight hours.
- Quality varies immensely: cheap solar lights often use low-lumen LEDs and poor batteries. Invest in reputable brands with clear specifications.
Universal Safety Protocol: Regardless of power source, every fixture and component installed outdoors must carry certification for wet-location use. In North America, look for UL (Underwriters Laboratories) or ETL (Intertek) marks with “Suitable for Wet Locations” designation. In Europe, seek CE marking alongside IP (Ingress Protection) ratings. For zones within 10 feet of pools, ponds, fountains, or other water features, adhere strictly to the National Electrical Code (NEC) Article 680 (US) or IEC 60364-7-702 (International), which mandate specific minimum distances from water edges, GFCI protection on all circuits (including low-voltage transformer feeds), and fixtures rated IP68 (submersible) for underwater use. When regional codes are unclear, default to the most stringent standard. Consult a qualified professional for water-adjacent installations.
Why this step is crucial: Electrical faults in garden environments are insidious. Moisture ingress into uncertified fixtures can cause short circuits, fire hazards, or electrocution risks—especially dangerous where children or pets play. Using non-direct-burial cable leads to jacket degradation, exposing conductors to soil moisture and root intrusion. Compliance isn’t bureaucratic red tape; it’s engineered protection.
Common mistake to avoid: Using indoor-rated extension cords, lamp wire, or non-UL-listed “landscape cable” sold online. These lack the necessary insulation, UV resistance, and moisture barriers. They degrade rapidly, creating fire hazards. The marginal cost savings are never worth the risk.
Method Comparison for Power Source Selection:
– Ideal Approach (Safety & Performance): Professionally installed low-voltage system with a correctly sized, GFCI-protected transformer mounted in a weatherproof enclosure. Uses direct-burial, oxygen-free copper cable (14/2 or 12/2 gauge for runs over 50 feet). Fixtures selected for specific IP ratings matching their micro-zone (IP65 for general garden, IP67/IP68 for wet zones).
– Budget-Conscious Approach (DIY Safe): High-quality plug-and-play low-voltage kit from a reputable brand (e.g., Kichler, Volt, Unique). Kits include transformer, pre-cut cable, connectors, and fixtures—all UL-listed for wet locations. Ideal for smaller gardens (<50ft cable run). Crucially: Still plug the transformer into a GFCI outlet. Avoid the cheapest big-box store kits with thin cable and uncertified components.
– Emergency/Temporary Fix: For a single event (e.g., wedding reception), use heavy-duty, outdoor-rated extension cords only above ground, secured with cord covers at pathway crossings. Never bury temporary cords. Use battery-operated LED path lights or flameless candles for accent lighting. This is strictly short-term; never a permanent solution.
Step 1.3: Create a Scaled, Annotated Lighting Plan
Transform observations into a precise blueprint. Sketch your property to scale (1 inch = 5 feet is manageable) using graph paper, a tablet app (SketchUp Free, Garden Planner), or even a detailed tracing of a satellite image (Google Earth). Overlay your site assessment notes. Then, using standardized symbols (create a legend), plot:
– All existing structures, trees, shrubs, paths, water features, utility marks
– Proposed fixture types (circle=path light, triangle=spotlight, square=deck light)
– Fixture specifications noted beside each symbol: wattage/LED equivalent, beam angle, IP rating
– Cable run paths (use a dashed line), indicating direction from transformer
– Transformer location (marked with “T”), noting proximity to GFCI outlet
– Zone divisions (if using multiple transformers or smart zones)
– Critical notes: “Avoid sprinkler zone,” “Keep 3ft from oak tree roots,” “IP68 required here”
Why this step is crucial: This plan prevents costly mid-project errors. It ensures you purchase the exact cable length needed (avoiding wasteful excess or frustrating shortages). It allows calculation of total wattage for correct transformer sizing. It provides a permanent record for future maintenance, gardening, or property sales. It facilitates clear communication if hiring help.
Analogy: This plan is the architectural blueprint for your lighting. You wouldn’t frame a wall without measurements; don’t bury cable without a map.
Pro Tip: Make multiple copies. Keep one pristine in a binder. Take a weatherproof copy to the site during installation. Photograph the final installed layout (before mulch covers cables) and store digitally with your home maintenance records. This “as-built” diagram is invaluable years later when adding a new rose bush or repairing a fixture.
Accessibility note: For those without drafting experience, trace a printed satellite image. Use colored pencils: blue for cable paths, red for fixtures, green for notes. Simplicity trumps artistry. The goal is clarity, not perfection.
The Fundamental Principle: Safety is not an add-on feature or a compromise to ambiance; it is the silent, essential architecture of your entire lighting design. Every aesthetic choice must pass through the filter of “Is this safe for my family, my guests, my property, and my local ecosystem?” Only upon this unwavering foundation can true ambiance flourish without reservation or risk.
Layer 2: The Function Layer – Purposeful Illumination for Clarity, Navigation, and Security
With the Foundation Layer securely established, attention shifts to what the light actively does for the people using the space. This layer ensures illumination serves fundamental human needs: guiding movement with intuitive clarity, defining spatial boundaries, enhancing security without creating hostility, and supporting specific activities. Ambiance begins its emergence here—functional light that feels effortless, comfortable, and psychologically reassuring is inherently pleasing. Poorly executed functional lighting (e.g., a blinding path light, a dark shadow concealing a step) instantly shatters any sense of ambiance and introduces genuine hazard. This layer answers the question: “How does this light make the space safer and more usable after dark?”
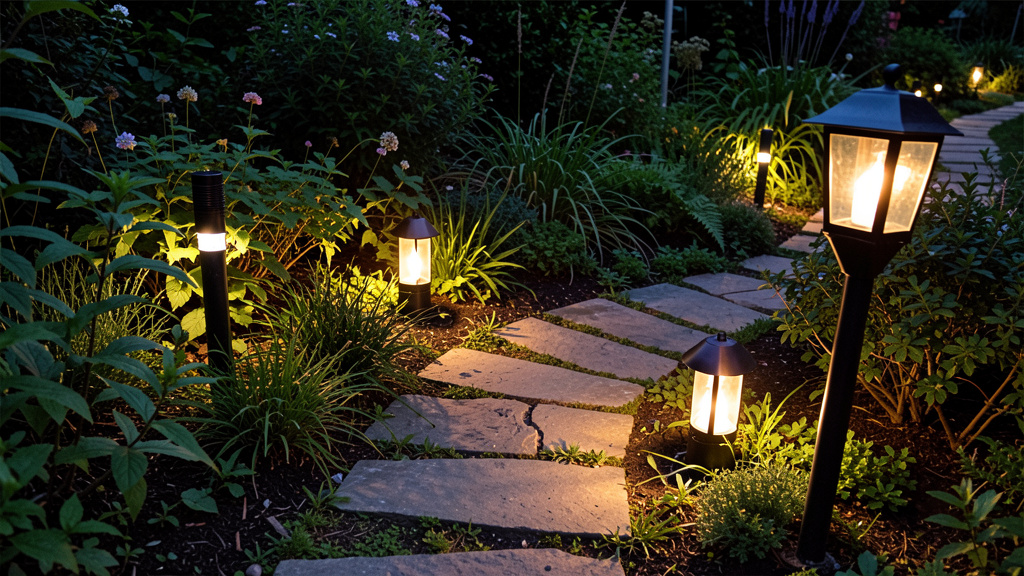
Step 2.1: Master Path and Step Lighting – The Art of Guiding Feet
Path lights are far more than decorative accents; they are critical visual cues for safe navigation. Their placement, height, output, and beam control directly impact fall prevention. Apply these evidence-based protocols:
- Height and Spacing Dynamics:
- Standard Paths (3–4ft wide): Fixtures 12–18 inches tall. Space 8–12 feet apart along straight sections. On curves, reduce spacing to 6–8 feet to maintain consistent light coverage around the bend.
- Narrow Paths (<3ft wide) or Garden Trails: Use lower-profile fixtures (8–12 inches tall) spaced 6–10 feet apart to avoid visual clutter and physical obstruction.
- Critical Rule: The light pool from one fixture should gently overlap with the next. Stand at one fixture and look toward the next; you should see a seamless transition of light, not distinct pools separated by darkness.
- Glare Elimination Techniques:
- Lens Selection: Prioritize fixtures with frosted, textured, or opalescent lenses. These diffuse the light source, eliminating harsh hotspots and direct glare. Avoid clear glass lenses with exposed bulbs.
- Baffling and Shielding: Choose fixtures with internal baffles, louvers, or deep shades that direct light downward and outward along the path, not upward toward eye level. The light source should be invisible when viewed from standing height on the path.
- Mounting Angle: For adjustable fixtures, tilt the beam slightly forward along the direction of travel. This illuminates the path ahead without casting long, confusing shadows behind the walker.
- Step and Stair Lighting – Non-Negotiable Safety:
- Illuminating the Tread: Install recessed step lights or low-profile well lights at the nosing (front edge) of each tread. The light should wash downward onto the tread surface of the step below.
- Creating Contrast: The critical safety element is illuminating the vertical face (riser) of the step below the tread you’re standing on. This creates a sharp shadow line that the human eye instantly recognizes as a change in elevation. Test rigorously at night: stand at the top and bottom of the stairs. Is every edge unmistakably clear? Are there any dark spots where a foot could misjudge depth?
- Fixture Choice: Use dedicated step lights rated for heavy foot traffic (IP67 minimum). Avoid surface-mounted fixtures that create tripping hazards. For wooden decks, consider integrated LED strip lighting under the nosing.
Why this step is crucial: Inadequate lighting is a documented environmental contributor to slips, trips, and falls outdoors, particularly on stairs and uneven surfaces. Properly executed path and step lighting serves as a proactive safety intervention.
Illustrative scenario: Path lights with clear glass lenses and exposed LED arrays can cause discomfort glare, reducing visual acuity for pedestrians. Replacing bulbs with frosted equivalents, adding internal baffles, and repositioning fixtures to eliminate dark gaps transforms the path into an intuitively navigable route where ambiance shifts from harsh to welcoming. The fixtures remain; the execution of function is refined.
Common mistake: Placing path lights too close to the physical edge of the path, where they become obstacles to mowers, trimmers, or feet. Center fixtures 6–12 inches off the path edge, nestled within low border plantings if possible.
Budget Adaptation: If replacing all fixtures isn’t feasible, prioritize step lighting and critical path junctions. Adding just two well-placed, glare-controlled step lights at a problematic staircase provides disproportionate safety ROI. Use removable adhesive-backed LED strip lights temporarily to test placement before permanent installation.
Step 2.2: Implement Strategic, Human-Centered Security Lighting
Security lighting should deter unwanted activity while fostering a sense of safety and neighborhood harmony—not create a harsh, prison-like environment that annoys neighbors and attracts insects. The key is targeted, intelligent illumination:
- Motion-Activated Lighting Protocol:
- Placement: Focus sensors on genuine entry points: side gates, garage doors, basement windows, dark corners adjacent to fences. Avoid aiming sensors toward public sidewalks or busy streets where passing cars/pedestrians will cause constant triggering.
- Sensitivity and Range: Adjust PIR (Passive Infrared) sensor sensitivity to ignore small animals (rabbits, cats). Choose fixtures with adjustable detection zones (e.g., 180-degree arc) to cover the specific area of concern without overspill.
- Light Quality: Select warm-white LEDs (2700K–3000K). Cool-white or blue-rich light feels clinical, increases skyglow, disrupts circadian rhythms, and is more attractive to insects. Aim for 300–700 lumens—sufficient to identify a person without causing disabling glare.
- Duration: Set timers to keep lights on for 30–90 seconds after motion ceases. Long durations waste energy and reduce the “surprise” deterrent effect.
- Layered Perimeter Strategy:
- Ambient Layer: Maintain low-level path lighting along perimeter fences or property edges. This eliminates deep hiding spots (“voids”) where shadows could conceal movement. Consistent, low-level light is more effective for security than isolated bright spots.
- Focused Layer: Deploy motion-activated fixtures at specific vulnerability points.
- Psychological Layer: Ensure your main entrance (front door, porch) is well-lit with warm, inviting light. A brightly lit, welcoming entrance signals occupancy and care, which is itself a deterrent. Avoid dark, shadowy porches.
- Light Trespass Mitigation (Good Neighbor Practice):
- Use full-cutoff fixtures that direct 100% of light downward.
- Install shields or hoods on existing fixtures to block light spill toward neighboring windows.
- Position fixtures so beams stop at your property line. A simple test: stand at your neighbor’s window at night. Can you see the bright face of your fixture? If yes, adjust or shield it.
Why this step is crucial: Effective security lighting reduces perceived vulnerability and actual risk while maintaining community goodwill. Poorly designed security lighting contributes to light pollution, disrupts wildlife, and creates unnecessary conflict.
Budget Alternative: High-quality solar-powered motion sensor lights have improved dramatically. While less powerful than wired options (typically 100–300 lumens), they are ideal for secondary areas: shed doors, side gates, compost bins. Look for models with adjustable sensitivity, dusk-to-dawn sensors, and replaceable batteries. Place the solar panel in a guaranteed sun location. They provide targeted deterrence with zero wiring cost.
Counter-Example to Avoid: Installing a single, ultra-bright (2000+ lumen), cool-white floodlight on a garage wall that blasts light indiscriminately across the entire backyard, into neighbors’ bedrooms, and creates deep, concealing shadows directly beneath it. This approach is ineffective for security (shadows hide threats), wasteful, and socially abrasive.
Step 2.3: Define Functional Zones with Area and Task Lighting
Use light intentionally to “draw” distinct rooms within your garden landscape, each serving a specific human activity. This zoning enhances usability and subtly guides behavior:
- Patios, Decks, and Seating Areas (The Social Zone):
- Ambient Layer: Overhead string lights (with warm-white, high-CRI bulbs), pendant lights over dining tables, or discreet LED strips under pergola beams create a “ceiling” effect, defining the space psychologically. Target 20–30 lumens per square foot for general ambiance.
- Task Layer: For dining tables, aim for 30–50 lumens per square foot on the table surface. Use dimmable pendants or focused downlights. Avoid placing bright lights directly above seating where they shine into eyes.
- Accent Layer: Low-level uplights behind seating (aimed at a wall or tall plant) provide soft backlighting, reducing harsh shadows on faces during conversation.
- Outdoor Kitchens and Cooking Areas (The Task Zone):
- Critical Requirement: Task lighting must be bright, shadow-minimizing, and heat/grease resistant. Install LED strip lights under upper cabinets, focused precisely on the grill surface and food prep counters.
- Fixture Specs: Must be rated IP65 minimum (dust-tight and protected against water jets). Look for fixtures specifically designed for outdoor kitchen use. Avoid placing lights where steam or grease can accumulate on lenses.
- Safety Note: Ensure all electrical components are GFCI-protected and located away from direct water sources (sink splash zones).
- Quiet Corners and Reading Nooks (The Contemplative Zone):
- Use very low-level lighting: a single, shielded path light nearby, a small solar-powered lantern on a side table, or a discreet well light grazing a textured wall. Target under 15 lumens per square foot. The goal is just enough light to perceive the space without disrupting relaxation or stargazing.
- Pro Tip: Incorporate a dimmer switch or smart control for this zone. The ability to lower light levels significantly enhances the sense of retreat.
Analogy: Just as interior designers layer ambient, task, and accent lighting in a living room, your garden zones require tailored solutions. A single overhead floodlight over a patio fails all three functions: it creates harsh shadows (poor task light), feels institutional (poor ambient), and offers no visual interest (no accent). Layering creates depth, comfort, and purpose.
Common friction point: “My patio feels too bright and exposed.” Solution: Remove or dim the primary overhead source. Add lower-level ambient sources (string lights at eave height, not directly overhead) and task lighting only where needed (table lamp on a side table). Introduce accent uplighting on perimeter plants to soften edges. Reduce overall lumen output while increasing layering. Darkness is a design element; strategic shadows create intimacy.
Layer 3: The Flourish Layer – Crafting Ambiance with Artistic Precision and Emotional Resonance
The canvas is now prepared. The Foundation Layer ensures structural integrity; the Function Layer guarantees usability and safety. The Flourish Layer is where emotion, artistry, and personal expression take center stage. This layer uses light as a sculpting tool—to reveal texture, create depth, evoke memory, and transform the ordinary into the extraordinary. Every choice here must enhance the experiential quality without undermining the safety and functionality meticulously established in Layers 1 and 2. Ambiance is not an afterthought; it is the intentional culmination of the framework.
Step 3.1: Apply the 3:1 Rule of Accent Lighting for Visual Hierarchy
Professional landscape lighting designers rely on this fundamental principle to create focal points and dimensional depth without visual chaos. The illuminated feature should be approximately three times brighter than the surrounding ambient light level. This ratio creates clear visual hierarchy, guiding the eye naturally while maintaining overall scene balance.
- Uplighting Techniques:
- Tree Uplighting: Place a well light or bullet spotlight at the base of a specimen tree (Japanese maple, sculptural olive, flowering dogwood). Angle the beam to graze the bark texture, revealing ridges and shadows. For larger trees, use two or three fixtures spaced evenly around the trunk. Critical Placement Tip: Position fixtures approximately one-third of the distance from the trunk to the edge of the drip line. This avoids creating a harsh “hot spot” directly at the base and allows the light to spread more naturally up the trunk.
- Architectural Uplighting: Highlight textured walls, stone pillars, or water feature edges. Angle the fixture to emphasize surface variation. Use a narrow beam angle (15–30 degrees) for dramatic effect on tall features; wider beams (45–60 degrees) for shorter walls.
- Avoiding the “Lighthouse Effect”: Ensure the light source itself is hidden from primary viewing angles. Place fixtures behind low shrubs, within mulch beds, or use models with deep recessed wells. The viewer should see the illuminated object, not the fixture glaring back.
- Downlighting (Moonlighting) Technique:
- Mount a fixture high within the branches of a deciduous tree (oak, maple). Aim the beam downward through the canopy. The goal is to mimic natural moonlight filtering through leaves, casting soft, dappled shadows on the ground below.
- Execution Nuance: Use a fixture with a wide beam angle (60+ degrees) and a frosted or diffused lens. This softens the light, preventing harsh, defined spots. Position the fixture so the beam passes through multiple layers of branches for maximum shadow play. Test at night and adjust angles meticulously.
- Psychological Impact: Moonlighting creates a serene, naturalistic, and deeply calming effect. It feels organic, not artificial.
- Silhouetting and Shadow Play:
- Place a light source behind an object with a distinctive silhouette (a sculptural agave, a wrought-iron gate, a bench) and aim it toward a lighter background (a pale stucco wall, a light-colored fence). The object becomes a dramatic dark outline against the illuminated surface.
- Creative Application: Position a low-wattage path light behind a cluster of tall ornamental grasses. The light catches the seed heads, casting intricate, moving shadows on a nearby wall as the breeze flows—a dynamic, living artwork.
Why this step is crucial: Accent lighting adds dimension, mystery, and narrative to the nighttime garden. It transforms a flat, evenly lit space into a dynamic environment that invites exploration and contemplation. It celebrates the unique character of your landscape.
Common mistake: Over-accenting. Installing uplights on every tree and bush creates visual noise, eliminates restful darkness, and diminishes the impact of true focal points. Practice restraint. Select 3–5 key features per major garden area to highlight. Let darkness frame the light.
Illustrative scenario: For a mature specimen tree, the framework ensures proper IP67-rated well lights and correct cable burial away from roots (Foundation Layer), safe path lighting to the bench beneath (Function Layer), and two strategically placed uplights at the calculated one-third distance from the trunk plus one moonlighting fixture high in the branches (Flourish Layer). The result: the tree becomes a luminous sculpture at night, with shadows dancing across the lawn. Fixtures are positioned to minimize insect attraction to seating areas, warm 2700K light enhances the tree’s natural warmth, and a separate low-voltage circuit allows independent dimming after midnight for stargazing. This holistic application creates a signature feature that is safe, functional, and deeply evocative.
Step 3.2: Master the Psychology of Color Temperature and CRI (Color Rendering Index)
Light color is not merely aesthetic; it profoundly influences human emotion, perception of space, and even physiological responses. Understanding these properties allows intentional mood crafting.
- Color Temperature (Measured in Kelvin – K):
- Warm White (2700K – 3000K): The gold standard for residential garden ambiance. Mimics the comforting glow of candlelight, sunset, or incandescent bulbs. Evokes feelings of warmth, relaxation, intimacy, and welcome. Ideal for: Seating areas, dining patios, path lighting, uplighting on warm-toned materials (brick, wood, sandstone).
- Neutral White (3500K – 4000K): Clean, crisp, alert. Resembles morning or midday sun. Feels modern and efficient. Ideal for: Task areas requiring accurate color judgment (outdoor kitchen prep surfaces), security zones where clear identification is paramount, contemporary landscapes with cool materials (concrete, steel, gray stone). Use sparingly in gardens; too much can feel sterile.
- Cool White (5000K+): Clinical, energetic, stark. Mimics overcast noon sky or fluorescent office lighting. Generally Avoid in Gardens: This spectrum feels unnatural in organic settings, can disrupt circadian rhythms (suppressing melatonin), attracts significantly more insects, and makes skin tones and plant colors appear washed out or unnatural. Reserve only for specific security floodlights where maximum visibility is the sole priority, and even then, warm-white motion sensors are often more effective psychologically.
- Color Rendering Index (CRI):
- CRI measures how accurately a light source reveals the true colors of objects compared to natural light. Scale is 0–100 (100 = perfect rendering, like sunlight).
- Minimum Standard: Always choose LEDs with a CRI of 90+ for garden lighting. Fixtures with CRI below 80 (common in cheap LEDs) make reds appear muddy brown, greens look sickly yellow, and vibrant flowers lose their magic. High CRI (90+) ensures your crimson roses glow richly, emerald foliage appears deep and lush, and skin tones look natural and healthy under patio lights.
- Practical verification: Purchase one high-CRI (90+) bulb and one standard CRI (80) bulb of the same color temperature and lumen output. Install them side-by-side on a neutral surface at dusk. The difference in color vibrancy and depth is immediately apparent. This small step prevents regretting an entire fixture purchase.
Why this step is crucial: Color temperature directly impacts the emotional experience of your space. Warm light encourages lingering and conversation; cool light can trigger alertness or unease. High CRI preserves the beauty you cultivated in your garden—it’s the difference between seeing a plant and experiencing its color.
Seasonal and Climatic Adaptation:
– Cool Climates (Northern US, Canada, UK, Northern Europe): Lean toward the warmer end of the spectrum (2700K). The psychological “warmth” of the light can subtly counteract the physical chill of evening air, making the space feel more inviting during shorter seasons.
– Warm Climates (Southern US, Mediterranean, Australia): A touch of neutral white (3500K) in task-oriented zones (dining table surface) can feel refreshing. However, maintain warm white (2700K–3000K) for ambient and accent lighting to preserve overall coziness.
– Humid/Tropical Zones: Warm white (2700K) with high CRI helps counteract visual “muddiness” that humidity can impart, keeping colors crisp and vibrant.
Counter-Example: Installing cool-white (5000K), low-CRI (75) path lights along a garden walkway. At night, the path feels institutional. Flower colors appear dull. Guests feel subtly agitated rather than relaxed. This single choice undermines gardening effort and ambiance goals.
Step 3.3: Integrate Dynamic Elements with Intention and Restraint
For special occasions, seasonal shifts, or added layers of interest, dynamic lighting elements can be powerful—but must be deployed thoughtfully to avoid gimmickry or compromising core safety/function.
- Dimmers and Smart Controls – The Ambiance Multiplier:
- Essential Application: Install dimmers on all ambient and accent lighting circuits. The ability to lower light levels after dinner (e.g., dim path lights to 30% after 10 PM) preserves night vision, reduces light pollution, enhances stargazing, and deepens intimacy.
- Smart Integration: Use smart plugs or transformers with app control to create scenes: “Dinner Party” (patio lights bright, path lights medium, tree accents on), “Stargazing” (all non-essential lights off, only minimal step lighting active), “Goodnight” (gradually dim all lights over 10 minutes). Schedule lights to adjust automatically with seasonal sunset times.
- Critical Safety Note: Never place path lighting, step lighting, or critical security lighting on dimmers that could reduce output below safe navigation levels. These circuits should remain at full brightness or use motion sensors with fixed output. Dimming is for ambiance layers only.
- Color-Changing LEDs – Use with Extreme Discernment:
- Appropriate Application: Subtle, slow color shifts for specific holidays: soft amber pulses for Halloween, gentle red/green fades for Christmas (avoid rapid cycling). Use only on non-critical accent fixtures (e.g., a single uplight on a non-essential shrub).
- Strict Avoidance: Never use color-changing lights for path lighting, step lighting, security lighting, or task lighting. Consistency and predictability are paramount for safety and usability. Rapid color changes are visually chaotic, attract excessive insects, and feel unprofessional.
- Pro Insight: If using color-changing, limit the palette. A slow transition between warm white (2700K) and a very soft amber (2200K) can mimic candlelight beautifully for special occasions without the distraction of full RGB spectrum.
- Water Feature Lighting – Capturing Liquid Magic:
- Safety First: All components must be GFCI-protected. Submersible lights require IP68 rating (continuous submersion). Ensure cables are routed away from pump intakes and sharp edges. Consult a professional for complex water features.
- Artistic Placement: For ponds, position lights at the water’s edge, aimed across the surface to highlight water lilies or koi. For fountains or cascades, place lights below the water flow to illuminate the moving water itself. Avoid aiming lights directly upward where they reflect blindingly off the water surface into seating areas.
- Color Choice: Warm white (2700K–3000K) is almost always superior. It enhances the natural blue/green tones of water and creates a warm, inviting glow. Cool white makes water look sterile; colored lights (blue, green) create an artificial “aquarium” effect that rarely feels elegant in naturalistic gardens.
- Illustrative scenario: For a recirculating stream, two IP68-rated, warm-white LED lights submerged near the top cascade, aimed downward through the flowing water, create a soft, liquid gold glow at night, casting dancing reflections on surrounding stones. Fixtures on a separate timer turn off at 11 PM to conserve energy and preserve the natural night soundscape—enhancing the water’s movement without overpowering the serene setting.
Choosing the Right Fixtures: A Decision Tree for Every Budget, Skill Level, and Garden Style
With the Integrated Framework providing strategic clarity, fixture selection transitions from overwhelming to targeted. This decision tree guides you based on primary constraints, environmental factors, and desired outcomes. Non-negotiable baseline: Every fixture must carry certification for wet-location use (UL/ETL “Wet Location” mark in North America; appropriate IP rating globally). Never compromise on this safety foundation for aesthetics or cost savings.
Comprehensive Fixture Type Comparison Guide
| Fixture Type | Primary Use Case | Critical Safety & Placement Notes | Ambiance Impact & Design Tips | Typical Budget Range (Per Fixture) | Material Longevity Notes |
|---|---|---|---|---|---|
| Path Lights | Walkways, garden edges, defining borders | Base must be stable (won’t tip); lens must be shatter-resistant (tempered glass/acrylic); bury stake 6+ inches deep in soft soil | Creates rhythm, guidance, and visual flow. Match style to garden: classic brass for traditional, matte black aluminum for modern, rustic copper for cottage gardens. Height (12″–18″) affects light spread. | $15 (basic solar) – $250+ (solid brass, professional grade) | Brass/copper develop patina; aluminum resists corrosion; avoid thin zinc alloys (“pot metal”) which crack in freeze-thaw cycles |
| Spotlights / Bullet Lights | Trees, statues, architectural features, wall washing | Secure mounting critical (vibration loosens); avoid aiming beams at windows (glare/light trespass); check beam spread (narrow=15°, wide=60°) | High-impact focal points. Adjustable heads offer flexibility. Use multiple low-wattage fixtures instead of one overpowering light for natural effect. | $20 (plastic housing) – $300+ (die-cast brass, precision optics) | Die-cast metal housings dissipate heat better than plastic, extending LED life. Sealed optics prevent moisture fogging. |
| Well Lights (In-Ground) | Discreet uplighting for trees, walls, pathways | Must be rated IP67/IP68; ensure proper drainage around fixture (gravel base); avoid placing where soil compaction is heavy (near paths) | Invisible by day; dramatic effect by night. Ideal for clean, minimalist landscapes. Creates “light from the earth” effect. | $35 – $400+ (stainless steel 316 for coastal areas) | Stainless steel 316 essential for salt-air environments. Check gasket quality—silicone lasts longer than rubber. |
| Deck / Step Lights | Stairs, deck perimeters, railings, under benches | Low-voltage strongly preferred; ensure no protrusion creates tripping hazard; heat dissipation critical for LED longevity | Enhances safety while adding subtle elegance. Integrated designs look built-in. Warm white only for steps to avoid clinical feel. | $25 – $150+ (integrated LED modules) | Look for UV-stabilized materials to prevent yellowing. Replaceable LED modules extend fixture life vs. integrated non-serviceable units. |
| String Lights / Festoons | Patios, pergolas, arbors, temporary ambiance | Must be explicitly rated “Outdoor Use”; check socket seals; avoid overloading circuits (follow wattage limits); secure tightly to prevent wind damage | Instant festive, romantic, or communal mood. Choose bulb style: vintage Edison (warm, directional), globe (softer diffusion). Warm white (2700K) with high CRI essential. | $25 (24ft basic) – $200+ (commercial-grade, heavy-duty) | Commercial-grade (S14 bulbs, rubber-coated wire) lasts years; cheap sets fail after one season. Look for replaceable bulbs. |
| Bollard Lights | Driveways, wide pathways, property perimeters | Must be impact-resistant (vehicles, mowers); bury deep for stability; ensure adequate height (24″–36″) for visibility | Strong architectural statement. Defines space formally. Choose height proportional to pathway width. | $50 – $500+ (cast aluminum, concrete) | Concrete bollards are permanent; metal require proper anchoring. Powder-coated finishes resist chipping. |
| Solar Path/Accent Lights | Low-traffic paths, garden beds, temporary accents | Panel placement critical (6–8 hrs direct sun); verify battery replaceability; check runtime specs (hrs on full charge) | Varies widely. High-quality solar can be charming; cheap versions look flimsy and underperform. Best as supplement, not primary lighting. | $10 – $120+ (premium brands with LiFePO4 batteries) | Lithium Iron Phosphate (LiFePO4) batteries last 3–5x longer than standard NiMH. Replaceable batteries = longer fixture life. |
Decision Tree: Navigating Your Fixture Selection
Answer these questions sequentially to narrow choices efficiently:
- What is the PRIMARY FUNCTION of this light?
- Safety/Navigation (Path, Steps): Prioritize path lights, step lights, bollards. Focus on glare control, consistent spacing, warm white (2700K–3000K), high CRI (90+).
- Security (Perimeter, Entry Points): Prioritize motion-sensor floodlights (warm white), layered path lighting. Focus on coverage area, sensor adjustability, shielded optics.
- Ambiance/Accent (Trees, Features, Zones): Prioritize spotlights, well lights, string lights. Focus on beam control, color temperature, dimmability.
-
Task (Outdoor Kitchen, Dining): Prioritize under-cabinet strips, focused downlights. Focus on brightness (lumens), CRI (90+), IP rating (IP65+), heat resistance.
-
What is my SKILL LEVEL and INSTALLATION CONTEXT?
- Beginner / Small Project (<10 fixtures): Choose a reputable plug-and-play low-voltage kit. Kits include transformer, cable, connectors, and fixtures—all pre-matched and UL-listed. Ideal for patios, small gardens. Avoid cheapest kits; invest in mid-tier brands (Volt, Kichler Landscape).
- Intermediate / Custom Layout: Purchase components separately: transformer sized for your load, direct-burial cable (14/2 or 12/2 gauge), individual fixtures. Requires basic wiring knowledge (waterproof connectors). Offers maximum flexibility and quality control.
-
Advanced / Large Property / Line-Voltage Needs: Consult a licensed landscape lighting professional. They handle complex zoning, voltage drop calculations, conduit runs, and code compliance. Worth the investment for estates, challenging terrain, or integrated smart systems.
-
What is my REALISTIC BUDGET (Total Project)?
- Under $200: Focus on 3–5 high-impact areas. Example: 4 quality path lights for main walkway ($80), 1 motion sensor security light for side gate ($60), 1 string light set for patio ($50). Prioritize safety zones first. Use solar only for non-critical accent spots (e.g., bench area).
- $200 – $800: Build a core low-voltage system. Example: 300W transformer ($100), 100ft 14/2 cable ($60), 8 path lights ($200), 4 spotlights ($160), connectors/misc ($50). Covers primary paths, 1–2 accent features, basic security.
- $800+: Consider professional design/installation consultation for layout, or invest in premium fixtures (solid brass, commercial-grade), smart controls, multiple zones, water feature lighting. This budget allows for a truly comprehensive, durable system.
Critical Friction Point Resolution:
– “I found the perfect fixture online, but it’s not rated for wet locations.”
Solution: Walk away. No aesthetic appeal justifies the risk of electrical failure, fire hazard, or voided insurance. Search for fixtures with identical visual design but proper wet-location certification. Reputable manufacturers (Kichler, FX Luminaire, Hinkley) offer extensive lines with consistent aesthetics across safety ratings. The short-term savings of an uncertified fixture risk catastrophic long-term consequences.
– “The fixture I love is plastic, but my neighbor says metal is better.”
Solution: Evaluate context. High-quality, UV-stabilized polycarbonate plastic can outperform cheap, thin metal (“pot metal”) that corrodes or cracks. Look for thick-walled construction, sealed optics, and reputable brand warranties. For coastal areas or high-moisture zones, prioritize marine-grade metals (stainless steel 316, solid brass, copper). For sheltered patios, quality plastic is acceptable. Check warranty length—5+ years indicates confidence in materials.
Pro Tip: Visit a specialty lighting showroom (not just big-box retailers) if possible. Handle fixtures. Feel the weight (heavier often indicates thicker metal, better heat dissipation). Examine gasket seals. Ask about warranty terms and availability of replacement parts (lenses, LED modules). Quality fixtures are an investment; they should feel substantial and well-engineered. A $40 fixture that fails in 18 months costs more than a $120 fixture lasting a decade.
Wiring and Power: Low-Voltage vs. Line-Voltage vs. Solar—A Deep, Unbiased Demystification
The power source is the circulatory system of your lighting design. Choosing incorrectly leads to frustration, hazard, or underperformance. This section provides granular, practical clarity on each option—its mechanics, ideal applications, limitations, and installation nuances—free from marketing hype or oversimplification.
Low-Voltage Systems (12V/24V AC): The DIY Sweet Spot for Safety and Flexibility
How It Works: A transformer (plug-in or hardwired) converts standard household current (120V/240V AC) to a safer 12V or 24V AC output. This low-voltage power travels through direct-burial cable to each fixture. Most modern systems use 12V; 24V systems are advantageous for longer cable runs (reducing voltage drop) but require compatible fixtures.
Comprehensive Pros:
– Safety: Minimal shock risk even if cable is cut (though always turn off power before handling). Safe for DIY installation by homeowners following protocols.
– Installation Flexibility: Cable can be buried shallowly (3–6 inches) in garden beds, run under mulch, or tucked along edging. No conduit required in most residential applications (check local codes). Easy to reposition fixtures or expand the system later.
– Energy Efficiency: Modern LED fixtures draw very little power (e.g., a 3W LED path light). A typical 300W transformer can power 80+ such fixtures.
– Design Versatility: Vast array of fixture styles, sizes, and beam options available. Easy to create multiple zones controlled independently.
– Cost-Effectiveness: Lower material costs than line-voltage; no need for expensive conduit or deep trenching.
Detailed Cons & Mitigation Strategies:
– Voltage Drop: The primary technical challenge. Over long cable runs (>75–100ft), electrical resistance causes voltage to decrease, resulting in dimmer lights at the far end of the run.
– Mitigation: Calculate total wattage. Use thicker gauge cable for longer runs (16/2 for <50ft, 14/2 for 50–150ft, 12/2 for >150ft). Place the transformer centrally within the layout to minimize maximum run length. Split large layouts into multiple zones powered by separate transformer taps or a multi-tap transformer. Use a voltage drop calculator (many free online tools) during planning.
– Transformer Dependency: Requires access to a GFCI-protected outdoor outlet. Transformer hum (audible buzz) can occur with cheap models; choose toroidal-core transformers for silent operation.
– Not for High-Power Needs: Cannot power very high-lumen fixtures (e.g., stadium lights for large fields).
Installation Nuances Often Overlooked:
– Series vs. Parallel Wiring: Always wire in parallel. Each fixture connects independently to the main cable run (using “T” or “piercing” connectors). Daisy-chaining fixtures in series (one after another) means if one bulb fails, all downstream fixtures go out—a major maintenance headache. Parallel wiring isolates failures.
– Cable Gauge Selection: Don’t guess. For a 100ft run powering ten 3W (30W total) path lights, 16/2 cable is sufficient. For a 150ft run powering six 10W (60W total) spotlights, upgrade to 14/2 cable. When in doubt, size up—thicker cable costs slightly more but prevents future dimming issues.
– Burial Best Practices: Lay cable in a shallow trench. No conduit needed unless crossing under a driveway, patio, or high-traffic area (then use PVC conduit). After burial, mark the cable path on your “as-built” plan. Place a layer of sand or fine gravel under the cable in rocky soil to prevent abrasion.
– Transformer Sizing: Sum the wattage of all fixtures on the circuit. Select a transformer rated for at least 20% more capacity (e.g., 180W load requires a 225W+ transformer). This prevents overheating, extends transformer life, and allows for future expansion. Undersized transformers fail prematurely.
Illustrative scenario: For a 120-foot perimeter path around a large backyard, initial planning with a single 200W transformer at one corner using 16/2 cable would likely result in noticeable dimming at the far end due to voltage drop. A revised plan using a 300W multi-tap transformer placed centrally, with 12/2 cable for the main 80ft backbone and 14/2 cable for branch runs, ensures consistent, full brightness across all fixtures. The slightly higher upfront investment prevents disappointing results and costly rework.
Line-Voltage Systems (120V/240V AC): Power, Permanence, and Professional Requirement
How It Works: Fixtures connect directly to standard household voltage circuits, often requiring conduit, deep burial, and integration with the home’s main electrical panel.
Comprehensive Pros:
– No Voltage Drop: Delivers full power consistently over very long distances. Ideal for large properties, sports fields, or high-lumen security applications.
– High Power Capacity: Can power extremely bright fixtures (100W+ halogen or LED equivalents) where low-voltage lacks sufficient output.
– Permanent Installation: When installed correctly by professionals, offers exceptional durability and longevity.
Detailed Cons & Critical Warnings:
– Significant Safety Hazard: Carries lethal shock risk. Moisture ingress, damaged insulation, or improper grounding can cause electrocution or fire.
– Professional Installation Mandatory: Requires a licensed, insured electrician in virtually all jurisdictions. Permits, inspections, and adherence to National Electrical Code (NEC) or local equivalents are non-optional.
– High Cost & Complexity: Deep trenching (18–24+ inches), rigid or flexible conduit, specialized fittings, and labor costs are substantial.
– Inflexibility: Extremely difficult and expensive to modify or expand after installation.
– Regulatory Burden: Strict code requirements govern burial depth, conduit type, GFCI protection, junction boxes, and clearances from structures/water.
When to Choose (Rare for Typical Residential Gardens):
– Illuminating a large athletic field or expansive estate grounds where low-voltage lacks reach/power.
– Integrating lighting into new construction where conduit is run during foundation work.
– Specific high-output security applications mandated by property requirements (e.g., perimeter floodlighting for commercial properties).
Safety Imperative: If your project involves line-voltage outdoor lighting, cease DIY planning immediately. Contact licensed electricians specializing in landscape lighting. Verify licenses, insurance, and references. Request detailed proposals including compliance documentation. This is not an area for cost-cutting or experimentation. The risks are severe and irreversible.
Solar-Powered Systems: Zero Wiring, Variable Performance—Setting Realistic Expectations
How It Works: Each fixture contains a small photovoltaic panel that charges an internal battery during daylight hours. At dusk, a photocell triggers the LED to illuminate using stored battery power.
Comprehensive Pros:
– Truly Wireless: Zero trenching, zero electrical work, zero connection to home power. Ideal for renters, historic properties where digging is restricted, or remote garden areas far from outlets.
– Zero Operating Cost: No electricity consumption.
– Easy Installation & Relocation: Typically involves pushing a stake into the ground. Can be moved seasonally or as garden layouts change.
– Eco-Friendly Perception: Appeals to sustainability values (though manufacturing impact varies).
Detailed Cons & Performance Realities:
– Sunlight Dependency: Performance is directly tied to daily sun exposure. Fixtures in shaded areas (under trees, north-facing spots, areas with morning fog) will be dim or fail to activate.
– Battery Limitations: Integrated batteries degrade over time (typically 1–3 years). Many inexpensive models have non-replaceable batteries, rendering the entire fixture useless when the battery dies. Runtime diminishes with age and cold temperatures.
– Lower Output & Consistency: Even high-end solar fixtures generally produce less consistent, lower-lumen light than wired low-voltage equivalents. Runtime varies daily based on weather.
– Quality Disparity: The market is flooded with low-quality products. Cheap solar lights use dim LEDs, poor batteries, and flimsy construction.
– Seasonal Variation: Shorter winter days and lower sun angles significantly reduce charging time and runtime.
Maximizing Solar Performance – A Practical Guide:
1. Panel Placement is Everything: Install fixtures where panels receive unobstructed direct sunlight for a minimum of 6–8 hours daily. South-facing (Northern Hemisphere) is ideal. Avoid even partial shade from leaves, eaves, or fences.
2. Battery Knowledge: Prioritize models advertising “replaceable batteries” (usually AA or 18650 lithium). Look for Lithium Iron Phosphate (LiFePO4) batteries—they offer 2–3x the cycle life of standard lithium-ion and perform better in temperature extremes.
3. Runtime Verification: Check specifications for “runtime on full charge” (e.g., “8 hours at full brightness”). Be skeptical of vague claims like “all night.” Real-world runtime is often less than advertised.
4. Seasonal Management: In regions with harsh winters, consider removing solar fixtures and storing them indoors to preserve battery life. Clean panels monthly with a soft cloth and mild soap—dust, pollen, and bird droppings drastically reduce efficiency.
5. Strategic Application: Use solar only for:
– Low-traffic accent lighting (e.g., highlighting a single bench, a small flower bed)
– Supplemental path lighting on secondary routes where safety isn’t critical
– Temporary/event lighting (weddings, holidays)
– Areas where running cable is genuinely impossible or prohibitively expensive
Honest Assessment: Solar technology has improved, but it remains a supplemental solution for most residential gardens. Relying solely on solar for primary safety lighting (main paths, steps, security zones) is risky due to inconsistent performance. The most successful gardens use solar alongside a core low-voltage system: low-voltage for critical safety and primary ambiance zones, solar for charming accents in sunny, low-stakes areas. Invest in reputable brands (e.g., URPOWER, Aootek, LITOM) with clear specifications and good customer reviews—avoid no-name brands on marketplace sites.
The Hybrid Approach: Strategic Integration for Optimal Results
Many thoughtfully designed residential lighting systems intelligently combine power sources to leverage strengths and mitigate weaknesses:
– Core System: Low-voltage for all critical zones—main pathways, steps, primary security points, patio ambient lighting. Provides reliable, consistent, high-quality illumination where it matters most.
– Strategic Solar: High-quality solar path lights for a secondary garden trail receiving full sun; solar-powered motion sensor light for a remote shed door. Adds functionality without trenching.
– Targeted Line-Voltage (Professionally Installed): A single, high-output, warm-white LED floodlight with motion sensor at the main driveway entrance, installed by an electrician for maximum security impact where low-voltage might lack reach.
This approach optimizes safety, ambiance, budget, and practicality without forcing a single solution to perform beyond its capabilities. It reflects mature design thinking—using the right tool for each specific job.
Placement Psychology: Where to Put Lights for Maximum Impact, Minimum Risk, and Emotional Resonance
Fixture placement is where technical knowledge meets human perception. Poor placement creates hazards (glare, disorienting shadows), wastes light (trespass, skyglow), and destroys ambiance. Masterful placement feels intuitive, guides movement effortlessly, and reveals the garden’s soul. These evidence-based principles, drawn from environmental psychology and lighting design practice, transform placement from guesswork into an intentional art.
The 5 Golden Rules of Fixture Placement (Non-Negotiable)
- Eliminate Eye-Level Glare: Never position a light source at direct human eye level (approximately 3–5 feet high) where it can shine directly into the eyes of someone standing or walking. Path lights should be low (12–18″); spotlights must be aimed downward or shielded so the bulb is not visible from typical viewing positions. Glare causes discomfort, reduces visibility (pupils constrict), and creates safety hazards.
- Create Seamless Light Layers, Not Isolated Pools: Avoid the “landing strip” effect of evenly spaced, identical path lights creating distinct bright spots separated by darkness. Instead, overlap light beams slightly so the edge of one fixture’s pool meets the next. This creates even, shadow-minimized illumination that feels expansive and safe. For path lights, space them so the light pools gently merge.
- Respect the Natural Horizon Line: When uplighting trees or structures, position fixtures so the light source itself is hidden from the primary viewing angle (e.g., behind a low shrub, within deep mulch). This prevents the distracting “lighthouse effect” where the bright fixture draws attention away from the illuminated subject. The focus should be on the tree’s texture, not the light fixture glaring back.
- Engineer Shadow Management: Light from a single direction creates long, potentially hazardous shadows. For steps, narrow paths, or areas requiring precise navigation, use opposing lights or wide-beam fixtures to fill shadows. Test placements at night: walk the path slowly. Do shadows obscure changes in elevation or obstacles? Adjust fixture angles or add a second light source to eliminate dangerous shadow zones.
- Honor Daytime Aesthetics: Fixtures should complement, not dominate, the landscape by day. Choose finishes that harmonize with your garden style (oil-rubbed bronze for rustic, matte black for modern, aged copper for cottage). Hide cables under mulch, along edging stones, or within planting beds. During installation, step back frequently in daylight to assess visual impact. A fixture that looks “hidden” at night might be an eyesore by day.
Zone-by-Zone Placement Psychology Guide
Front Yard & Entry Sequence:
– Primary Goal: Project warmth, welcome, and security. Signal “this home is cared for.”
– Placement Strategy:
– Path lights along the main walkway to the front door: spaced for seamless coverage, warm white (2700K), frosted lenses to eliminate glare for approaching visitors.
– Single accent light on a foundation planting or architectural detail near the door (e.g., a small uplight on a column). Avoid lighting the front door itself directly—creates glare for visitors and feels interrogative.
– House number illuminated with a small, shielded fixture (ensures visibility for emergency services).
– Motion sensor light positioned to cover the mailbox area or side gate, not aimed directly at the street or neighbor’s property.
– Psychological Insight: Soft, warm light on the approach path subconsciously signals safety and invitation. Harsh, cool light on the door can feel unwelcoming or institutional. The entry sequence should feel like a gentle transition from public to private space.
Backyard Living Zones (Patios, Decks, Lawns):
– Primary Goal: Foster relaxation, connection, and defined functionality.
– Placement Strategy:
– Seating Areas: Layer ambient (string lights at eave height, not directly overhead), task (dimmable pendant over dining table), and accent (low uplight behind seating grazing a wall or tall plant). Keep light sources below eye level when seated.
– Fire Pit Zone: Place path lights leading to the pit, but avoid lighting the pit area itself brightly. The fire provides ample ambient light; additional bright lighting diminishes the fire’s ambiance and creates competing light sources. A single, very low-level path light nearby ensures safe access.
– Lawn/Play Area: Minimal, low-level path lighting defining the perimeter. Avoid bright overhead lights that create deep, concealing shadows in the center. The goal is to define boundaries without making the space feel like a stadium.
– Psychological Insight: Lower light levels in relaxation zones encourage conversation, reduce visual stimulation, and support natural circadian rhythms. Bright, uniform lighting feels institutional and inhibits relaxation. Strategic darkness is as important as light.
Side Yards & Transitional Corridors:
– Primary Goal: Safe, unobtrusive passage; privacy preservation.
– Placement Strategy: Minimal path lighting only where needed for navigation (e.g., the route to the side gate). Use shielded fixtures aimed strictly downward. Avoid over-lighting—these areas should feel like quiet corridors, not stages. Ensure no light trespass into neighbors’ windows or yards.
– Psychological Insight: These zones benefit from “wayfinding” lighting—just enough to see the path clearly without drawing attention to the space itself. Over-lighting creates a sense of exposure and wastes energy. Respect the transitional nature of these areas.
Water Features (Ponds, Fountains, Streams):
– Critical Safety Reminder: All electrical components must be GFCI-protected. Submersible lights require IP68 rating. Maintain safe distances from pump intakes and electrical connections. Consult a professional for complex water features.
– Placement Strategy:
– Ponds: Position lights at the water’s edge, aimed across the surface to highlight lilies, koi, or rock formations. Avoid aiming lights directly upward where reflections cause glare in seating areas.
– Fountains/Cascades: Place lights below the water flow to illuminate the moving water. For tiered fountains, light each tier from below to emphasize the water’s journey.
– Streams: Submerge small, warm-white LED lights at gentle bends to catch the water flow. Space them to create a “liquid path” effect.
– Psychological Insight: Warm white light (2700K–3000K) enhances the natural blue/green tones of water and creates a serene, inviting glow. Cool white makes water look sterile; colored lights (blue, green) create an artificial “aquarium” effect that rarely feels elegant in naturalistic settings. The goal is to enhance the water’s inherent beauty, not transform it.
Illustrative scenario: For a pool deck and adjacent lounge area, safety requires clear definition of the pool edge. Instead of overhead or direct pool lighting (which creates glare and diminishes water reflections), install low-voltage LED strip lighting under the pool coping (edge), casting a soft glow onto the deck surface around the pool perimeter. Add subtle path lights along the route from the house, and use warm-white, shielded uplights to graze textured walls of the outdoor kitchen, creating ambient backlighting for lounge chairs. The pool edge is clearly defined for safe navigation, while the water surface remains dark, preserving reflections of the night sky. This nuanced placement transforms a potential hazard zone into a serene, resort-like ambiance feature—demonstrating that “safety lighting” for water features focuses on illuminating the transition zone, not the water itself.
Seasonal and Adaptive Lighting: Building Resilience for Weather, Holidays, and Evolving Needs
A static lighting plan becomes obsolete as seasons shift, plants grow, and life changes. Truly masterful garden lighting systems are designed with adaptability and resilience baked in from the outset. This section provides actionable protocols for weatherproofing, seasonal adjustments, holiday integration, and long-term system evolution—ensuring your investment remains functional, beautiful, and relevant year after year.
Climate-Specific Weatherproofing Protocols
Environmental conditions are the ultimate test of fixture quality and installation quality. Proactive measures prevent premature failure and costly replacements.
- Humid, Coastal, or Salt-Air Environments (Florida, Gulf Coast, Pacific Northwest, Coastal UK/EU):
- Fixture Selection: Prioritize marine-grade materials: Solid brass, copper, or stainless steel 316 (not 304). Avoid aluminum (corrodes in salt air) and any fixtures with exposed steel components. Powder-coated finishes must be specifically rated for marine environments.
- Sealant Protocol: Apply a thin bead of dielectric grease or marine-grade silicone sealant to all cable connection points before assembly. This creates a moisture barrier inside connectors. Reapply annually during maintenance.
- Placement Strategy: Elevate fixtures slightly above grade in areas prone to standing water or salt spray. Ensure adequate drainage around in-ground well lights.
-
Maintenance: Rinse fixtures monthly with fresh water to remove salt deposits. Inspect seals and gaskets quarterly for degradation.
-
Cold Climates with Freeze-Thaw Cycles (Northern US, Canada, Northern Europe):
- Fixture Selection: Choose fixtures with flexible gaskets (silicone over rubber) that remain pliable in sub-zero temperatures. Avoid fixtures with thin, brittle plastic components prone to cracking.
- Installation Protocol: Bury cable at least 6 inches deep to avoid frost heave damaging connections. In areas with heavy snowfall, select taller path lights (18″+) or plan to clear snow carefully around fixtures. Mark fixture locations with small, weatherproof stakes before winter to avoid damage during snow removal.
- Transformer Care: Mount transformers in sheltered locations (garage, shed) if possible. If mounted outdoors, ensure the enclosure is rated for extreme cold and has adequate ventilation to prevent condensation buildup when temperatures fluctuate.
-
Battery Note for Solar: Lithium Iron Phosphate (LiFePO4) batteries perform significantly better in cold temperatures than standard lithium-ion. If using solar in cold zones, prioritize this battery type.
-
Arid, High-UV, or Desert Climates (Southwest US, Australia Outback, Mediterranean Summers):
- Fixture Selection: Prioritize UV-stabilized materials. Powder-coated finishes should specify UV resistance. Avoid plastics that yellow or become brittle under intense sun.
- Placement Strategy: Position solar panels for optimal sun exposure (critical in these zones), but ensure fixture bodies are shaded where possible to reduce heat buildup (prolongs LED and driver life).
- Maintenance: Clean solar panels weekly during dusty seasons. Dust accumulation drastically reduces charging efficiency. Inspect cable insulation annually for UV degradation (cracking, brittleness).
Universal Bi-Annual Maintenance Schedule (Spring & Fall):
– Spring (Post-Winter):
– Inspect all fixtures for physical damage from weather, animals, or snow removal.
– Clean lenses thoroughly with mild soap, water, and a soft cloth. Remove mineral deposits with vinegar solution if needed.
– Check and tighten all mounting hardware (expansion/contraction loosens screws).
– Test GFCI outlets and transformer functionality.
– Trim back any new plant growth obscuring fixtures or cable paths.
– Verify timer/smart settings align with lengthening days.
– Fall (Pre-Winter):
– Clean lenses again after summer pollen/dust accumulation.
– Inspect cables for rodent damage (common in fall as animals seek shelter).
– Apply dielectric grease to exposed connections in humid/coastal zones.
– For solar fixtures: Clean panels thoroughly; check battery health; consider storing non-essential solar lights indoors if harsh winter is expected.
– Adjust timer/smart settings for shortening days.
– Mark cable paths and fixture locations on your plan before leaf fall or snow cover obscures them.
Holiday and Special Event Lighting Integration – Done Right
Holidays are a time for celebration, not lighting system stress. Integrate festive elements safely and sustainably.
- Proactive Planning During Initial Installation:
- Run extra cable length (10–15% more) to potential holiday decoration zones (e.g., near the front door, along the roofline edge of a pergola). Install weatherproof outdoor-rated outlets with GFCI protection in these zones during initial build.
- Designate specific circuits or smart plugs for seasonal use. Label them clearly in your electrical panel or smart app.
- Safe Decoration Practices:
- Only use lights and extension cords explicitly rated for outdoor use. Check for certification marks (UL, ETL) and “Suitable for Wet Locations.”
- Inspect all cords and bulbs before installation. Discard any with frayed wires, cracked sockets, or damaged insulation.
- Never overload circuits. Follow the wattage limits printed on extension cords and power strips. When in doubt, use multiple circuits.
- Secure cords firmly to surfaces using clips designed for outdoor use—never nails or staples that can damage insulation. Use cord covers at pathway crossings.
- Turn off all decorative lighting before going to bed or leaving home. Use timers or smart plugs for automatic shutoff.
- Post-Holiday Protocol:
- Carefully coil cords to prevent kinks. Store in a dry, temperature-controlled location.
- Note any fixtures or cords that underperformed or failed. Replace them before next season.
- Update your lighting plan with lessons learned: “Added two extra GFCI outlets near front porch for future holiday use.”
Philosophical Note: Holiday lighting should enhance your existing framework, not overwhelm it. A few strands of warm-white fairy