Stop guessing and start building with knowledge. This comprehensive guide walks you through every critical decision—from identifying load-bearing walls to selecting appropriate structural supports—while prioritizing safety, code compliance, and long-term integrity.
Opening an interior wall to create a flowing kitchen-living space, expanding a cramped hallway, or framing a new doorway appears straightforward. Yet beneath the drywall lies a carefully balanced structural system of studs, plates, and critical support members carrying cumulative loads from floors, roof, and contents above. Misjudging a wall’s role or installing inadequate support can lead to progressive issues: sagging floors, cracked finishes, compromised framing, or more serious structural concerns. This guide provides a structured, phase-based approach to help you navigate these decisions with greater understanding. We synthesize widely referenced building science principles, International Residential Code (IRC) frameworks, material considerations, and field-tested protocols into a clear workflow. Whether planning a modest doorway or a wider opening, you’ll gain insight into assessing structural roles, understanding load pathways, selecting appropriate materials, implementing robust temporary support, and recognizing clear thresholds where professional engineering is essential. Structural modifications carry responsibility—this guide emphasizes verification, caution, and informed engagement with local building authorities.
Introduction: Why Wall Assessment Requires Methodical Verification
Homes function as integrated structural systems. Every wall participates in a network of forces: dead loads (permanent weight of framing, roofing, finishes), live loads (occupants, furniture, seasonal snow), and environmental stresses (wind, seismic activity where applicable). Removing even a single stud in a load-bearing assembly disrupts this equilibrium. The International Residential Code dedicates specific chapters—R301 (loads), R502 (floor framing), R602 (wall construction)—to ensuring these systems perform safely over time. Yet simplified online advice often reduces beam sizing to generalized rules: “Double 2×10 for an 8-foot span” or “Match header depth to wall thickness.” These overlook critical variables: regional snow loads, roof geometry, floor joist orientation, concentrated point loads, or local code amendments.
This guide operates on a foundational principle: structural decisions require context-specific verification, not universal shortcuts. We emphasize transparent decision pathways, safety margins, and alignment with widely adopted standards (including references from the American Wood Council’s Wood Frame Construction Manual and ICC publications), while underscoring that local building department requirements always supersede general guidance. Municipal building departments exist to safeguard occupants—this resource aims to help you engage with them more effectively. Before any tool contacts drywall, you’ll understand why verification steps matter, how errors may manifest over time, and where professional validation becomes necessary. This work transcends passing inspection; it’s about preserving the integrity that shelters your household for years to come.
The Structural Integrity Framework: A 5-Phase Decision Pathway
True safety emerges from a cohesive workflow where each phase logically informs the next. This framework—synthesized from consolidated building science resources and field protocols—guides you from initial observation to informed action. It sequences tasks deliberately to prevent irreversible steps (like cutting framing before verifying temporary support). Phase 3 (Load Path Analysis) represents the cognitive peak: developing this awareness transforms assumptions into reasoned judgment.
The Fundamental Principle: The reliability of your modified opening depends on the integrity of every link in the support chain—from properly installed temporary bracing during demolition to the final header’s connection with adjacent framing.
Phase 1: Wall Typology Assessment – Determining Structural Role (The Essential First Step)
Never proceed on assumption alone. Misidentification is a frequent contributor to structural complications in wall modifications. Follow this multi-point verification protocol:
Step 1: Trace the Load Path Upward
Access your attic (safely, with proper footing on joists). Locate the wall in question. Observe what rests directly above it:
– Roof Trusses: If trusses run perpendicular to the wall and bear directly on its top plate, it likely carries roof load. If trusses run parallel and span clear over the wall (with no vertical webs landing on it), it may be non-bearing. Important nuance: Some truss configurations (e.g., scissor trusses) transfer lateral forces unexpectedly—when uncertain, seek professional input.
– Rafters: In stick-framed roofs, if rafters meet at a ridge board and rest on this wall’s top plate, it supports roof weight.
– Floor Joists Above: In multi-story homes, check the floor above. If floor joists run perpendicular to the wall and terminate on its top plate (visible in attic or via access panel), it carries floor/ceiling loads. Joists running parallel over the wall suggest non-bearing status—but verify for concentrated loads (see Phase 2).
Step 2: Foundation Correlation
Descend to the basement or crawlspace. Locate the wall’s position relative to the foundation:
– Is there a continuous footing, beam, or structural post directly beneath it? This strongly indicates load-bearing function.
– Is a steel column (lally column) or girder aligned under the wall? This confirms load path continuity.
– Note: In platform framing, some interior walls sit on subfloor without direct foundation support yet still carry roof loads transferred via ceiling joists. Attic verification remains essential.
Step 3: Documentation Review
Original construction drawings (sometimes stored with property records or available at the local building department) often label bearing walls with notations like “B.W.” or structural grid indicators. If prior renovations occurred, review associated permits—they may reveal relocated loads or added structural elements.
Step 4: Debunking the “Knock Test”
Tapping a wall to judge hollowness is unreliable. Non-bearing partitions can feel solid due to insulation density or double top plates; load-bearing walls in older construction may sound hollow due to wider stud spacing. Sound should never be used as a diagnostic method.
Indicators Suggesting Professional Assessment Is Advisable:
– The wall runs parallel to floor joists but has a header above an existing opening (suggesting prior load transfer)
– Visible cracks in drywall above openings on this wall (potential sign of historical stress)
– The wall aligns near the home’s central axis (a common location for primary load paths)
– Your home features vaulted ceilings, cathedral spaces, or complex roof geometry above the wall
Why this phase matters: Removing framing from a load-bearing assembly without verified support can initiate immediate deflection or delayed issues as materials respond to redistributed forces. Verification requires time and attention; addressing structural complications after modification is significantly more complex. Taking hours to confirm structural role is a prudent investment before proceeding.
Phase 2: Load Path Analysis – Understanding What the Header Must Support
Identifying a wall’s structural role is only the beginning. To approach header selection knowledgeably, consider what loads converge above the planned opening. Loads are categorized conceptually:
Dead Loads (Permanent Weight):
– Roof assembly: Shingles, sheathing, framing members. Typical range varies by design.
– Ceiling assembly: Drywall, insulation, fixtures.
– Floor assembly (if wall supports floor above): Subfloor, finished flooring, joists.
– Note: psf (pounds per square foot) values are highly site-specific. Local codes define minimums.
Live Loads (Variable Weight):
– Residential floors: IRC specifies minimum design loads (e.g., 40 psf for general living areas).
– Roofs: Snow load requirements vary significantly by geographic region. Consult your local building department or regional snow load maps (referenced in ASCE 7 standards).
– Attic spaces: If designed for storage, higher live load capacity applies.
Concentrated Loads: A Critical Consideration
A wall may carry focused weight from elements above:
– A post supporting a beam in the room above
– A masonry chimney section resting on the wall
– Heavy fixtures or equipment locations directly overhead
Example: A structural post from the second floor lands near your planned opening. That post concentrates significant load from an upper area. Standard prescriptive tables typically do not account for this—you would need engineered analysis.
Visualizing the Load Path:
Sketch a simple side view of your wall section. Draw arrows downward showing:
1. Roof peak to ridge board
2. Ridge board to rafters/trusses
3. Rafters/trusses to the wall’s top plate
4. Top plate through studs to sole plate
5. Sole plate to subfloor, then to floor framing or foundation
Where arrows converge on your wall indicates load concentration. This exercise clarifies why a header’s role is to redistribute forces laterally to adjacent framing (jack and king studs), not merely “hold up” what’s above.
Common Oversight to Avoid:
Assuming “only the roof” matters for a first-floor wall in a two-story home. Such a wall often carries:
– Dead and live loads from the second-floor structure
– Dead and live loads from the roof assembly
Total tributary load can be substantial. Overlooking the floor above is a frequent error in preliminary assessments.
Phase 3: Header Selection Guidance – From Analysis to Material Options
This phase bridges conceptual understanding and practical selection. We emphasize methodology and decision factors—not prescriptive sizing—because final header specifications must align with your local building code requirements and, where applicable, engineered drawings. This section educates; it does not replace site-specific professional validation.
Understanding Header Function
A header is a horizontal structural assembly spanning the rough opening. Its purpose is to transfer loads from above around the opening to the jack studs (trimmers) on either side. Jack studs then transfer load to full-height king studs. Header depth (height) is a primary factor in resisting bending (deflection); width must accommodate wall thickness.
Step-by-Step Selection Considerations
-
Determine Rough Opening Width:
Measure the intended clear opening (e.g., 36″ for a standard door). Account for jack stud width on each side when considering bearing. Effective span includes the opening plus bearing areas. -
Clarify Load Conditions:
- Single-story context: Header supports roof and ceiling loads only.
- Multi-story context: Header supports floor above plus roof and ceiling loads.
-
Exterior walls: Involve additional lateral load considerations (wind, seismic); professional design is strongly recommended.
-
Consult Official Code Resources:
Local building departments provide access to applicable span tables (e.g., IRC Table R507.3.1(1) for wood headers). These tables correlate: - Span length
- Building width (indicating total roof load influence)
- Local snow load requirement
- Supported conditions (roof only, one floor + roof, etc.)
Example reference point (illustrative only, not for direct use):
For a 6-foot opening supporting roof, ceiling, and one floor above in a region with moderate snow load, tables may indicate a built-up header of two 2x10s (species and grade dependent).
Illustrative Guidance Table for Common Interior Scenarios (Roof + Ceiling Load Only, Moderate Snow Region):
| Rough Opening Width | Single-Story Context (Roof/Ceiling) | Two-Story Context (Floor + Roof/Ceiling) |
|———————|————————————–|——————————————|
| 3′ (36″) | (2) 2×6 | (2) 2×8 |
| 4′ (48″) | (2) 2×8 | (2) 2×10 |
| 6′ (72″) | (2) 2×10 | (2) 2×12 |
| 8′ (96″) | (2) 2×12 | Engineered Wood Recommended |
| 10’+ | Engineered Wood Required | Engineered Wood Required |
Critical Notes:
– “(2) 2×10″ typically means two 2×10 boards with a spacer (often ½” plywood) to match wall stud depth.
– Wood species and grade significantly impact strength values (e.g., Southern Yellow Pine vs. Spruce-Pine-Fir). Tables specify required grades.
– This table is conceptual. Your municipality’s adopted code, local amendments, actual load conditions, and material availability determine requirements. Always obtain and use the official table applicable to your project location.
-
Deflection Awareness: Beyond Strength
Codes limit allowable sag (deflection) under load. For visible roof structures, limits are stricter (e.g., L/240) than for floors (e.g., L/360). Excessive deflection may cause drywall cracks, sticking doors, or perceptible movement. Deeper headers generally resist deflection better. If an installed header feels flexible, deflection may exceed acceptable limits—reassessment is warranted. -
Situations Requiring Engineered Design:
Prescriptive tables assume uniform loads. Seek professional engineering if your project involves: - Concentrated point loads near the opening
- Openings wider than typical table ranges (often 10 feet+)
- Unusual loads (e.g., heavy equipment location above)
- Older homes with non-standard or deteriorated framing
- Any uncertainty after reviewing official resources
Professional engineering provides site-specific calculations, detailed drawings, and peace of mind. The investment is modest relative to potential risks of inadequate support.
Material Options: Characteristics and Considerations
Solid Sawn Lumber (Traditional Built-Up Headers):
– Typical use: Smaller openings within prescriptive table limits.
– Considerations: Readily available; strength depends on species, grade, and proper assembly (spacer thickness, nailing pattern). May be susceptible to warping over time. Verify spacer thickness matches wall depth requirements.
Laminated Veneer Lumber (LVL):
– Typical use: Longer spans, multi-story loads, or where reduced depth is beneficial.
– Considerations: Higher strength-to-depth ratio than solid lumber; consistent performance; minimal deflection. Requires manufacturer-specified hangers and fasteners. Store flat and protected from moisture prior to installation.
Glulam (Glued Laminated Timber):
– Typical use: Architectural applications where the beam is exposed; very long spans.
– Considerations: High strength; aesthetic appeal; typically custom-ordered. Requires careful handling due to weight.
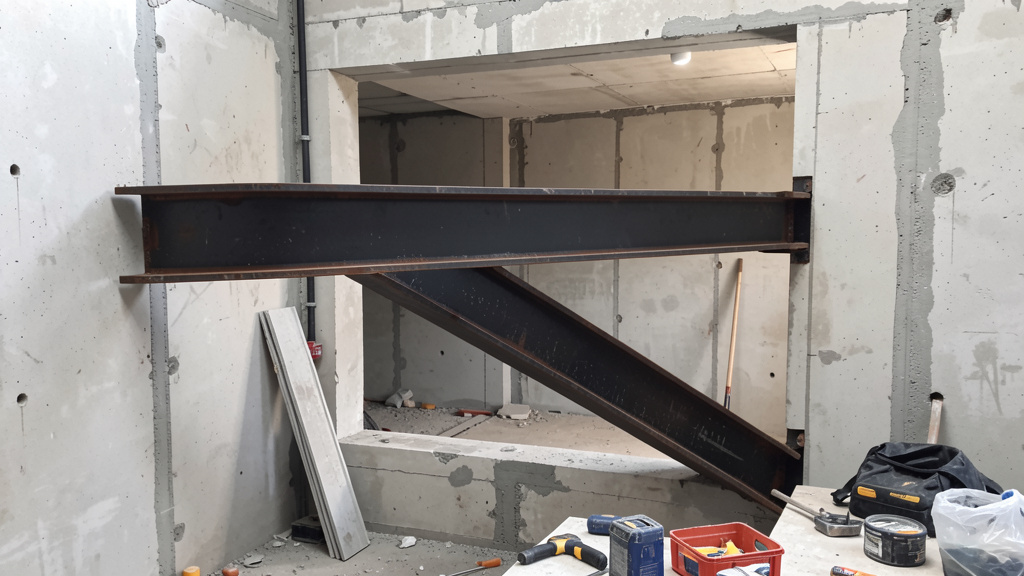
Steel Beams:
– Typical use: Very wide spans, heavy concentrated loads, or specific retrofit scenarios.
– Considerations: Requires engineering design, fabrication, and installation expertise. Fire protection and thermal bridging considerations apply. Never substitute steel sizes based on wood tables—properties differ fundamentally.
Adaptive Selection Guidance:
– Opening ≤ 6 ft with straightforward loads? → Solid sawn lumber if verified against official tables.
– Opening 6–10 ft or multi-story loads? → LVL is often a robust choice; consult tables or engineer.
– Opening >10 ft, point loads, complex conditions, or aesthetic exposure? → Professional engineering is the appropriate path.
– Budget constraints with larger openings? → Reconsider opening width or secure engineering. Downsizing structural elements below verified requirements is not a safe compromise.
Phase 4: Temporary Support System – The Non-Negotiable Safety Protocol
This phase is critical. Removing existing framing without first transferring its load is structurally unsound. Temporary walls (“strongbacks”) must be fully installed and verified before any demolition begins.
Constructing Effective Temporary Walls:
1. Placement: Build temporary walls parallel to the existing wall, approximately 2–3 feet away on both sides of the planned opening area. This creates a stable load-transfer zone.
2. Materials: Use straight 2x4s for top and bottom plates. For studs: 4×4 posts or doubled 2x4s spaced 16 inches on center. Single 2×4 studs lack sufficient capacity for this critical role.
3. Assembly Sequence:
– Cut bottom plate; secure firmly to subfloor.
– Cut top plate; position firmly against ceiling structure (joists, not just drywall).
– Cut studs approximately ¼” shorter than floor-to-ceiling height.
– Position studs between plates. Drive wooden wedges (shims) between top plate and ceiling gradually until uniform, firm resistance is felt across all studs. Avoid hammering studs tight, which can lift framing.
– Secure studs to plates with appropriate nails or screws.
4. Verification Steps:
– Place a straightedge across the ceiling above the temporary wall. Check for gaps indicating incomplete load transfer.
– Insert a thin feeler gauge or business card at multiple points; tighten wedges until gaps close uniformly.
– Wait 10–15 minutes. Re-check wedge tightness—wood compresses slightly under load.
– Monitor adjacent areas for new cracks or movement during tightening.
Essential Safety Practices:
– Personal Protective Equipment (PPE): Hard hat, safety glasses, and sturdy footwear are mandatory during demolition.
– Work Sequence: Temporary walls verified → Utilities confirmed de-energized and clear → Drywall removed carefully → Existing header removed → New header installed → Temporary walls removed gradually.
– Never work alone: A second person can monitor for warning signs (unusual sounds, shifting) and assist in emergencies.
– Stop immediately if: You hear popping/cracking, observe new cracks widening, feel vibration, or notice unexpected movement. Reassess support or consult a professional.
Why Robust Temporary Support Matters:
Inadequate temporary framing (e.g., single 2×4 studs, insufficient wedging) can lead to partial load transfer, causing immediate or delayed deflection. Using robust materials and verifying uniform pressure distribution across all temporary studs is fundamental to safety. A small level placed on the temporary wall’s top plate can help confirm even load distribution during wedging.
Phase 5: Installation Protocol – Methodical Execution
With temporary support verified and utilities confirmed clear, proceed deliberately:
Step 1: Controlled Demolition
– Cut drywall carefully along stud edges using a utility knife guided by a level. Preserve sections to inspect existing framing.
– Document observations:
– Existing header size, material, and condition (photograph)
– Number and condition of jack/king studs
– Presence of cripple studs above the header
– Nail patterns or signs of prior modifications
– Remove insulation cautiously—fiberglass can conceal wiring or plumbing.
Step 2: Verify Conditions Against Plan
– Confirm actual rough opening width.
– Check thoroughly for hidden obstacles:
– Electrical wiring (circuit confirmed OFF at main panel)
– Plumbing lines or vents
– HVAC ducts
– If obstacles are found: Halt work. Reroute utilities before proceeding. Consult licensed tradespeople if uncertain.
Step 3: Prepare the Opening
– Cut existing header flush with king studs using appropriate tools (reciprocating saw with metal-cutting blade for nails).
– Remove jack studs carefully.
– Clean debris from sole plate and king stud edges to ensure solid bearing for the new header.
Step 4: Install the New Header
– For built-up lumber headers:
1. Assemble on a flat surface: sandwich spacer between boards.
2. Clamp securely. Drill pilot holes to prevent splitting.
3. Fasten with structural screws or nails per code requirements (staggered pattern).
4. Note: Construction adhesive between layers is sometimes specified; follow local code or engineer details.
– For engineered wood (LVL/glulam):
1. Verify beam is labeled with grade, species, and span rating.
2. Install manufacturer-specified hangers to king studs before lifting beam into place.
3. Use required fasteners (often specific structural screws).
– Lifting and Placement:
– Headers over 6–8 feet require two people. Use padded straps.
– Slide header into position atop jack studs. Ensure full bearing (minimum bearing per code, often 1.5″ per side).
– Check level in both directions. Shim minor gaps with solid wood shims (avoid compressible materials).
– Secure per hanger manufacturer or engineer specifications.
Step 5: Rebuild Framing
– Install new jack studs cut to precise height to support header without excessive shimming.
– Add cripple studs above header spaced per code (typically 16″ OC) to support drywall.
– Reinstall or verify king studs are plumb and secure.
– Quality check: Use a 4-foot level to confirm king and jack studs are plumb. Out-of-plumb framing transfers load unevenly.
Step 6: Final Verification Before Closing
– Remove temporary walls slowly: Tap wedges out incrementally while monitoring for movement.
– Inspect header for deflection: Stretch a taut string line along the underside. Measure sag at center. Minor deflection may be acceptable per code; significant sag requires reassessment.
– Check adjacent walls, ceilings, and floors for new cracks or shifts.
– Documentation: Take clear “as-built” photos showing header, connections, and clearances. These aid future reference and inspector review.
Navigating Complex Scenarios: Contextual Considerations
Real-world projects often involve nuances beyond standard examples. These situations warrant heightened caution:
Multi-Story Load Paths
In a three-story structure, a first-floor interior wall may carry cumulative loads from two floors above plus the roof.
Approach: Treat as “supports two floors plus roof” in official span tables. For openings beyond minimal widths, professional engineering is strongly advisable. Temporary support must transfer load continuously downward—build aligned temporary walls on all levels below the work area.
Concentrated Loads Near Openings
A structural post from above lands close to your planned opening edge.
Approach: Standard tables are generally not designed for this condition. Provide an engineer with: distance from post to opening, estimated load context, and existing framing details. Solutions may include a deeper header, supplemental reinforcement, or modified opening location.
Older Homes (Pre-1950s Construction)
- Balloon framing: Studs run continuous from foundation to roof plate. Cutting framing compromises multiple levels. Temporary support must span all affected floors.
- Historical headers: Original headers may be undersized by modern standards or show signs of distress. Do not assume existing size is adequate.
- Material condition: Inspect thoroughly for rot, insect damage, or prior repairs. Sistering damaged studs may be necessary before modification.
Approach: Given higher uncertainty, engaging a structural engineer for assessment is a prudent step. Their evaluation provides clarity specific to your home’s condition.
Exterior Wall Openings
Strong recommendation: Proceed only with engineered plans and professional involvement. Exterior walls resist:
– Vertical loads (roof, floors)
– Lateral loads (wind pressure)
– Shear forces (provided by sheathing like plywood/OSB)
Creating an opening compromises shear capacity. Solutions require engineered headers, reinforced framing, potential shear panel adjustments, and often foundation considerations. Permits are universally required. Partner with contractors experienced in structural exterior modifications.
Safety Integration: Protocols Woven Into Every Step
Safety is not a standalone section—it informs every action. These protocols address high-stakes considerations:
Utility Awareness
- Before demolition: Shut off power at the main panel. Verify circuits are de-energized using both a non-contact voltage tester and a multimeter.
- Hidden wiring: Wires often run horizontally through studs at standard heights (e.g., near switches or outlets). Cut drywall in small sections; probe carefully before cutting framing.
- If a wire is nicked: Stop work immediately. Secure exposed conductors. Engage a licensed electrician for repair before proceeding.
Material and Environmental Hazards
- Containment: Seal the work area with plastic sheeting to limit dust migration.
- Respiratory protection: Wear an N95 respirator or better. Homes built before 1978 may contain lead-based paint; pre-1980s insulation may contain asbestos. If suspected, pause work and consult abatement professionals.
- Ventilation: Ensure adequate airflow, especially when cutting or sanding.
Tool-Specific Precautions
- Reciprocating saws: Blades can bind on hidden nails. Use demolition-grade blades. Maintain awareness of kickback path.
- Circular saws: Set blade depth just beyond stud thickness to avoid cutting hidden elements or temporary supports.
- Lifting: Bend knees, keep back straight. For heavy beams, use mechanical aids or coordinated two-person lifts with clear communication.
Preparedness Mindset
Post a simple emergency reminder in the workspace:
1. Structural shift/sag: Evacuate area. Contact structural professional and building department. Do not re-enter.
2. Injury: Call emergency services. Maintain a well-stocked first-aid kit accessible outside the work zone.
3. Fire: Use a nearby ABC-rated fire extinguisher for small incidents; evacuate for larger fires.
Prevention: Keep pathways clear, secure cords, and maintain organized tools.
Recognizing When Professional Engineering Is Essential
Clarity on thresholds protects your project and home. Engage a licensed structural engineer when:
✅ Opening width exceeds typical prescriptive table limits (often 8 feet+) in a load-bearing wall
✅ Supporting more than one floor level above plus roof loads
✅ Concentrated point loads exist near the opening
✅ Home is located in a designated high-wind or seismic zone (verify via FEMA or local resources)
✅ Foundation shows signs of movement, cracking, or prior repairs near the work area
✅ Existing framing is damaged, deteriorated, or non-standard (e.g., log construction, historic methods)
✅ Local building department requires stamped drawings (common for significant openings)
✅ Uncertainty persists after thorough self-assessment using official resources
What Engineering Provides:
– Site-specific load calculations and analysis
– Detailed drawings specifying materials, connections, and temporary support
– Official stamp required for permits in many jurisdictions
– Professional liability coverage for the designed solution
Frame your inquiry clearly: “I am planning a [width]-foot opening in a load-bearing wall supporting [describe loads]. I have sketches and photos.” Provide full access during their site visit.
Your Questions, Answered
Q: Can I use the existing header size as a reference for my new opening?
A: It is not advisable to assume existing work meets current requirements. Original headers may be undersized (common in older homes or prior unpermitted work), damaged, or designed for different loads. Always determine requirements based on current conditions, official code tables, and professional input where needed. Document the existing header for reference, but size the new one independently.
Q: Do I need a permit for a small opening in a wall I believe is non-bearing?
A: Permit requirements vary by location, but most jurisdictions require permits for any wall modification. Reasons include: verification prevents accidental bearing wall alteration, inspectors check fire blocking, electrical safety, and egress compliance. Always contact your local building department first. Unpermitted work can lead to fines, complications during home sale, or required remediation.
Q: What is the practical difference between a header and a beam?
A: In residential framing:
– Header: A beam specifically spanning a door or window opening within a wall assembly. Transfers load to adjacent jack studs.
– Beam: A broader term for any horizontal structural member supporting loads (e.g., basement girders, ridge beams). Headers are a type of beam with a specific application. Colloquially, “beam” is sometimes used for large headers.
Q: Can I install the header myself if an engineer provides detailed drawings?
A: Yes, if you possess advanced framing skills and follow the engineered drawings precisely. Critical elements include correct bearing length, specified fasteners/hangers, plumb alignment, and proper temporary support. For complex connections (steel plates, through-bolts), consider hiring an experienced framer for installation while you oversee adherence to the plans.
Q: How do I confirm temporary walls are adequately tight?
A: Avoid relying on sound. Instead:
1. Place a straightedge across the ceiling directly above the temporary wall.
2. Attempt to slide a thin feeler gauge or business card between straightedge and ceiling at multiple points.
3. Gradually tighten wedges until gaps close uniformly along the entire wall.
4. Wait 10–15 minutes; re-check as wood compresses slightly under load.
If gaps reappear or the straightedge rocks, add studs or adjust shims.
Q: What if verification confirms the wall is non-bearing after building temporary walls?
A: This is positive confirmation. However, retain temporary walls until drywall repair is complete. Unexpected loads can exist (e.g., heavy cabinetry mounted above). Removing support prematurely risks damage during finishing work. Keep documentation (photos of attic/basement verification) for your records.
Q: Is pressure-treated lumber suitable for an interior header?
A: Generally not recommended. Pressure-treated wood contains moisture and chemicals that may:
– Accelerate corrosion of standard steel hangers/fasteners (requiring hot-dipped galvanized hardware)
– Warp as it dries in interior conditions
– Emit odors in enclosed spaces
Use kiln-dried dimensional lumber or engineered wood products rated for interior structural use. Pressure-treated lumber is intended for ground contact or high-moisture exterior applications.
Q: How does header depth impact finished doorway height?
A: Header depth directly affects rough opening height. For example:
– A 2×10 header (actual depth ~9.25″) allows greater headroom than a 2×12 (~11.25″).
– In a standard 80″ finished doorway, a deeper header may require lowering the threshold or accepting a shorter door.
Plan headroom during the design phase. Engineered wood (like LVL) sometimes offers equivalent strength at reduced depths compared to solid lumber.
Q: What might cause a header to sag noticeably years after installation?
A: Potential factors include:
– Header undersized for actual long-term loads (e.g., added attic storage)
– Moisture exposure leading to wood degradation
– Inadequate bearing on jack studs causing crushing over time
– Fastener failure due to improper installation or corrosion
– Foundation movement altering load paths
If sag becomes visible (e.g., >¼”), consult a structural professional promptly. Temporary shoring may be needed before repair.
Q: Are there sustainable material options for headers?
A: Options exist with verification:
– FSC-certified engineered wood products (LVL, glulam) from sustainably managed forests
– Reclaimed timber beams (requires engineering verification of structural capacity and condition)
– Emerging materials like bamboo-based composites (verify local code acceptance)
Always prioritize verified structural performance. Sustainability goals should complement, not compromise, safety and code compliance.
Q: How can I find a qualified structural engineer for residential work?
A:
1. Contact your local building department for referrals to engineers familiar with residential projects in your area.
2. Search the National Council of Structural Engineers Associations (NCSEA) online directory.
3. Verify current licensure through your state’s professional engineering board website.
4. Request quotes from 2–3 engineers; inquire specifically about experience with residential header design and renovations.
Engineers specializing solely in large commercial projects may not be the most efficient fit for typical home modifications.
Q: Does seasonal timing affect this type of project?
A: Indirectly. Heavy snow load on the roof increases demand on structural elements; some professionals advise against major structural modifications during peak snow season in high-snow regions. Additionally, building department review times may vary seasonally. Consult your local department about optimal timing. Always account for regional climate factors in load calculations (snow, wind).
Conclusion and Your 24-Hour Verification Step
This guide has outlined a systematic framework to approach wall modifications with greater awareness and caution. Core principles remain: verify structural role through multiple evidence sources, understand load pathways before selecting materials, implement robust temporary support without exception, and recognize clear thresholds where professional engineering is essential. Structural work carries lasting responsibility—it is fundamentally about preserving the integrity that protects your household.
Recap: Three Foundational Practices
1. Verify through evidence: Use attic observations, foundation correlation, and documentation—not assumptions—to determine wall function.
2. Support before removal: Temporary walls must be fully installed, verified for uniform load transfer, and monitored before any existing framing is cut.
3. Respect professional thresholds: For larger openings, complex loads, older homes, or any uncertainty, engineered design is a prudent and often required step.
The 24-Hour Verification Step:
After installing and verifying temporary support walls, and before cutting the existing header, pause for a full 24 hours. During this interval:
– Re-check wedge tightness twice (morning and evening)
– Monitor adjacent walls, ceilings, and floors for new cracks, sounds, or shifts
– Re-review your header specifications against official code tables one final time
– Confirm all utilities are marked, de-energized, and clear of the work zone
This intentional pause mitigates impulsive decisions. Structural modifications benefit from patience and deliberate verification. Let this waiting period serve as a final safety checkpoint.
The Broader Perspective:
Thoughtfully approaching a wall opening deepens your understanding of your home as an interconnected system. You are not merely creating space—you are learning to recognize the language of loads, supports, and forces that maintain structural harmony. Carry this awareness forward: conduct periodic visual checks of framing areas after heavy snow, maintain dialogue with building professionals, and apply this methodical mindset to future projects. Share knowledge responsibly with others. Safety and informed action create lasting value.
Explore Our Complete Structural Awareness Series:
Understanding Load Paths: A Visual Guide to Home Framing | Temporary Wall Construction: Safety-First Support Protocols | Engineered Wood vs. Dimensional Lumber: Selection Criteria | Navigating Building Permits: A Homeowner’s Preparation Checklist | Foundation Observations: What Homeowners Should Monitor | Utility Safety During Renovations: A Step-by-Step Protocol | Post-Modification Verification: A 10-Point Inspection Guide